

If you are looking for a festive and delicious way to celebrate with your family this spooky season, these Halloween Mini Pizzas: Fun, Custom Treats for Family Fun Recipe are a total game-changer. Each mini pizza is a canvas where classic cheesy goodness meets playful, colorful toppings designed to bring laughter and creativity right to your dinner table. Quick to prepare yet irresistibly tasty, these personalized pizzas make mealtime both an activity and a treat, perfect for involving everyone from little ghosts to grown-up goblins in some joyful kitchen fun.
Ingredients You’ll Need
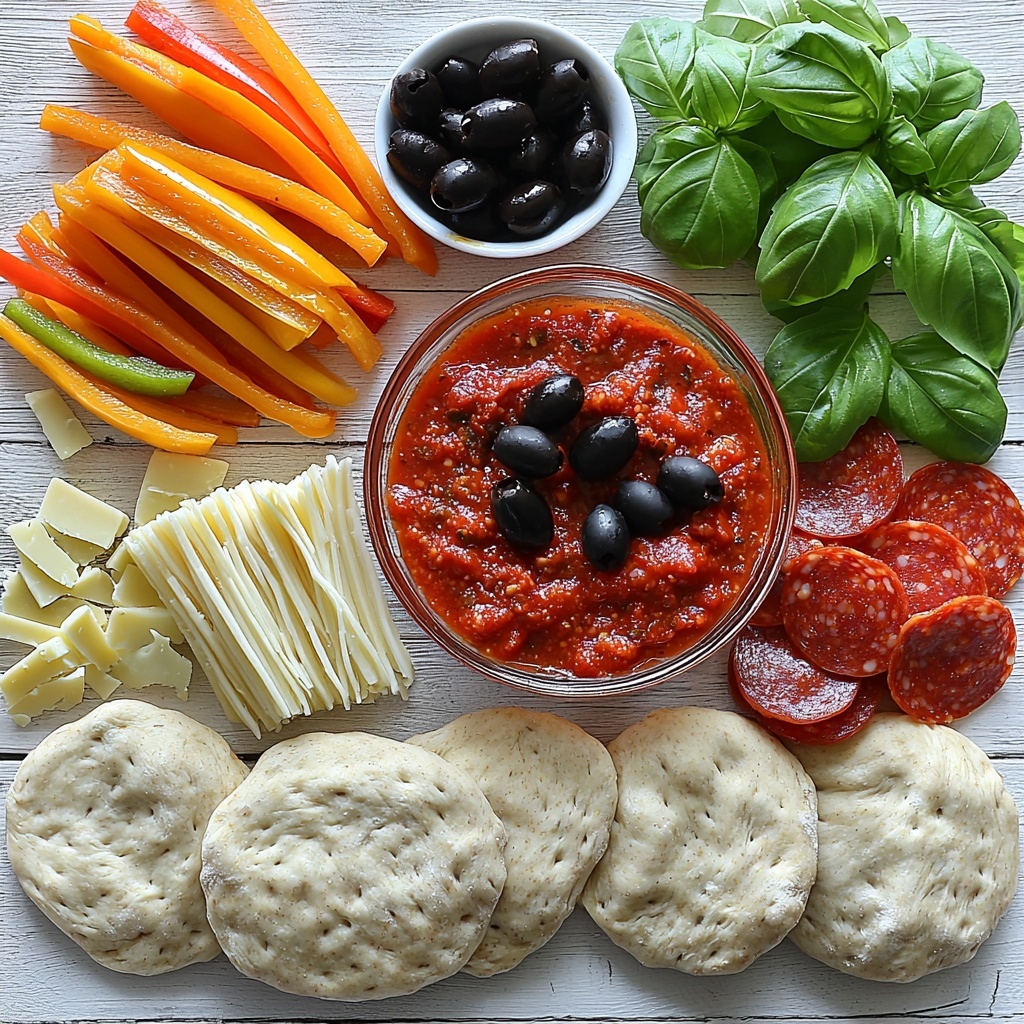
Getting started with this recipe means gathering a handful of straightforward ingredients, each chosen for how they come together to deliver flavor, texture, and that perfect pop of Halloween color. Simple but essential, these ingredients make the magic happen in every bite.
- Mini Pizza Crusts: The base platform that’s crispy on the outside and soft inside, perfect for mini-sized creations.
- Olive Oil Spray: Used to lightly grease the baking sheet so your mini pizzas don’t stick while baking.
- Pizza Sauce: Adds that rich, tangy tomato flavor that ties all the toppings together—marinara works just as well.
- Mozzarella Cheese: Shredded to melt perfectly over each pizza, delivering that classic ooey-gooey texture.
- Part-Skim String Cheese: Great for crafting creepy ‘mummy’ designs by pulling and wrapping strips over the pizza.
- Black Olives: Sliced for spooky eyes or accents that bring depth and color contrast.
- Mini Pepperoni (optional): Adds a little spicy kick and traditional pizza flair.
- Orange & Green Bell Peppers: Thinly sliced to add a fresh crunch and vibrant Halloween hues.
- Fresh Basil: Chiffonade that offers a fragrant, herbal touch for garnishing once baked.
How to Make Halloween Mini Pizzas: Fun, Custom Treats for Family Fun Recipe
Step 1: Prepare Your Oven and Baking Sheet
Before the fun begins, preheat your oven to a sizzling 425°F (220°C). Spray a baking sheet lightly with olive oil spray to keep your mini pizzas from sticking. This simple step ensures your crusts stay perfectly crisp when they come out of the oven.
Step 2: Spread the Sauce
Next, grab your mini pizza crusts and spread 1 to 2 tablespoons of pizza sauce onto each one. Leave a small border around the edges so that the crust can brown nicely while baking. The tomato sauce is where the rich flavor base is built, so don’t be shy about covering each crust evenly.
Step 3: Add the Cheese
Now for one of the best parts: cheese! Sprinkle shredded mozzarella liberally over half of the mini pizzas for that classic melty goodness. For the other half, use pulled-apart string cheese sticks to wrap little ‘mummy’ designs—this is where imagination comes into play as you create spooky silhouettes and eerie looks.
Step 4: Decorate with Toppings
Let your creativity run wild by decorating your mini pizzas with slices of black olives for eyes, tiny strips of orange and green bell peppers for color and texture, and optional mini pepperoni pieces to add a meaty finish. These toppings transform simple pizzas into playful Halloween treats that everyone will love.
Step 5: Bake to Perfection
Slide your creations into the oven and bake for 10 to 12 minutes. You’ll want to watch for golden-brown crusts and bubbly melted cheese—that perfect combination tells you your Halloween mini pizzas are ready to come out and delight your family.
Step 6: Garnish and Serve
Once baked, give your mini pizzas a couple of minutes to cool. Then finish them off with fresh basil chiffonade sprinkled on top to add a burst of herbal freshness and a pop of green that perfectly complements the Halloween color scheme.
How to Serve Halloween Mini Pizzas: Fun, Custom Treats for Family Fun Recipe
Garnishes
Besides fresh basil, you can enhance your presentation and flavor with a sprinkle of red pepper flakes for warmth or a drizzle of garlic-infused olive oil for extra richness. These little touches not only make the pizzas look appetizing but also elevate the taste.
Side Dishes
Pair these mini pizzas with light and crisp side dishes like a simple garden salad or vegetable sticks with ranch dip. The fresh crunch balances the comforting heartiness of the pizza, keeping the meal well-rounded and satisfying.
Creative Ways to Present
For a real family fun recipe vibe, arrange the mini pizzas on a spooky-themed platter with Halloween decorations such as plastic spiders, spider webs, or pumpkin-shaped napkins. You might even serve them alongside a cauldron of spooky punch or glowing drinks to complete the festive atmosphere.
Make Ahead and Storage
Storing Leftovers
If you’re lucky enough to have leftovers, store them in an airtight container in the refrigerator for up to 2 days. This keeps the crust from getting soggy and the toppings fresh.
Freezing
You can freeze individual mini pizzas by wrapping them tightly in plastic wrap and foil, then storing in a freezer bag. They’ll keep well for up to one month and are perfect for a quick meal or snack later on.
Reheating
To reheat, preheat your oven to 375°F (190°C) and place the pizzas on a baking sheet for 7 to 10 minutes or until warmed through and the crust re-crisps. Avoid microwaving if you want to keep that satisfying crunchy texture.
FAQs
Can I use a different type of cheese?
Absolutely! Feel free to substitute mozzarella with cheddar, Monterey Jack, or even a vegan cheese alternative if you prefer. Each will bring its own unique flavor and melting quality.
Can these mini pizzas be made gluten-free?
Yes, simply swap out the mini pizza crusts for gluten-free versions available at many grocery stores, or make your own with gluten-free flour to suit dietary needs.
Do I have to use string cheese for the mummy designs?
While string cheese is great for creating mummy wrapping effects, you can also use shredded mozzarella or thin strips of mozzarella cheese if you want a similar look and texture.
What toppings work best for kids?
Kids often love simple and brightly colored toppings like bell peppers, olives, and mini pepperoni. You can also experiment with fun shapes using cookie cutters or arranging toppings into faces and spooky scenes.
Can I make this recipe vegan?
To make these pizzas vegan, use vegan cheese options and ensure the crusts are dairy-free. Load up on veggies and plant-based toppings for delicious and inclusive Halloween treats.
Final Thoughts
There is something incredibly joyful about making and sharing Halloween Mini Pizzas: Fun, Custom Treats for Family Fun Recipe with those you love. This recipe is more than just food—it’s an experience filled with creativity, laughter, and the magic of handmade traditions. I can’t wait for you to gather around the kitchen and enjoy turning simple ingredients into the spooky, delicious pizzas that everyone will remember. Give this recipe a try—you’re just a few steps away from making your Halloween extra special this year!
Print
Halloween Mini Pizzas: Fun, Custom Treats for Family Fun Recipe
- Prep Time: 10 minutes
- Cook Time: 12 minutes
- Total Time: 22 minutes
- Yield: 4 servings
- Category: Snack
- Method: Baking
- Cuisine: American
- Diet: Vegetarian
Description
These Halloween Mini Pizzas are a fun and festive way to engage the whole family in creating spooky, delicious treats. Using mini pizza crusts topped with classic pizza sauce, mozzarella, and creative decorations like string cheese ‘mummies’, black olives, and colorful bell peppers, these pizzas are perfect for a playful and tasty Halloween snack or meal.
Ingredients
Pizza Bases
- 8 ounces Mini Pizza Crusts (store-bought or homemade)
- 1 tablespoon Olive Oil Spray (for greasing the baking sheet)
Pizza Toppings
- 3/4 cup Pizza Sauce (Marinara can be substituted)
- 1 cup Mozzarella Cheese (shredded)
- 4 sticks Part-Skim String Cheese (for ‘mummy’ designs)
- 1/4 cup Black Olives (sliced)
- 1/4 cup Mini Pepperoni (optional)
- 1 cup Orange & Green Bell Peppers (thin strips)
- 2 tablespoons Fresh Basil (chiffonade for garnishing)
Instructions
- Preparation: Preheat your oven to 425°F (220°C) and lightly mist a baking sheet with olive oil spray to prevent sticking.
- Sauce Application: Spread 1 to 2 tablespoons of pizza sauce evenly over each mini pizza crust, carefully leaving a small border around the edges for a perfect crust.
- Cheese Topping: On half of the mini pizzas, sprinkle shredded mozzarella cheese generously. For the other half, create ‘mummy’ faces by pulling apart sticks of string cheese and wrapping them over the sauce to mimic bandages.
- Decorate: Use sliced black olives, thin strips of orange and green bell peppers, and optional mini pepperoni to create spooky Halloween-themed designs like eyes, mouths, and other fun shapes.
- Bake: Place the prepared mini pizzas on the greased baking sheet and bake in the preheated oven for 10 to 12 minutes, or until the crusts turn golden brown and the cheese is thoroughly melted.
- Cool and Garnish: Remove the pizzas from the oven and allow them to cool for about 2 minutes. Then, garnish with fresh basil chiffonade for a burst of color and fresh flavor before serving.
Notes
- For a vegetarian option, omit the mini pepperoni.
- If you prefer a crispier crust, bake for an additional 2-3 minutes, watching carefully to avoid burning.
- Use marinara sauce if pizza sauce is not available; it works perfectly as a substitute.
- Get creative with toppings to personalize the Halloween designs.
- Serve immediately for the best taste and texture.


