

If you’ve been searching for the ultimate indulgence that combines the rich, velvety charm of chocolate with the creamy, nutty goodness of peanut butter, look no further. This Homemade Chocolate Peanut Butter Cups Recipe is a wonderfully easy way to create those irresistible treats right in your own kitchen. With just a handful of simple ingredients, you’ll transform your kitchen into a mini chocolate factory, crafting peanut butter cups that taste exactly like the classic store-bought version but without any artificial stuff—just pure, homemade bliss.

Ingredients You’ll Need
These ingredients are straightforward but each plays a crucial role in getting that perfect balance of smooth chocolate and creamy peanut butter filling. From the luscious chocolate chips that form the shell to the powdered sugar that sweetens the filling just right, you’ll appreciate how each component contributes to the final texture and taste.
- 16 ounces chocolate chips (divided): High-quality chocolate chips melt smoothly to create the perfect shell and top layer of your peanut butter cups.
- 3 teaspoons coconut oil (divided, optional): Adds shine and silky texture to the melted chocolate, making it easier to spread and harden beautifully.
- ½ cup creamy peanut butter: Use shelf-stable creamy peanut butter for a smooth, spreadable filling that holds its shape well.
- ¼ cup powdered sugar: Sweetens the peanut butter filling and helps achieve a firm, dough-like consistency.
- ½ teaspoon vanilla extract: Enhances the flavor complexity, lifting the peanut butter mixture with a subtle aromatic note.
- ¼ teaspoon table salt: Balances sweetness and deepens the flavors, giving the cups that perfect sweet-salty contrast.
How to Make Homemade Chocolate Peanut Butter Cups Recipe
Step 1: Prepare Your Pan
Start by lining a 6-cup muffin tin with silicone or paper liners. Alternatively, mini cupcake liners work great if you want bite-sized peanut butter cups. This preparation ensures easy removal and helps maintain the shape during setting.
Step 2: Assemble the Chocolate Base
Take 1 cup of the chocolate chips and melt them gently in the microwave using 30-second bursts. Stir between intervals to help melt evenly, leaving a few chunks to finish melting with residual heat. Once mostly melted, stir in 1 teaspoon of coconut oil to give the chocolate a gorgeous glossy finish.
Step 3: Form the Chocolate Base
Using about ½ tablespoon of your melted chocolate, spoon it into each muffin cup. Spread it thin and even with the back of a spoon — this thin chocolate layer will form the base. Chill the tray in the fridge or freezer for 5 minutes to let the chocolate harden before adding the filling.
Step 4: Prepare the Peanut Butter Filling
While your chocolate base chills, blend together ½ cup creamy peanut butter, ¼ cup powdered sugar, ½ teaspoon vanilla extract, and ¼ teaspoon salt. Use a handheld mixer to achieve a smooth, well-combined mixture. If you use natural peanut butter, add an extra tablespoon or two of powdered sugar for firmness. The texture should resemble soft cookie dough, perfect for shaping.
Step 5: Shape the Peanut Butter Discs
Once the chocolate base is firm, remove the tray and portion the peanut butter mixture by the tablespoon into discs slightly smaller than the chocolate base. Gently place each disc onto the hardened chocolate base inside the muffin cups.
Step 6: Melt the Remaining Chocolate
Now, melt the remaining 1½ cups of chocolate chips just like before — 30-second intervals, stirring to melt evenly. Add the last 2 teaspoons of coconut oil, mixing until the chocolate is smooth and shiny, ready to encase the peanut butter filling.
Step 7: Cover the Peanut Butter Filling
Carefully spoon about 2 teaspoons of melted chocolate over each peanut butter disc. Smooth it out with the back of your spoon, making sure to let any extra chocolate drip down the sides, fully encasing the filling in a rich chocolate shell.
Step 8: Harden Your Homemade Chocolate Peanut Butter Cups Recipe
Place the muffin tin back into the fridge for around an hour to allow everything to set completely. In a pinch, the freezer works well too, speeding up the process to just 10-15 minutes.
Step 9: Remove and Store
Once firmly set, pop the peanut butter cups out of the liners, and store them in an airtight container in the fridge for up to five days. For the best experience, let them sit at room temperature for a few minutes before devouring.
How to Serve Homemade Chocolate Peanut Butter Cups Recipe
Garnishes
If you want to elevate your chocolate peanut butter cups, sprinkle a tiny pinch of flaky sea salt on top before the chocolate hardens. This little touch of saltiness contrasts beautifully against the sweet chocolate and creamy peanut butter. Alternatively, finely chopped roasted peanuts or a dusting of cocoa powder can add texture and a visual pop.
Side Dishes
These peanut butter cups make a perfect dessert or snack all on their own, but pairing them with fresh berries or a dollop of whipped cream offers a refreshing balance. A cold glass of milk or your favorite coffee drink beautifully complements the rich flavors and makes for a cozy treat experience.
Creative Ways to Present
Try arranging your homemade chocolate peanut butter cups in a decorative box or wrapping them individually in little parchment paper squares — they make fantastic gifts! For a fun party platter, layer them on a pretty tray surrounded by nuts, fruit slices, and even some dark chocolate shavings to enhance the inviting look.
Make Ahead and Storage
Storing Leftovers
Your Homemade Chocolate Peanut Butter Cups Recipe treats keep wonderfully in the refrigerator inside an airtight container for up to five days. Keeping them cool maintains the chocolate’s snap and the soft peanut butter’s luscious texture.
Freezing
Want to keep these delightful cups longer? Freeze them in a sealed container or freezer-safe bag for up to one month. Just thaw them in the fridge before serving to keep their shape and flavor intact.
Reheating
Since these cups are meant to be enjoyed chilled, reheating is not usually necessary. However, if you prefer slightly softer chocolate, allow them to sit at room temperature for 10 to 15 minutes before eating — this is the perfect way to enjoy their melt-in-the-mouth goodness without losing their shape.
FAQs
Can I use natural peanut butter for this recipe?
Yes! Natural peanut butter works well, but it’s usually runnier, so you’ll want to add a bit more powdered sugar to thicken the mixture to a dough-like consistency. This helps the peanut butter filling hold its shape perfectly.
Do I have to use coconut oil when melting chocolate?
Coconut oil is optional but highly recommended as it gives the melted chocolate a beautiful shine and smooth texture, making it easier to spread and harden. If you prefer, you can omit it, but it might affect the final texture slightly.
What’s the best type of chocolate to use?
High-quality semi-sweet or bittersweet chocolate chips or chopped chocolate bars work best for a rich and balanced flavor. Using lower-quality chocolate can affect the taste and texture, so choose something you’d enjoy eating on its own.
Can I make these peanut butter cups dairy-free?
Absolutely! Choose dairy-free or vegan chocolate chips and ensure your peanut butter does not contain any dairy ingredients. Using coconut oil instead of butter is already a step toward dairy-free preparation.
How long does it take to make these peanut butter cups?
From start to finish, including chilling time, this Homemade Chocolate Peanut Butter Cups Recipe takes about an hour and ten minutes, with much of that being hands-off time while the chocolate sets.
Final Thoughts
You’re going to love whipping up this Homemade Chocolate Peanut Butter Cups Recipe whenever you want an irresistibly delicious and nostalgic treat. It’s a wonderful way to impress your friends or spoil yourself with something sweet that feels truly special because you made it yourself. So grab those ingredients, get cozy in the kitchen, and enjoy every bite of these little chocolate-and-peanut butter treasures!
Print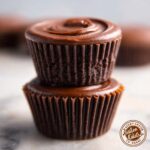
Homemade Chocolate Peanut Butter Cups Recipe
- Prep Time: 15 minutes
- Cook Time: 10 minutes
- Total Time: 1 hour 10 minutes
- Yield: 12 servings
- Category: Dessert
- Method: No-Cook
- Cuisine: American
Description
Delicious homemade chocolate peanut butter cups made with creamy peanut butter, rich chocolate, and a hint of vanilla. These easy-to-make treats have a smooth chocolate base, a sweet and salty peanut butter filling, and are fully encased in glossy chocolate. Perfect for satisfying your sweet tooth with a classic flavor combination.
Ingredients
Chocolate Base
- 16 ounces chocolate chips, divided (approximately 2½ cups)
- 3 teaspoons coconut oil, divided (optional)
Peanut Butter Filling
- ½ cup creamy peanut butter (shelf-stable recommended)
- ¼ cup powdered sugar
- ½ teaspoon vanilla extract
- ¼ teaspoon table salt
Instructions
- Prepare Pan: Line a 6-cup muffin tin with silicone or paper liners, or use 12-cup mini cupcake liners for smaller peanut butter cups.
- Assemble Chocolate Base: Place 1 cup of chocolate chips into a small heat-safe bowl. Microwave in 30-second intervals, stirring after each until mostly melted but with a few chunks remaining. Stir continuously off heat until fully melted. Add 1 teaspoon coconut oil and mix until glossy.
- Form Chocolate Base: Spoon about ½ tablespoon of the melted chocolate into each muffin cup, spreading into a thin layer with the back of a spoon. Chill in fridge or freezer for 5 minutes to harden.
- Prepare Peanut Butter Filling: Mix ½ cup creamy peanut butter, ¼ cup powdered sugar, ½ teaspoon vanilla extract, and ¼ teaspoon salt in a medium bowl using a handheld mixer on medium speed until smooth and combined. For natural peanut butter, add 1-2 tablespoons more powdered sugar to thicken. Should be firm enough to shape like soft cookie dough.
- Shape Peanut Butter Discs: Remove muffin tin from fridge/freezer. Use about 1 tablespoon peanut butter mixture per cup and shape into discs slightly smaller than chocolate base. Place discs on top of chocolate base in muffin cups.
- Melt Remaining Chocolate: Place remaining 1½ cups chocolate chips in a clean heat-safe bowl. Microwave in 30-second intervals, stirring between each until mostly melted with a few chunks remaining. Stir off heat to melt fully. Add remaining 2 teaspoons coconut oil and stir until smooth and glossy.
- Cover Peanut Butter: Pour about 2 teaspoons of melted chocolate over each peanut butter disc, smoothing with back of a spoon and allowing excess to drip down sides to encase the peanut butter fully.
- Harden Peanut Butter Cups: Return tray to fridge for about 1 hour or place in freezer for 10-15 minutes to set quickly.
- Store and Serve: Once hardened, remove peanut butter cups from liners if desired. Store in airtight container in refrigerator for up to 5 days. Allow to sit at room temperature 5-10 minutes before eating for best flavor and texture.
Notes
- Use shelf-stable peanut butter for best texture; if using natural peanut butter, increase powdered sugar to thicken filling.
- Chilling the chocolate base before adding the peanut butter filling helps create a clean layer separation.
- You can substitute coconut oil with another neutral oil or omit it, but it helps smooth the melted chocolate.
- Let peanut butter cups come to room temperature before eating for a softer bite and enhanced flavor.
- Store peanut butter cups in the fridge up to 5 days. For longer storage, freeze and thaw before eating.

