

“`html
If you’re craving a fun, flavorful twist on a classic favorite, this Chicken Quesadilla Ring with Bell Peppers and Cream Cheese Recipe is an absolute showstopper. Picture a blooming ring of crispy, cheesy tortillas packed with tender shredded chicken, vibrant sautéed bell peppers, and a luscious cream cheese blend that’s both tangy and comforting. It’s perfect for gatherings, family dinners, or any time you want to impress with minimal fuss and maximum flavor. This dish brings together layers of cheesy goodness and colorful veggies in a visually stunning presentation that everyone will love digging into.
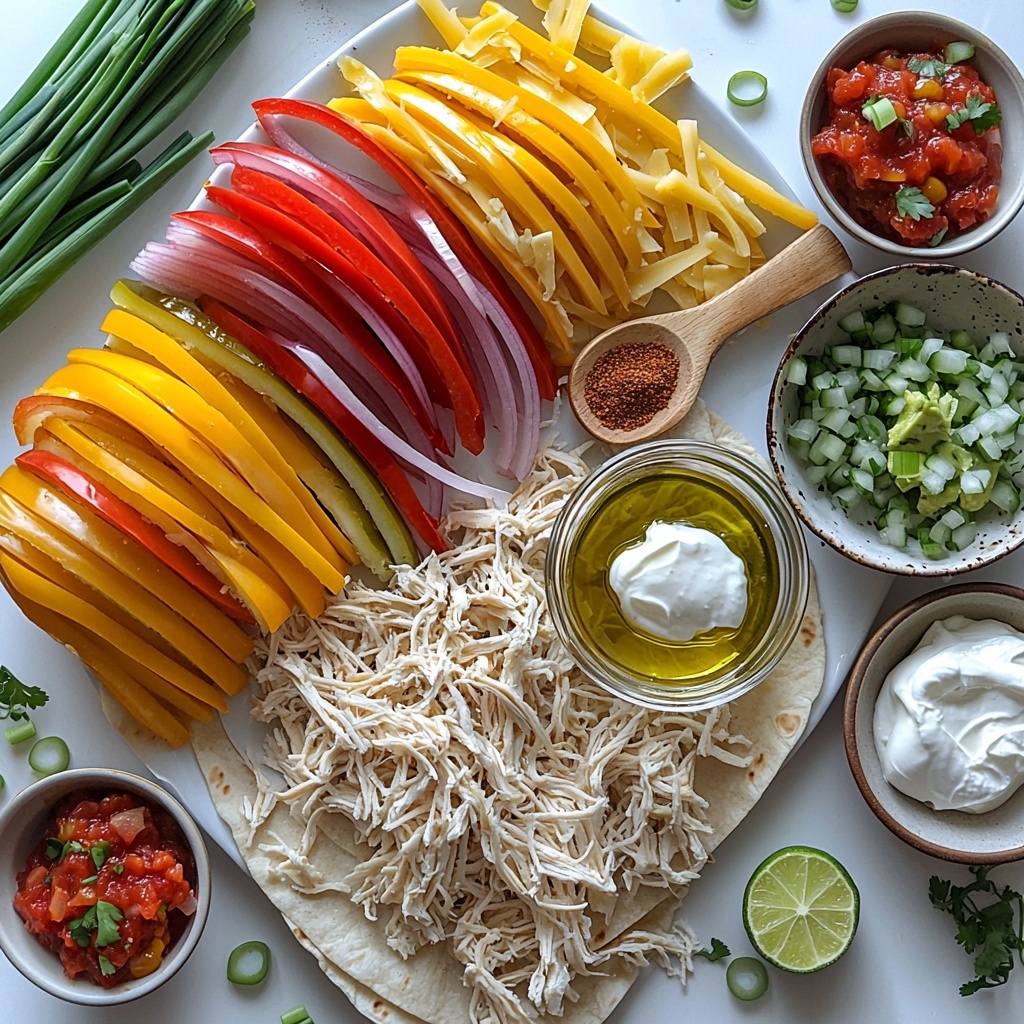
Ingredients You’ll Need
These ingredients might look simple, but each one plays a crucial role in building the layers of flavor, texture, and color in this Chicken Quesadilla Ring with Bell Peppers and Cream Cheese Recipe. From the creamy richness of the cheese to the bright zing of lime juice, every component makes the final dish sing.
- 2 tablespoons olive oil: For sautéing the onions and bell peppers to caramelized perfection.
- 1 medium onion (thinly sliced): Adds sweetness and depth when cooked until golden brown.
- 2 bell peppers (sliced, your choice of colors): Brings vibrant color and a subtle crunch that contrasts beautifully with the creamy filling.
- 8 ounces cream cheese (at room temperature): The creamy base that binds everything and adds a luscious texture.
- ¼ cup sour cream (or plain Greek yogurt): Adds tanginess and smoothness to balance the spices.
- 1 tbsp lime juice: Injects bright acidity that lifts the rich flavors.
- ¼ cup mozzarella cheese (shredded): Melts wonderfully for that gooey, stringy tomato-era quesadilla vibe.
- ¼ cup cheddar cheese (shredded): Provides sharpness and a golden melty finish.
- 1 ½ tbsp taco seasoning: The secret spice blend that gives the chicken that familiar, irresistible Mexican-inspired punch.
- 3 cups cooked chicken (shredded; rotisserie or homemade): The hearty protein that makes this dish more than just a snack.
- 12 medium flour tortillas (10″–12″): The flexible, soft tortilla wraps that hold every tasty bite together.
- Cooking spray: To achieve that perfect golden crisp on the tortilla edges during baking.
- 3 green onions (thinly sliced): A fresh, mild onion garnish that adds color and extra zing.
- Salsa, Guacamole, and Sour Cream: Essential dippers that bring freshness and cooling contrast to every bite.
How to Make Chicken Quesadilla Ring with Bell Peppers and Cream Cheese Recipe
Step 1: Prepare the Veggie Filling
Start by heating the olive oil in a large pan over medium heat. Toss in the thinly sliced onion and bell peppers of your choosing—whether red, yellow, green, or orange—then sauté them gently until they’re softened and golden brown. This usually takes about 5-6 minutes. The warmth and caramelization will bring out their natural sweetness, which perfectly balances the richness of the cream cheese filling.
Step 2: Mix the Cream Cheese Base
While the veggies are cooling, combine the cream cheese, sour cream (or Greek yogurt), lime juice, shredded mozzarella, shredded cheddar, and taco seasoning in a large bowl. Stir these ingredients thoroughly to create a smooth, flavorful, and tangy base that will coat the chicken beautifully. This blend is really what makes your Chicken Quesadilla Ring with Bell Peppers and Cream Cheese Recipe taste irresistible.
Step 3: Combine Chicken and Veggies
Add the shredded cooked chicken along with the cooled sautéed onions and bell peppers to the creamy mixture. Gently fold everything together until the filling is evenly distributed. The result is a savory, well-seasoned mix that brings every element together, ensuring each bite is packed with flavor and texture.
Step 4: Prepare the Tortillas
Slice each of the 12 medium flour tortillas in half. This step makes it easier to roll them into cones and helps the quesadilla ring take its signature flower-like shape.
Step 5: Fill and Roll the Tortillas
Divide the chicken and cream cheese filling equally among the sliced tortillas—roughly 1.5 to 2 tablespoons per piece. Spread the filling evenly, being careful to leave a little border around the edges. Then, roll each tortilla carefully into a cone shape, snug enough to hold the filling but not so tight that it oozes out. These cones will form the petals of your quesadilla ring.
Step 6: Arrange the Quesadilla Ring
Place a small, round bowl in the center of a baking tray lined with parchment paper or greased foil. Arrange half of the filled tortilla cones around this bowl, positioning the pointed ends touching the bowl to create a base layer. This clever design lets your quesadilla ring bloom beautifully while baking.
Step 7: Add Cheese and Second Layer
Sprinkle half of your shredded cheddar and mozzarella cheeses evenly over the base layer of cones. Then add the remaining cones on top to form a second layer, finishing by sprinkling the rest of the shredded cheddar and mozzarella over everything. Once the two layers are stacked, carefully remove the bowl from the center so the ring keeps its shape.
Step 8: Bake to Perfection
Lightly spray the edges of the tortillas with cooking spray or brush them with a bit of oil to encourage a golden, crispy finish. Bake the quesadilla ring in your preheated oven at 375℉ on the middle rack for about 15-20 minutes. You’ll know it’s done when you see bubbly melted cheese and beautifully crisped tortilla edges.
Step 9: Garnish and Serve
Use a spatula to transfer your stunning blooming quesadilla ring to a serving platter. Garnish the top with a sprinkling of thinly sliced green onions for a fresh pop of color and mild crunch. Place a small bowl of salsa in the center of the ring, then serve with extra sour cream and guacamole on the side for dipping. And just like that, your Chicken Quesadilla Ring with Bell Peppers and Cream Cheese Recipe is ready to be devoured!
How to Serve Chicken Quesadilla Ring with Bell Peppers and Cream Cheese Recipe
Garnishes
Freshly sliced green onions make the ideal garnish, adding both color and a subtle bite that complements the creamy and cheesy filling. You can also sprinkle a bit of fresh chopped cilantro or even a dash of smoked paprika for an extra boost of flavor. These little finishing touches elevate the presentation visually and taste-wise.
Side Dishes
Because this quesadilla ring is rich and satisfying on its own, pairing it with light sides works best. A crisp salad with avocado, cherry tomatoes, and a zesty lime vinaigrette pairs beautifully. Alternatively, serve it alongside a refreshing corn and black bean salad or Mexican rice to round out the meal and keep things fresh and vibrant.
Creative Ways to Present
To wow your guests, serve the quesadilla ring on a colorful platter with multiple dipping bowls arranged around it—think salsa, guacamole, and sour cream—as well as some pickled jalapeños or a squeeze of fresh lime wedges. For gatherings, individual mini quesadilla cones as appetizers also work well, wrapping the same filling in smaller tortillas and baking until crispy.
Make Ahead and Storage
Storing Leftovers
Leftovers of this Chicken Quesadilla Ring with Bell Peppers and Cream Cheese Recipe keep wonderfully in an airtight container in the refrigerator for 3-4 days. To retain the best texture, avoid stacking the pieces too tightly so they don’t get soggy.
Freezing
If you want to prep ahead or save some for later, freeze the baked quesadilla ring in a sealed container or freezer-safe bag. It can be stored for up to 1 month. When ready to eat, thaw it overnight in the refrigerator before reheating to ensure even warming.
Reheating
The best way to reheat is in the oven or toaster oven at 350℉ for 10-15 minutes until the quesadilla ring is hot inside and crispy again on the outside. Avoid microwaving if possible, as this tends to make the tortillas soft and less enjoyable.
FAQs
Can I use a different type of cheese for the quesadilla ring?
Absolutely! While mozzarella and cheddar give a classic melty texture and flavor, you can experiment with Monterey Jack, pepper jack for some kick, or even a blend of cheeses you love. Just make sure to use cheeses that melt well for the best results.
What kind of chicken works best in this recipe?
Rotisserie chicken is a fantastic shortcut, but you can also use leftover roasted chicken or grilled chicken breasts shredded finely. The key is that the chicken is cooked and shredded to easily incorporate into the creamy filling.
Can I make this recipe vegetarian?
Yes! Simply omit the chicken and consider adding extra beans, sautéed mushrooms, or roasted veggies to keep the filling hearty and satisfying. The cream cheese mixture and peppers will still provide plenty of flavor and creaminess.
Is it possible to make this recipe gluten-free?
Definitely. Substitute the flour tortillas with gluten-free tortillas of a similar size. Just watch the baking time as different tortillas can crisp up differently, but the delicious combo of flavors remains the same.
How spicy is this quesadilla ring?
This recipe uses mild taco seasoning, so it’s generally mild with a perfect balance of spices that are flavorful but not overwhelmingly spicy. If you like heat, you can add a pinch of cayenne or use spicy salsa as a dip to amp it up.
Final Thoughts
There’s something truly delightful about how this Chicken Quesadilla Ring with Bell Peppers and Cream Cheese Recipe transforms simple ingredients into an eye-catching, crowd-pleasing dish. Whether for a party, family dinner, or casual weekend treat, it’s a guaranteed hit that brings people together around the table. Give it a try—you might just find a new favorite to make again and again!
“`
Print
Chicken Quesadilla Ring with Bell Peppers and Cream Cheese Recipe
- Prep Time: 15 minutes
- Cook Time: 15-20 minutes
- Total Time: 30-35 minutes
- Yield: 24 servings
- Category: Appetizer
- Method: Baking
- Cuisine: Mexican-American
- Diet: Halal
Description
This Chicken Quesadilla Ring is a fun and flavorful twist on classic quesadillas, perfect for parties or family gatherings. Layers of seasoned chicken, sautéed peppers and onions, cream cheese, and cheddar and mozzarella cheeses are rolled into tortillas, arranged in a ring, and baked until golden and crispy. Served with salsa, guacamole, and sour cream for dipping, it’s a crowd-pleasing appetizer or main dish that’s as visually appealing as it is delicious.
Ingredients
Vegetables and Aromatics
- 1 medium onion, thinly sliced
- 2 bell peppers, sliced (red, yellow, green, orange, or a combination)
- 3 green onions, thinly sliced
Dairy & Cheese
- 8 ounces cream cheese, at room temperature (1 brick, 250 grams)
- ¼ cup sour cream or plain Greek yogurt
- ¼ cup shredded mozzarella cheese (plus additional ¼ cup for topping)
- ¼ cup shredded cheddar cheese (plus additional ¼ cup for topping)
Proteins & Meat
- 3 cups cooked chicken, shredded (such as rotisserie or homemade)
Seasonings & Condiments
- 2 tablespoons olive oil
- 1 ½ tablespoons taco seasoning
- 1 tablespoon lime juice
- Cooking spray or additional oil for brushing
Other
- 12 medium flour tortillas (10″-12″)
- Salsa, for serving
- Guacamole, for serving
- Sour cream, for serving
Instructions
- Preheat Oven: Preheat your oven to 375℉ (190℃) and line a large baking sheet or pizza tray with parchment paper or greased foil to prevent sticking.
- Sauté Vegetables: Heat 2 tablespoons of olive oil in a large frying pan or skillet over medium heat. Add the thinly sliced onion and bell peppers, sautéing until softened and golden brown, about 5-6 minutes, stirring often. Remove from heat and allow to cool.
- Prepare Chicken Filling: In a large mixing bowl, combine the cream cheese, sour cream (or Greek yogurt), lime juice, shredded mozzarella and cheddar cheeses, and taco seasoning. Mix thoroughly until smooth and well blended.
- Combine Filling Ingredients: Add the shredded cooked chicken along with the cooled sautéed onions and peppers to the cheese mixture. Gently fold to combine everything evenly without breaking the chicken pieces.
- Prepare Tortillas: Slice each flour tortilla in half, creating 24 half-moon shapes.
- Fill Tortillas: Evenly distribute the chicken filling among the cut tortillas, about 1.5 to 2 tablespoons per piece. Spread the filling close to the edges but leave a small border to help sealing.
- Roll Tortillas: Roll each tortilla half into a cone shape, ensuring they are snug enough to hold the filling but not too tight to cause filling leakage.
- Prepare Baking Tray: Place a small round bowl in the center of the lined baking tray to create the ring’s hole.
- Assemble Base Layer: Arrange half of the rolled cones around the bowl with the pointed ends touching the bowl, forming the base of the ring.
- Add Cheese Base: Sprinkle half of the reserved shredded cheddar and mozzarella cheeses over the arranged base cones.
- Assemble Second Layer: Carefully place the remaining rolled cones on top of the first layer, completing the ring shape. Sprinkle the remaining cheddar and mozzarella cheese evenly over the top. Remove the bowl from the center.
- Apply Cooking Spray: Lightly spray or brush the exposed edges of the tortillas with cooking spray or oil to promote crisping and browning during baking.
- Bake the Ring: Place the tray on the oven’s middle rack and bake for approximately 15-20 minutes, or until the cheese is melted and bubbly and the tortilla edges are crispy and golden brown.
- Garnish and Serve: Carefully transfer the quesadilla ring to a serving platter. Optionally, garnish with the thinly sliced green onions for a fresh touch.
- Add Dips: Fill a small bowl with salsa and place it in the center of the ring. Serve additional small bowls of sour cream and guacamole alongside for dipping. Enjoy!
Notes
- Use tortillas sized between 10″ to 12″ for best results in rolling and creating a sturdy ring.
- Allow the sautéed vegetables to cool before mixing with cream cheese to keep the filling texture creamy and smooth.
- For a spicier kick, add chopped jalapeños or use spicy taco seasoning.
- The quesadilla ring can be assembled ahead of time and refrigerated, then baked just before serving.
- To make this dish gluten-free, substitute flour tortillas with gluten-free tortillas of similar size.
- Leftovers can be stored in the refrigerator and reheated in the oven to retain crispiness.
