
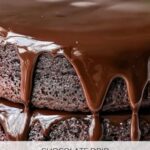
If you’ve ever gazed at a beautifully decorated cake and admired those luscious streams of glossy chocolate cascading down the sides, you’re in for a treat! The Chocolate Drip Recipe: An Incredible Ultimate Guide to 5 Variations Recipe makes creating professional-looking, irresistibly delicious drips easier than you’d expect. Whether you prefer the classic dark chocolate shine, a sweet white chocolate glaze, a nutty Nutella drizzle, or even a salted caramel twist, this guide has all the secrets to elevate your desserts to a whole new level of wow-factor that friends and family will rave about.
Ingredients You’ll Need
Getting the perfect chocolate drip doesn’t require a mountain of fancy ingredients. Each one plays an essential role in achieving that smooth texture, glossy finish, and balanced flavor that drips just glide down the cake without clumping or running away.
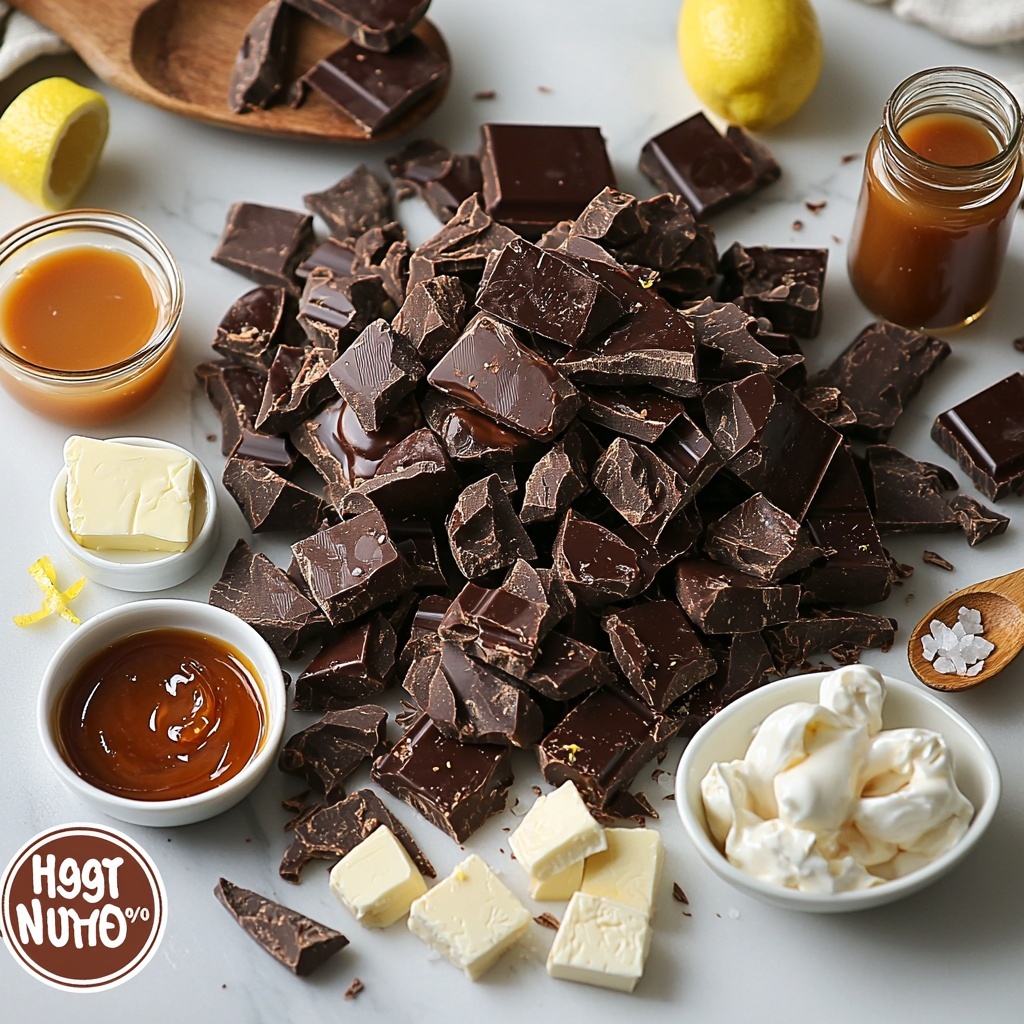
- High-quality chocolate: Using good chocolate ensures a rich, deep flavor and smooth texture that is crucial for the drip’s shine and consistency.
- Heavy cream: This adds the perfect silkiness and helps the chocolate melt uniformly, preventing it from becoming grainy or stiff.
- Unsalted butter (optional): Adds a subtle gloss and extra smoothness to your drip, perfect for that professional finish.
- Vanilla extract or citrus zest (optional): Gives flavor layers that complement the base chocolate drip.
- Nutella or caramel sauce: For those delicious variations that bring new dimensions of flavor to your drips.
- Sea salt: Just a sprinkle enhances the salted caramel drip with a perfect sweet-salty balance.
How to Make Chocolate Drip Recipe: An Incredible Ultimate Guide to 5 Variations Recipe
Step 1: Heating the Cream and Preparing the Chocolate
Start by warming the heavy cream gently over low heat until it’s just steaming—never boiling—so it melts your chocolate perfectly without scorching it. Place your chosen chocolate in a heatproof bowl and pour the hot cream right over. Let it rest for a minute or two; this gives the chocolate time to soften beautifully before stirring.
Step 2: Stirring to a Smooth Mixture
Stir the chocolate and cream mixture slowly and gently until everything melts together into a glossy, silky sauce. If you want to add butter for that extra luster or vanilla extract for flavor, this is the perfect moment to mix those in. Patience here ensures your drip looks flawless.
Step 3: Cooling to the Ideal Consistency
Once smooth, let your drip cool at room temperature for 5 to 10 minutes until it thickens slightly but remains pourable. This step is vital because too hot, and it will ruin your frosting; too thick, and it won’t drip properly.
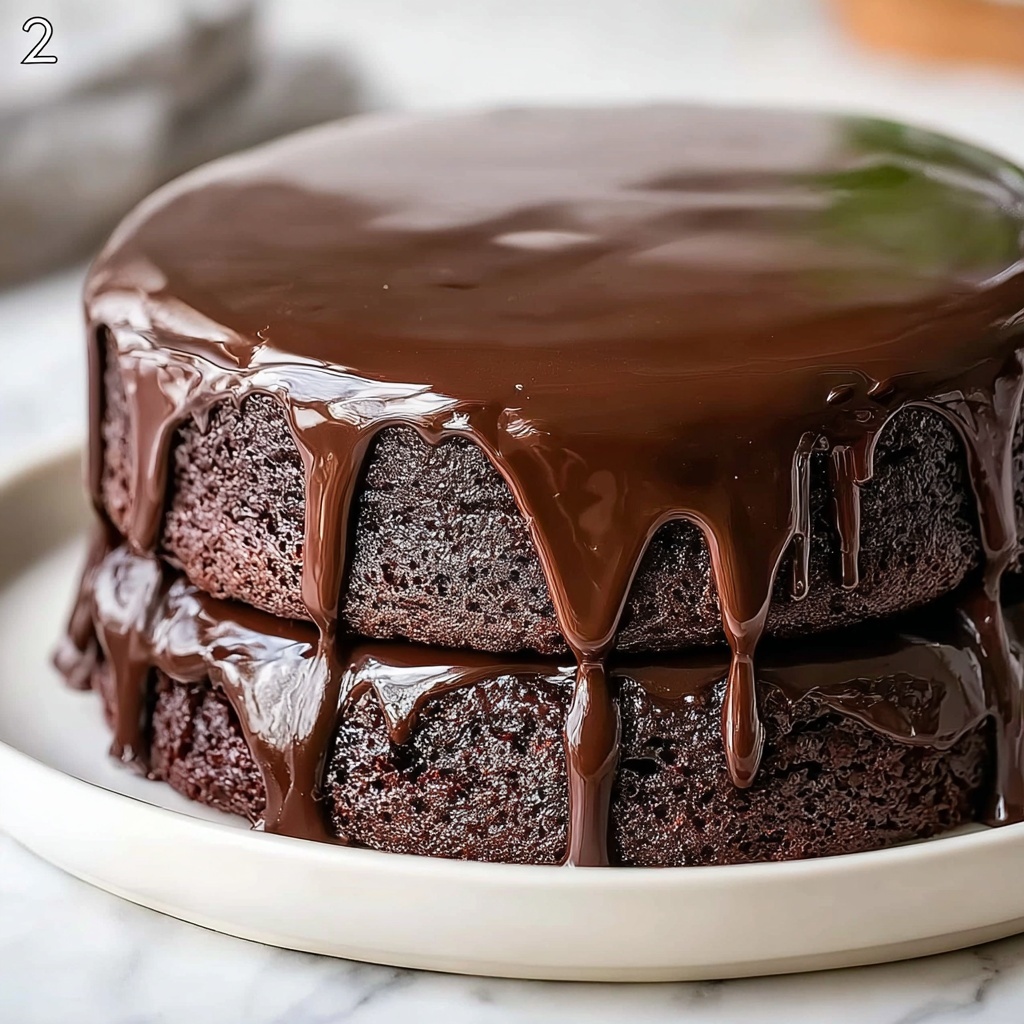
Step 4: Applying the Drip to Your Dessert
With a spoon, piping bag, or squeeze bottle, carefully add the chocolate drip along the edges of your cake or cupcakes. Gravity will do its magic as the drip cascades down elegantly. You can then pour or spread the remaining chocolate over the top for a decadent finish.
Step 5: Exploring Different Variations
From milk to white chocolate, Nutella to salted caramel, each variation follows the same great method with minor ingredient tweaks to match your flavor preference and occasion. For example, milk chocolate brings a creamy sweetness ideal for vanilla or caramel cakes, while dark chocolate offers rich intensity for lovers of bold flavors.
How to Serve Chocolate Drip Recipe: An Incredible Ultimate Guide to 5 Variations Recipe
Garnishes
To add an extra dimension of beauty and taste, consider decorating your dripped desserts with fresh berries, edible flowers, crushed nuts, or sprinkles. A touch of sea salt on salted caramel drips highlights the flavor perfectly. These little touches transform your cake from pretty to unforgettable.
Side Dishes
When serving chocolate-dripped cakes, pairing them with lightly whipped cream, a scoop of vanilla ice cream, or fresh fruit complements the rich chocolate perfectly and balances the indulgence with fresh, bright notes.
Creative Ways to Present
Try using clear glass cake stands to showcase the dripping effect from all angles, or place mini dripped cupcakes on decorative platters accented with matching ribbons or themed toppers. Don’t be afraid to experiment by layering different drip flavors on multi-tiered cakes for a stunning visual and flavor surprise.
Make Ahead and Storage
Storing Leftovers
Chocolate drips, especially those made with cream, best stay fresh when refrigerated. Cover your dessert with a cake dome or plastic wrap to prevent moisture from dulling the glaze. Before serving, let it come to room temperature so the drip regains that perfect glossy, melt-in-your-mouth texture.
Freezing
If you want to prepare in advance, you can freeze a dripped cake, but be mindful that the moisture may affect drip texture. Wrap tightly in plastic to protect the chocolate, and thaw slowly in the fridge before bringing it to room temperature. Some drips like Nutella or salted caramel tend to freeze better than cream-based versions.
Reheating
Since chocolate drips are meant to stay relatively cool, reheating isn’t usually needed. If the drip becomes too hard or dull from refrigeration, allow your cake to rest at room temperature naturally to soften. Avoid microwaving the whole dessert as it may cause melting and ruin the presentation.
FAQs
Can I use any chocolate for the drip?
Yes, but using high-quality chocolate with at least 50% cocoa content helps achieve that silky, shiny drip. Milk chocolate will be sweeter, while dark chocolate adds richer flavors. White chocolate or Nutella are great for lighter or nutty variations.
How thick should the drip mixture be?
The drip should be thick enough to hold shape yet fluid enough to slowly run down the cake’s sides. If it’s too thin, add a touch more melted chocolate; if too thick, stir in a bit of warm cream to loosen it.
Can I make the drip ahead of time?
Absolutely! Prepare your drip mixture up to a day in advance, store it covered at room temperature or in the fridge, and gently warm it before applying. Just make sure to keep it pourable.
What’s the best way to apply the drip for a clean look?
Using a squeeze bottle or piping bag gives the most control for even drip placement. Spoon method works well too but requires a steady hand and practice to avoid drips pooling too much.
Can I add flavors to the chocolate drip?
Yes! Vanilla extract, citrus zest, or even a splash of liqueur like Grand Marnier or coffee extract can be stirred into your drip to customize flavor without compromising texture.
Final Thoughts
There is something truly magical about watching a smooth river of chocolate cascade over the edges of a cake, instantly turning a simple dessert into a masterpiece. The Chocolate Drip Recipe: An Incredible Ultimate Guide to 5 Variations Recipe invites you to play with flavors and textures while mastering a technique that brings joy both in making and tasting. So go ahead, grab your favorite chocolate, and let your creations drip with beauty and flavor that everyone will adore!
Print
Chocolate Drip Recipe: An Incredible Ultimate Guide to 5 Variations Recipe
- Prep Time: 5 minutes
- Cook Time: 5 minutes
- Total Time: 10 minutes
- Yield: 1 cup of drip (enough for 2-3 standard cakes depending on size)
- Category: Dessert
- Method: Stovetop
- Cuisine: American
- Diet: Vegetarian
Description
Discover the ultimate guide to making stunning chocolate drips with five delicious variations. From basic semi-sweet and milk chocolate drips to white chocolate, intense dark chocolate, Nutella, and salted caramel drips, this recipe elevates your cakes and desserts with a glossy, elegant finish. Perfect for a range of flavor pairings, these drips add a professional touch to your creations with simple ingredients and easy techniques.
Ingredients
Basic Chocolate Drip
- 4 ounces high-quality semi-sweet or dark chocolate, chopped
- 1/4 cup heavy cream
- 1 tablespoon unsalted butter (optional for extra shine)
Milk Chocolate Drip
- 4 ounces milk chocolate, chopped
- 1/4 cup heavy cream
- 1 teaspoon vanilla extract (optional)
White Chocolate Drip
- 4 ounces white chocolate, chopped
- 1/4 cup heavy cream
- 1 teaspoon lemon zest (optional)
Dark Chocolate Drip (Intense)
- 4 ounces dark chocolate (70% or higher), chopped
- 1/4 cup heavy cream
- 1 tablespoon light corn syrup (optional for extra shine)
Nutella Drip (Hazelnut Chocolate Drip)
- 1/2 cup Nutella
- 1/4 cup heavy cream
- 1 tablespoon unsalted butter (optional for extra gloss)
Salted Caramel Drip
- 1/2 cup caramel sauce (store-bought or homemade)
- 2 tablespoons heavy cream
- 1/2 teaspoon sea salt (for garnish)
Instructions
- Heat the Cream or Base: For chocolate drips, gently heat the heavy cream in a small saucepan over low heat until steaming but not boiling. For Nutella drip, warm Nutella and heavy cream together, and for caramel drip, warm caramel sauce with heavy cream, stirring until smooth and combined.
- Add Chocolate or Flavorings: Pour the hot cream over chopped chocolate in a heatproof bowl and let it sit for 1-2 minutes. For milk chocolate drip, add vanilla extract; for white chocolate drip, add lemon zest; for dark chocolate drip, stir in corn syrup for shine; for Nutella drip, stir in butter if using; for caramel, no additional ingredients.
- Stir Until Smooth: Stir gently until the chocolate or Nutella is fully melted and the mixture is smooth. Incorporate butter for extra gloss where indicated.
- Cool Slightly: Let the drip mixture cool for 5-10 minutes, until it thickens slightly but is still pourable and near room temperature. This prevents melting your cake frosting.
- Apply the Drip: Using a spoon, squeeze bottle, or piping bag, drizzle the chocolate or caramel along the edges of your cake, allowing it to drip down naturally. Then pour over the top and smooth out as desired. For caramel drip, sprinkle sea salt on top immediately after drizzling.
Notes
- The drip should be smooth and pourable but not too runny; adjust cream to chocolate ratio to achieve the desired consistency.
- Allow the drip mixture to cool to room temperature before applying to avoid melting the cake’s frosting.
- Use a piping bag or squeeze bottle for better control over drip placement and size.
- Store cakes with cream-based drips in the refrigerator and bring to room temperature before serving for the best texture.
- Choose your drip variation to complement cake flavors — e.g., milk chocolate for vanilla or caramel cakes, white chocolate for fruity or lemon cakes, Nutella for hazelnut or coffee-flavored cakes.

