

If you have a sweet tooth and a love for nostalgic desserts, the Creamy Banana Pudding with Vanilla Wafers Recipe is your new best friend. This luscious treat combines silky homemade pudding with the natural sweetness of ripe bananas and the satisfying crunch of vanilla wafers. Every spoonful delivers layers of flavor and texture that make it utterly irresistible. Whether you’re serving it for a family gathering or as a personal indulgence, this classic dessert feels like a warm hug from the inside out and is guaranteed to brighten any day.
Ingredients You’ll Need
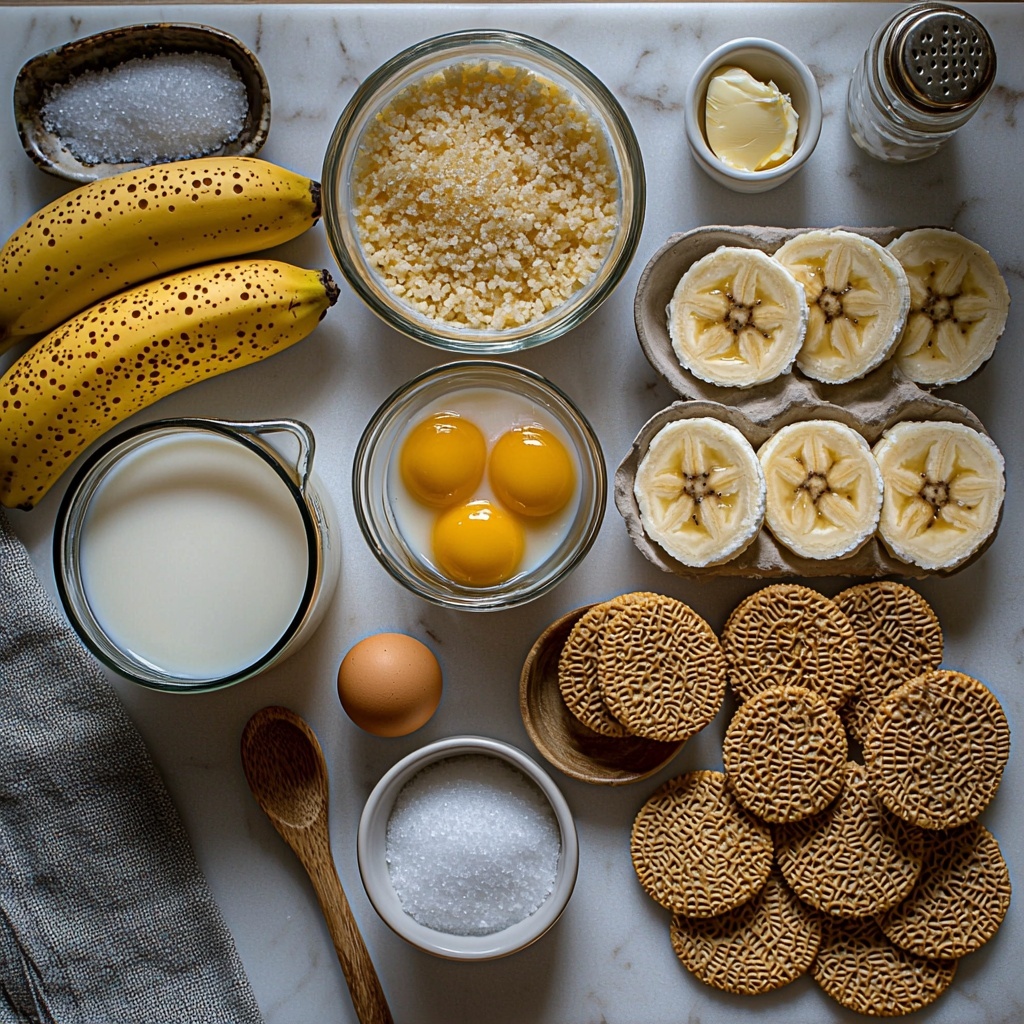
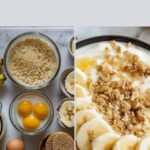
Gathering the right ingredients for this recipe is wonderfully straightforward, but each one plays a crucial role in crafting the perfect balance of creaminess, sweetness, and crunch. Fresh milk and cream create the base for a smooth pudding texture, while bananas bring freshness and natural sweetness. Vanilla wafers add a delightful crunch that contrasts beautifully with the silky layers.
- Whole milk (1 1/2 cups): Provides the creamy foundation for the pudding’s rich texture.
- Heavy cream (1 1/2 cups): Enhances the dessert’s luxurious mouthfeel and depth of flavor.
- Granulated sugar (1/2 cup): Sweetens the pudding just right without overpowering the banana’s natural taste.
- Large egg yolks (4): Essential for thickening the pudding and giving it a silky smooth consistency.
- Cornstarch (1/4 cup): Works as a thickening agent to help the pudding set perfectly.
- Salt (1/4 teaspoon): Balances sweetness and enhances the overall flavor profile.
- Vanilla extract (1 teaspoon): Adds a warm, aromatic punch that elevates the pudding’s flavor.
- Unsalted butter (1 tablespoon): Adds richness and a velvety finish to the pudding.
- Vanilla wafers (1 box): Provides that nostalgic crunch and subtle vanilla flavor in every bite.
- Ripe bananas (4): The star fruit of this dessert, bringing natural sweetness and a smooth texture.
How to Make Creamy Banana Pudding with Vanilla Wafers Recipe
Step 1: Warm the Dairy Mixture
Start by combining the whole milk and heavy cream in a medium saucepan. Warm this mixture over medium heat while stirring occasionally, but be careful to avoid boiling. Warming the mixture gently prepares it for combining with the egg mixture and helps create that luscious pudding texture.
Step 2: Prepare the Egg Mixture
While the milk and cream warm up, whisk together the granulated sugar, egg yolks, cornstarch, and salt in a separate bowl. This blend brings structure and sweetness to the pudding, ensuring it thickens properly and tastes balanced.
Step 3: Temper the Eggs
Slowly add a small amount of the warm milk and cream mixture to the egg mixture while whisking constantly. This tempering prevents the eggs from scrambling by gradually adjusting them to the warmth. Once tempered, pour the rest of the dairy mixture in slowly while continuing to whisk.
Step 4: Cook the Pudding Base
Transfer the combined mixture back to the saucepan and place it over medium heat. Stir constantly as it heats, watching closely for it to thicken and start bubbling—this is the magic moment where the pudding sets. Timing and consistent stirring are key to avoid lumps and to achieve that silky texture.
Step 5: Finish the Pudding
Once thickened, remove the saucepan from heat. Stir in the vanilla extract and unsalted butter until fully incorporated. This final step enriches the pudding with warm vanilla notes and buttery smoothness that make it truly creamy and delicious.
Step 6: Assemble the Layers
Allow the pudding to cool slightly, stirring occasionally to prevent a skin from forming. Meanwhile, layer vanilla wafers on the bottom of your serving dish, followed by thinly sliced bananas. Pour a layer of pudding over the bananas and wafers, smoothing it out. Repeat the layering—wafers, bananas, pudding—until all ingredients are used, finishing with a top layer of pudding.
Step 7: Chill and Set
Cover the layered pudding with plastic wrap and refrigerate for at least four hours. This chilling step lets all the flavors meld together beautifully and allows the pudding to set perfectly, making every bite a creamy dream.
How to Serve Creamy Banana Pudding with Vanilla Wafers Recipe
Garnishes
When it comes to garnishing your Creamy Banana Pudding with Vanilla Wafers Recipe, the sky’s the limit! A few extra vanilla wafers nestled on top add a delightful crunch and aesthetic appeal. If you want to go a step further, a dollop of fresh whipped cream or a sprinkle of toasted nuts like pecans or almonds introduces an extra layer of flavor and texture to wow your guests.
Side Dishes
This sweet, creamy dessert pairs wonderfully with lighter companions. Consider fresh fruit salads or a simple herbal tea to balance the richness of the pudding. If you’re hosting a larger meal, a crisp green salad or a citrusy main dish can complement the sweetness and make your menu feel perfectly rounded.
Creative Ways to Present
Take your presentation up a notch by serving the pudding in individual glass cups or mason jars. This not only looks charming but makes portioning a breeze for guests. Another fun idea is to layer it in a trifle bowl for a stunning centerpiece that showcases the beautiful layers of banana, pudding, and wafers. Don’t forget a pretty spoon and perhaps some edible flowers to make it feel special!
Make Ahead and Storage
Storing Leftovers
Store any leftover Creamy Banana Pudding with Vanilla Wafers Recipe in an airtight container in the refrigerator. It will keep well for 2-3 days, although the wafers will soften over time. For best texture, enjoy it within the first day or two.
Freezing
While freezing this pudding isn’t ideal because the bananas and wafers may lose their texture and become mushy, you can freeze the pudding base separately before assembling. Once thawed, layer with fresh bananas and wafers just before serving for a fresher experience.
Reheating
This dessert tastes best cold or at room temperature, so reheating is not typically recommended. If you prefer a warmer treat, gently warm a small portion in the microwave for about 10-15 seconds without the wafers and bananas to avoid sogginess.
FAQs
Can I use low-fat milk instead of whole milk?
Using low-fat milk will change the creaminess of the pudding slightly, making it lighter but less rich. For the best creamy texture in the Creamy Banana Pudding with Vanilla Wafers Recipe, whole milk and heavy cream are ideal.
How ripe should the bananas be?
Ripe bananas with yellow skin and a few brown spots are perfect for sweetness and flavor. Avoid overripe bananas that are overly mushy, as they can alter the texture of the pudding layers.
Can I make this dessert vegan or dairy-free?
To adapt this recipe, try using plant-based milk like coconut or almond milk and substitute egg yolks with cornstarch or a vegan pudding mix. Note that flavors and textures will differ from the classic Creamy Banana Pudding with Vanilla Wafers Recipe.
Why do I need to temper the eggs?
Tempering prevents scrambled eggs by gradually raising their temperature with the warm milk mixture. This technique ensures a smooth pudding without lumps or curdled eggs.
Can I use other cookies instead of vanilla wafers?
Absolutely! While vanilla wafers are traditional and provide that classic vanilla flavor and crunch, you can experiment with shortbread, graham crackers, or even gingersnaps for a creative twist on the Creamy Banana Pudding with Vanilla Wafers Recipe.
Final Thoughts
Diving into this Creamy Banana Pudding with Vanilla Wafers Recipe feels like wrapping yourself in a cozy blanket of comforting flavors and textures. It’s simple enough for weeknight indulgence yet special enough to impress guests. If you’ve been searching for a new favorite dessert that combines nostalgia with a fresh homemade touch, this recipe is a must-try. Trust me, once you make it, you’ll want to keep a batch ready in your fridge at all times!
Print
Creamy Banana Pudding with Vanilla Wafers Recipe
- Prep Time: 30 minutes
- Cook Time: 20 minutes
- Total Time: 2 hours 35 minutes
- Yield: 6 to 8 servings
- Category: Dessert
- Method: Stovetop
- Cuisine: American
Description
Classic homemade banana pudding features layers of creamy vanilla custard, ripe bananas, and crunchy vanilla wafers. This luscious, comforting dessert is perfectly chilled for a smooth, indulgent treat that’s ideal for any occasion.
Ingredients
Custard
- 1 1/2 cups whole milk
- 1 1/2 cups heavy cream
- 1/2 cup granulated sugar
- 4 large egg yolks
- 1/4 cup cornstarch
- 1/4 teaspoon salt
- 1 teaspoon vanilla extract
- 1 tablespoon unsalted butter
Layers
- 1 box vanilla wafers (approximately 11 oz)
- 4 ripe bananas, sliced into thin rounds
Instructions
- Heat Milk and Cream: In a medium saucepan, combine the whole milk and heavy cream. Place over medium heat and stir occasionally. Warm the mixture until hot but do not let it boil.
- Prepare Egg Mixture: In a separate bowl, whisk together granulated sugar, egg yolks, cornstarch, and salt until smooth and fully combined.
- Temper Eggs: Slowly pour a small amount of the warm milk and cream into the egg mixture while whisking constantly to gently raise the temperature and prevent curdling.
- Combine Mixtures: Gradually add the remaining warm milk and cream mixture into the egg mixture, whisking continuously to ensure a smooth blend.
- Cook Custard: Pour the combined mixture back into the saucepan. Cook over medium heat, stirring constantly, until the mixture thickens and begins to bubble, indicating it has reached pudding consistency.
- Finish Custard: Remove from heat and stir in vanilla extract and unsalted butter until fully incorporated. Allow the pudding to cool for a few minutes, stirring occasionally to prevent a skin from forming.
- Build Layers: In a large serving dish, arrange a layer of vanilla wafers on the bottom, then add a layer of banana slices on top.
- Add Pudding: Pour a portion of the cooled pudding over the bananas and wafers, spreading it evenly using a spatula.
- Repeat Layers: Add another layer of vanilla wafers, followed by another layer of banana slices, then top with the remaining pudding, smoothing the surface.
- Chill: Cover the pudding with plastic wrap, pressing it directly on the surface of the pudding to prevent skin formation. Refrigerate for at least 4 hours or until fully set and chilled.
- Serve: Once chilled, serve the banana pudding cold. Optionally, garnish with extra vanilla wafers or whipped cream for added texture and flavor.
Notes
- Make sure to temper the eggs carefully to avoid curdling the custard.
- Use ripe bananas for the best sweetness and texture.
- Press the plastic wrap directly on the pudding surface to prevent a skin from forming while chilling.
- This pudding can be made a day ahead, as chilling improves the flavors and texture.
- If desired, substitute some whole milk with half-and-half for a richer custard.