

“`html
If you’ve ever wished for a nostalgic, comforting breakfast treat that you can whip up in no time, then these Easy Homemade Pop Tarts with Pie Crust Recipe are about to become your new favorite indulgence. Flaky, buttery pie crust encloses your favorite jam nestled inside, then everything is topped with a smooth, sweet glaze that takes these to a whole new level of homemade goodness. Whether it’s a cozy weekend morning or a special snack, these pop tarts combine simplicity and flavor in the most delightful way.
Ingredients You’ll Need
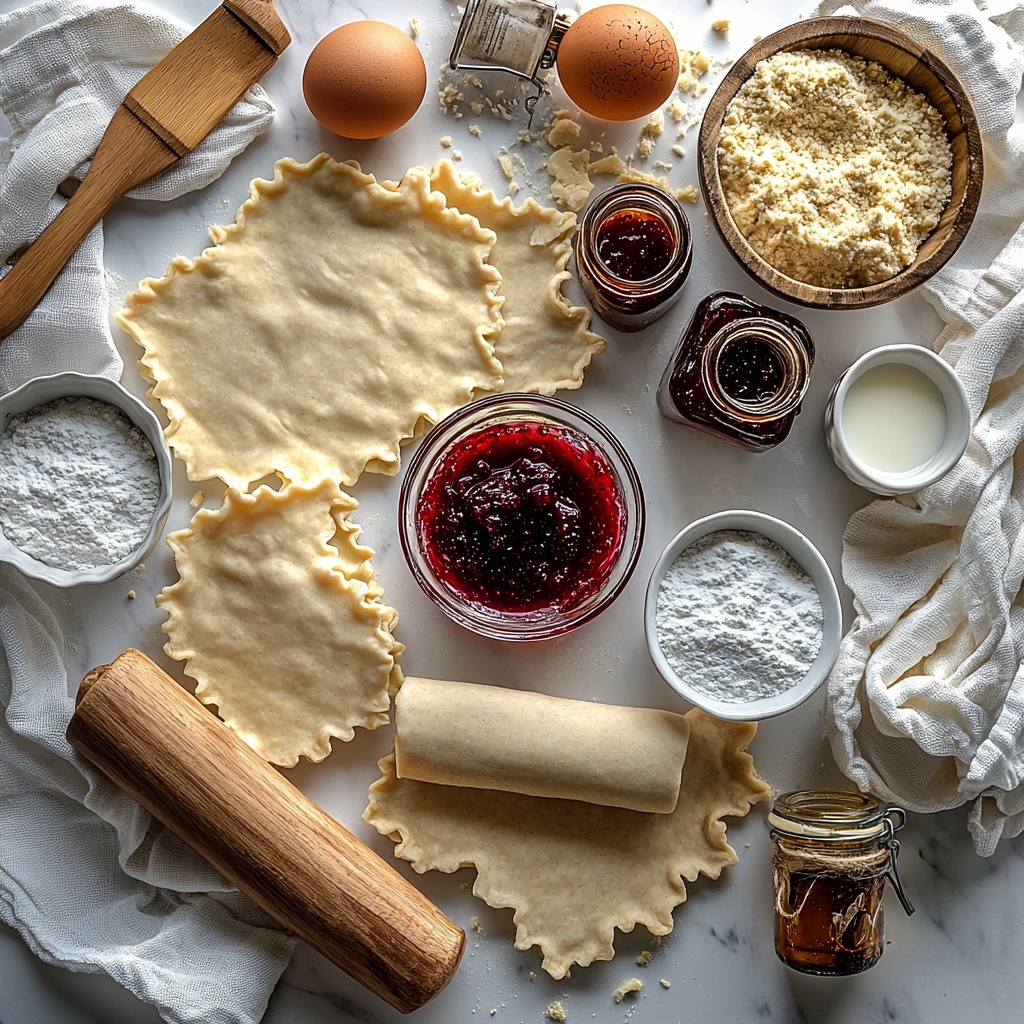
The beauty of this recipe lies in its simplicity — just a handful of essential ingredients come together to create these irresistible treats. Each one plays its part, from the flaky pie crust that forms the base, to the jam that brings a fruity burst, and the glaze that adds the perfect finishing touch.
- 1 package rolled pie crust (2 ct., 7.5 oz pack): The flaky foundation that makes these pop tarts tender and golden brown.
- 1 cup plus 2 tablespoons jam or preserves: Your choice of flavor to fill that buttery crust with juicy sweetness.
- 1 large egg: Whisked into an egg wash, it gives the crust a gorgeous shine and helps seal the edges.
- 1 cup powdered sugar: Key for creating the smooth glaze to drizzle or spread atop each tart.
- 2-3 tablespoons milk or cream: Adds the perfect consistency to the glaze for a glossy finish.
- 2 tablespoons jam: Mixed into the glaze for an extra pop of fruit flavor.
- 1/2 teaspoon vanilla: A warm hint of flavor to elevate the sweetness of the glaze.
How to Make Easy Homemade Pop Tarts with Pie Crust Recipe
Step 1: Preparing the Pie Crust Rectangles
Start by preheating your oven to 400°F to get it ready for baking. Then, lay a sheet of parchment paper on a baking sheet for a smooth, nonstick surface. Unroll one sheet of pie crust on another piece of parchment and cut it into rectangles about 3 by 5 inches — a simple index card works perfectly here. Don’t toss the leftover scraps; knead and roll them out to cut additional rectangles, ensuring nothing goes to waste and maximizing your yield.
Step 2: Adding the Jam Filling
Beat the egg lightly to create an egg wash. Arrange eight of your crust rectangles on the parchment-lined baking sheet. On each, spoon about 1 1/2 tablespoons of your favorite jam or preserves right in the center. This jam layer will be the sweet, gooey heart of your pop tarts, so don’t skimp on it!
Step 3: Sealing and Crimping the Pop Tarts
Brush the edges of each jam-filled rectangle with the egg wash to help seal. Then, carefully place another rectangle on top of each, forming a little pocket of jam inside. Press the edges firmly together and crimp with a fork—not only does this lock in the filling, but it’s a classic pop tart signature. Don’t forget to poke holes on the top crust so steam can escape during baking.
Step 4: Applying the Egg Wash and Baking
Give the top and edges of every pop tart a generous brush with the remaining egg wash. This step ensures a beautiful golden sheen once they bake. Pop them into the oven and bake for 12 to 15 minutes, watching as the crust turns a warm, inviting golden brown that signals they are perfectly baked.
Step 5: Making and Spreading the Glaze
Once your pop tarts have cooled slightly, whisk together powdered sugar, 2 tablespoons of jam, vanilla, and 2 to 3 tablespoons of milk or cream to form a smooth glaze. This sweet icing adds extra flavor and a lovely shine. Spread it over the tops of each pop tart. If you want, feel free to sprinkle on some freeze-dried berries, crushed rose petals, or sprinkles to add a fun, whimsical touch.
How to Serve Easy Homemade Pop Tarts with Pie Crust Recipe
Garnishes
Glaze is fabulous on its own, but these Easy Homemade Pop Tarts with Pie Crust Recipe really come alive with charming garnishes. Freeze-dried berries lend a tart crunch, while edible rose petals add a delicate floral note and gorgeous visual appeal. Or go classic with colorful sprinkles for a playful finish that everyone will love.
Side Dishes
Pair your homemade pop tarts with fresh fruit or a dollop of whipped cream to complement their sweet richness. A steaming cup of coffee or tea provides a cozy balance that elevates your entire breakfast or snack experience into something truly special.
Creative Ways to Present
Cut each pop tart diagonally for perfect bite-sized triangles that are great for sharing at brunch or parties. Or stack them on a pretty platter with a small bowl of extra jam for dipping. For a fun twist, serve them warm topped with a scoop of vanilla ice cream for an irresistible dessert.
Make Ahead and Storage
Storing Leftovers
If you find yourself with some leftover Easy Homemade Pop Tarts with Pie Crust Recipe, store them in an airtight container for up to 2 days. They taste best when fresh, but this keeps them from drying out and maintains that lovely flaky texture.
Freezing
To keep these treats longer, freeze unglazed pop tarts in a single layer on a baking sheet, then transfer to a freezer-safe bag or container. They’ll keep beautifully for up to 1 month. When ready, thaw and add the glaze freshly to maintain that perfect finish.
Reheating
Warm your pop tarts gently in a toaster oven or regular oven at 300°F for about 5 to 7 minutes to refresh that buttery crunch. Avoid microwaving if possible — reheating this way keeps the crust flaky instead of soggy.
FAQs
Can I use homemade pie crust for this recipe?
Absolutely! Homemade pie crust adds a wonderful personal touch and can be even flakier than store-bought. Just roll it out to the same thickness and cut the same-sized rectangles to achieve equally delicious results.
What are some jam flavors that work best?
Berry jams like strawberry, raspberry, or blueberry create a classic balance of sweet and tart. Apricot and peach jams also make lovely, flavorful fillings, but feel free to experiment with your favorites to make it truly your own.
Is it necessary to seal the pop tart edges with egg wash?
Yes, brushing the edges with egg wash helps seal the pop tarts so the jam doesn’t leak out during baking. Plus, it gives the crust that irresistible golden color once baked.
Can I make these pop tarts gluten-free?
Yes! Simply use your favorite gluten-free pie crust alternative and ensure any jam you use doesn’t contain gluten. The process remains the same for a tasty gluten-free treat.
How can I make the glaze thicker or thinner?
Adjust the consistency by adding more milk or cream to thin the glaze if it’s too thick, or more powdered sugar if you want it thicker. It’s all about reaching that smooth, spreadable texture that coats the pop tarts perfectly.
Final Thoughts
Making Easy Homemade Pop Tarts with Pie Crust Recipe is such a joyful and rewarding experience — the aroma alone promises comfort and deliciousness. Once you take that first bite of flaky crust and sweet jam with a luscious glaze, you’ll want to make them again and again. Trust me, these pop tarts are a simple way to bring a little magic into your mornings or any time snack cravings hit. So gather your ingredients and get ready to treat yourself to some homemade happiness!
“`
Print
Easy Homemade Pop Tarts with Pie Crust Recipe
- Prep Time: 15 minutes
- Cook Time: 15 minutes
- Total Time: 30 minutes
- Yield: 6 servings (12 pop tarts depending on size)
- Category: Breakfast
- Method: Baking
- Cuisine: American
Description
These Easy Homemade Pop Tarts with Pie Crust are a delightful and simple treat you can whip up in just 35 minutes. Using store-bought rolled pie crust and your favorite jam or preserves, they are filled, baked to golden perfection, and topped with a sweet glaze for a nostalgic breakfast or snack.
Ingredients
Pop Tart Dough and Filling
- 1 package rolled pie crust (2 count, 7.5 oz total)
- 1 cup plus 2 tablespoons jam or preserves (any flavor)
- 1 large egg (for egg wash)
Glaze
- 1 cup powdered sugar
- 2–3 tablespoons milk or cream
- 2 tablespoons jam
- 1/2 teaspoon vanilla extract
Instructions
- Preheat Oven: Preheat your oven to 400°F (204°C) and prepare a baking sheet lined with parchment paper for easy clean-up.
- Prepare Pie Crust Rectangles: Unroll one sheet of pie crust onto parchment and cut into rectangles approximately 3 by 5 inches. Knead any leftover dough together, roll it out to just under 1/4 inch thick, and cut additional rectangles. Repeat until you have enough pieces for your pop tarts.
- Assemble Pop Tarts: Beat the egg to create an egg wash. Place 8 rectangles on the parchment-lined baking sheet. Spoon about 1 1/2 tablespoons of jam onto each rectangle, avoiding the edges. Brush edges with egg wash, then place another rectangle on top. Press edges firmly and crimp with a fork to seal. Poke holes on the top pastry to vent steam and brush the entire top with egg wash.
- Bake: Bake the assembled pop tarts for 12 to 15 minutes or until they are golden brown and puffed.
- Prepare Glaze and Decorate: Once the pop tarts have cooled slightly, whisk together powdered sugar, milk or cream, jam, and vanilla extract to make a glaze. Spread the glaze evenly over each pop tart. Optionally, decorate with sprinkles, crushed freeze-dried berries, or edible rose petals. Allow glaze to set before serving.
- Storage: Store finished pop tarts in an airtight container for up to 2 days for best freshness.
Notes
- Use any flavor of jam or preserves to customize your pop tarts.
- If you run out of parchment, a lightly greased baking sheet can be used but may require careful removal.
- Make sure to poke holes in the top crust to prevent bubbling and uneven baking.
- For dairy-free glaze, substitute milk or cream with plant-based milk.
- Pop tarts are best enjoyed fresh but can be warmed slightly before serving if desired.


