

If you have ever dreamed of biting into warm, soft, and perfectly crusty homemade bread, this French Bread Rolls Recipe is exactly what you need. These rolls are delightfully airy with a golden-brown crust and just the right hint of sweetness from sugar and richness from vegetable oil. Whether you are serving them alongside dinner, using them for sandwiches, or simply snacking on them fresh from the oven, these French bread rolls bring that comforting, bakery-fresh charm right into your kitchen. The method is straightforward, and the results are nothing short of extraordinary, making this recipe a true staple for bread lovers everywhere.
Ingredients You’ll Need
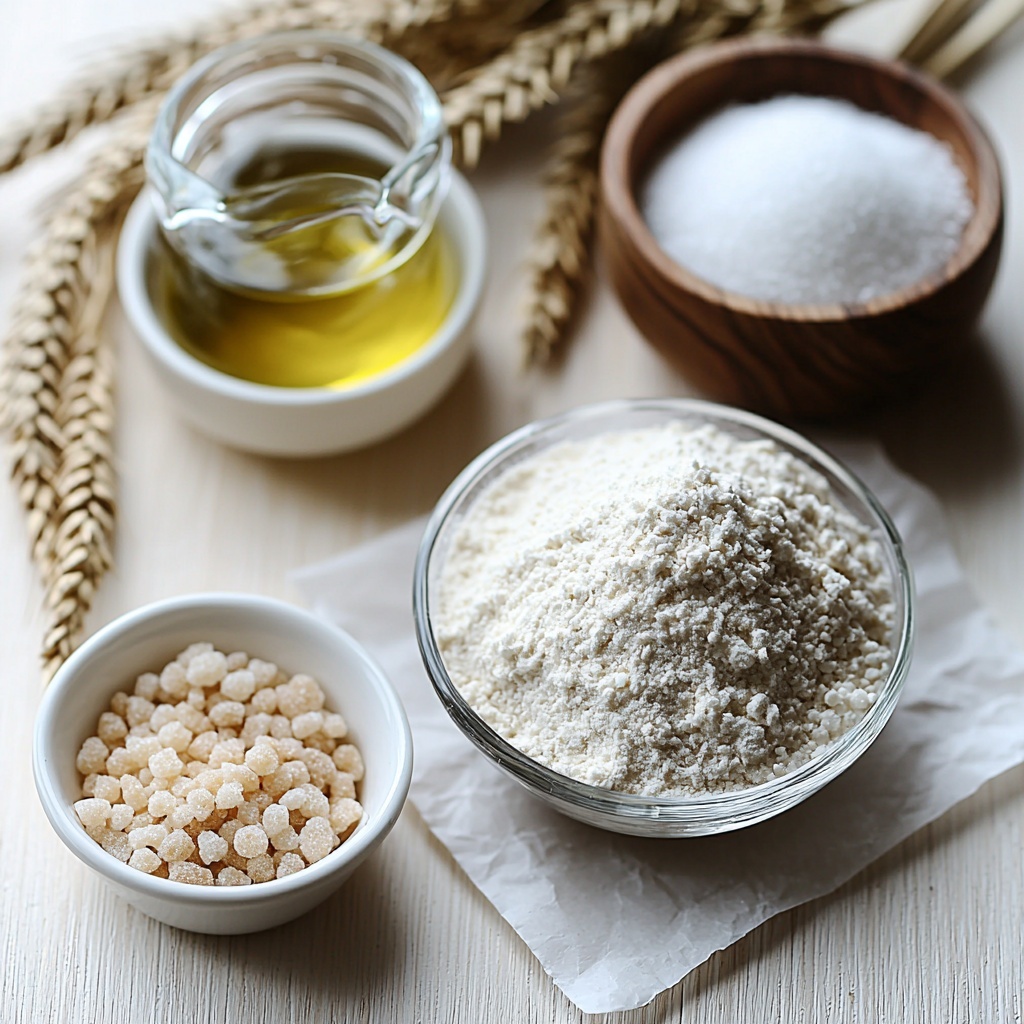
The magic behind this French Bread Rolls Recipe lies in the simplicity and quality of the ingredients. Each component plays a crucial role to ensure your rolls have the perfect rise, texture, and flavor.
- Warm water: Activates the yeast and creates the perfect environment for the dough to rise.
- Instant yeast: Provides reliable and fast fermentation for that lovely dough expansion.
- Granulated sugar: Feeds the yeast a little sweetness and balances out the flavors.
- Vegetable oil: Adds tender moisture to the dough, making the crumb soft and rich.
- Salt: Enhances all the flavors and controls yeast activity for a well-balanced dough.
- All-purpose flour: The main structure builder that gives the bread rolls their shape and bite.
How to Make French Bread Rolls Recipe
Step 1: Prepare the Starter Mixture
Begin by combining warm water, yeast, sugar, vegetable oil, salt, and half of the flour in your mixer bowl or a large mixing bowl if you’re mixing by hand. If you are using active dry yeast, allow it to sit in the warm water and sugar for about 3 to 5 minutes until it becomes foamy; this awakening step is essential for a well-risen dough. This mixture forms the base that gets your dough beautifully started.
Step 2: Mix and Add Flour Gradually
Start mixing your ingredients either on a stand mixer or by hand, adding the remaining flour slowly. Keep an eye on the dough’s texture—it should pull away from the sides but stay slightly tacky. This balance ensures your bread rolls don’t turn out dry or too sticky, setting the stage for the perfect texture you want.
Step 3: Knead Until Smooth and Elastic
Kneading is where the dough develops its structure. Continue kneading for about 5 minutes with a stand mixer or 8 to 10 minutes by hand until the dough is smooth and elastic. This step really feels rewarding as the dough transforms under your hands, becoming soft yet resilient.
Step 4: First Rise
Lightly grease a large bowl with cooking spray and place your dough inside, turning it once to coat it in oil. Cover the bowl with lightly greased plastic wrap. This cozy environment helps the dough rise and double in size within 45 minutes to an hour. Watching your dough puff up is one of the most satisfying parts of baking.
Step 5: Shape the Rolls and Second Rise
After the dough has doubled, gently punch it down to release air bubbles. Transfer it to a lightly greased countertop and divide it into 12 equal pieces. Roll each piece into a smooth ball and place them on a greased baking sheet or a 9×13-inch pan. Cover again with a kitchen towel or greased plastic wrap and let them rise a second time until doubled; this ensures your rolls become light and fluffy.
Step 6: Bake to Golden Perfection
Preheat your oven to 400 degrees Fahrenheit. Bake the rolls for about 16 to 18 minutes until they’re golden brown on top and cooked through. Once out of the oven, brush the tops immediately with butter for a rich, shiny finish that enhances flavor and keeps the crust tender. Serve them warm—it’s an unforgettable experience!
How to Serve French Bread Rolls Recipe
Garnishes
French bread rolls are delightful on their own, but you can elevate them with simple garnishes like a sprinkle of coarse sea salt or a light dusting of garlic powder right after baking. Fresh herbs like rosemary or thyme pressed on top before baking add a fragrant touch that makes these rolls stunningly aromatic as well as tasty.
Side Dishes
These rolls are the perfect companion to hearty soups and stews, cheesy casseroles, or classic dishes like roast chicken. Their soft interior and crispy exterior soak up sauces and can be used to scoop up every last bite. You might also enjoy them alongside a fresh garden salad or creamy butter to keep things light and fresh.
Creative Ways to Present
Consider slicing these rolls horizontally to create mini sandwiches filled with deli meats, cheeses, or even roasted vegetables for a casual meal. For an inviting brunch, split them and toast the halves with melted cheese and herbs. You can also turn these rolls into elegant dinner accompaniments by placing small herb butter pats on top just before serving.
Make Ahead and Storage
Storing Leftovers
If you have any leftover French bread rolls, store them in an airtight container or a resealable plastic bag at room temperature for up to two days. Keeping them sealed maintains their soft texture and prevents them from drying out. For best results, enjoy them within this timeframe to savor the freshness.
Freezing
You can freeze the rolls in a sealed freezer bag for up to three months. To freeze, wrap each roll tightly in plastic wrap, then place them together in a freezer bag to avoid freezer burn. When ready to enjoy, thaw at room temperature or reheat directly from frozen.
Reheating
Reheat your rolls by wrapping them in foil and warming in a preheated oven at 350°F for about 10 minutes. This process refreshes their crusty exterior while keeping the crumb soft and moist. Alternatively, microwave briefly wrapped in a damp cloth for a quick fix, but the oven method delivers the best texture.
FAQs
Can I use active dry yeast instead of instant yeast?
Absolutely! If you choose active dry yeast, just make sure to dissolve it in warm water with sugar for 3 to 5 minutes until it becomes foamy before adding it to the dough. This step activates the yeast and helps achieve the right rise.
How do I know when the dough has risen enough?
The dough has doubled in size when it looks visibly puffed and almost twice as large as when you first placed it to rise. You can gently press your fingertip into the dough; if the indentation remains, it’s ready for the next step.
Can I substitute whole wheat flour?
While whole wheat flour adds a delicious nutty flavor, it tends to make rolls denser. You can substitute up to half the all-purpose flour with whole wheat flour for a heartier roll, but sticking to all-purpose flour ensures the lightest texture.
What if my dough is too sticky or too dry?
If the dough feels too sticky, sprinkle in a bit more flour during kneading, a tablespoon at a time. If it’s too dry and crumbly, add small amounts of warm water until it feels soft and tacky but manageable. Achieving the right texture is key to beautiful rolls.
Can I make the dough in advance and refrigerate it?
Yes! After the first kneading, you can refrigerate the dough in a greased bowl covered tightly with plastic wrap for up to 24 hours. Before shaping the rolls, bring the dough to room temperature and allow it to rise until doubled.
Final Thoughts
This French Bread Rolls Recipe is one of those treasures you’ll come back to again and again. With a handful of simple ingredients and a little patience, you can create irresistible, warm rolls that fill your home with the most comforting aromas. Whether for weekday dinners or special occasions, these rolls will quickly become a beloved classic in your kitchen. Go ahead, roll up your sleeves, and enjoy the lovely journey of baking bread from scratch—you won’t regret it!
Print
French Bread Rolls Recipe
- Prep Time: 20 minutes
- Cook Time: 18 minutes
- Total Time: 2 hours 16 minutes
- Yield: 12 rolls
- Category: Bread
- Method: Baking
- Cuisine: French
Description
These French Bread Rolls are soft, fluffy, and perfect for any meal. Made with simple ingredients and a classic yeast dough, these rolls have a golden-brown crust and tender interior, great for sandwiches or as a side to soups and salads. The recipe involves kneading, rising, and baking to achieve the ideal texture and flavor.
Ingredients
For the Dough
- 1 ½ cups warm water
- 3/4 Tablespoon instant yeast (or 1 tablespoon active dry yeast)
- 2 Tablespoons granulated sugar
- 2 Tablespoons vegetable oil
- 1 teaspoon salt
- 4 cups all-purpose flour
Instructions
- Combine Ingredients: In the bowl of a stand mixer or a large mixing bowl, mix the warm water, yeast, sugar, oil, salt, and 2 cups of flour together. If using active dry yeast, let it sit in the warm water and sugar for 3 to 5 minutes until foamy before adding other ingredients.
- Add Flour and Mix: Begin mixing the dough and gradually add the remaining flour until the dough pulls away from the bowl sides. The dough should be soft, smooth, and slightly tacky.
- Knead the Dough: Knead the dough in the stand mixer for about 5 minutes or 8-10 minutes by hand until it is very smooth and elastic.
- First Rise: Lightly spray a large bowl with cooking spray and place the dough inside. Cover with lightly greased plastic wrap and let it rise for 45 minutes to an hour until doubled in size.
- Shape Rolls: Punch down the dough and turn it onto a lightly greased countertop. Divide into 12 equal pieces, roll each into a ball, and place them on a greased baking sheet or a 9×13-inch glass pan.
- Second Rise: Cover the rolls with a kitchen towel or greased plastic wrap and let rise again until doubled in size.
- Bake: Preheat the oven to 400°F. Bake the rolls for 16 to 18 minutes until golden-brown and cooked through.
- Finish and Serve: Remove rolls from the oven and immediately rub the tops with butter. Serve warm and enjoy!
Notes
- If using active dry yeast, activate it by letting it foam in warm water and sugar before mixing.
- The exact amount of flour may vary depending on humidity and flour type; dough should be slightly tacky but not sticky.
- Make sure to let the dough rise in a warm, draft-free area for best results.
- Rubbing the tops with butter right after baking adds flavor and keeps the crust soft.
- These rolls can be stored in an airtight container for up to 2 days or frozen for longer storage.


