

“`html
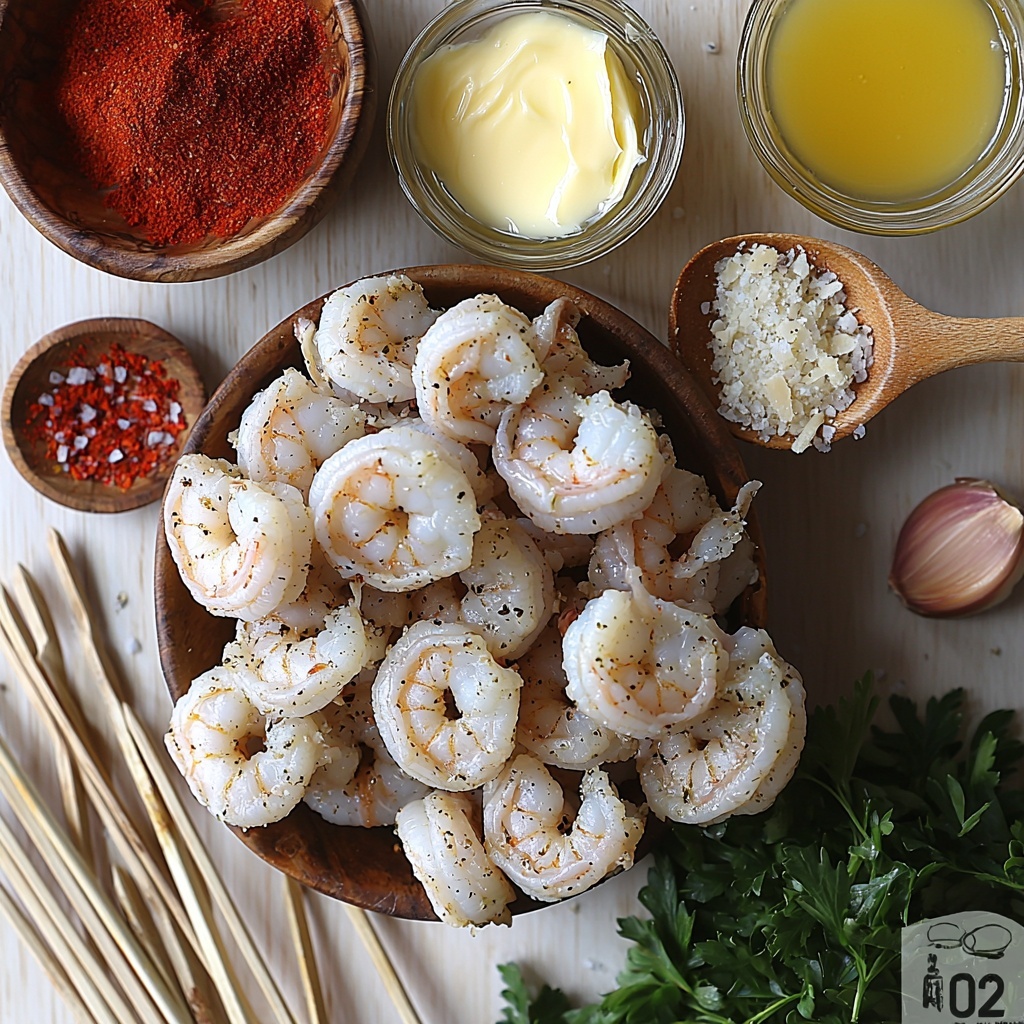
If you’re craving a dish that bursts with flavor, is quick to prepare, and has that perfect balance of buttery richness and garlicky goodness, this Garlic Parmesan Shrimp Skewers Recipe is exactly what you need. Juicy shrimp get tossed in a luscious garlic butter, then coated in freshly grated Parmesan for a crispy, golden finish that charms every bite. Whether you’re firing up the grill or broiling in the oven, these skewers deliver a crowd-pleasing, irresistible taste in about 20 minutes flat, making them an ideal go-to for busy weeknights or any casual get-together.
Ingredients You’ll Need
Simple, fresh ingredients come together in this Garlic Parmesan Shrimp Skewers Recipe to create layers of flavor and texture that truly shine. Each component, from the shrimp to the spices and cheese, plays its crucial role in making every bite a delightful experience.
- 1 lb large shrimp, peeled & deveined: The star of the dish, juicy and tender shrimp are perfect for quick cooking and soaking up the garlic butter.
- 3 tbsp melted butter: Adds rich, creamy notes that help carry the garlic and spices.
- 3 cloves garlic, minced: Infuses bold, aromatic flavor integral to this recipe.
- ½ tsp salt: Enhances all the flavors while balancing the sweetness of the shrimp.
- ½ tsp black pepper: Adds a subtle kick without overpowering the dish.
- ½ tsp paprika (smoked if you like heat): Gives a mild smokiness and a beautiful warm color.
- ¼ tsp red pepper flakes (optional): For those who love a hint of heat to elevate the flavor profile.
- ½ cup freshly grated Parmesan cheese: Brings a nutty, salty crispness when broiled or grilled.
- 1 tbsp lemon juice: Brightens the entire dish with a fresh, tangy punch.
- 1 tbsp chopped fresh parsley: Adds a pop of color and fresh herbal notes to finish.
- Wooden or metal skewers: Essential for easy grilling or broiling and attractive presentation.
How to Make Garlic Parmesan Shrimp Skewers Recipe
Step 1: Prep Your Skewers and Shrimp
Before diving into cooking, if you’re using wooden skewers, soak them in water for at least 15 minutes to prevent burning during grilling or broiling. Meanwhile, pat your shrimp dry with paper towels—this is key because dry shrimp will char beautifully, giving you that slightly crispy exterior you want, rather than steaming and staying soggy.
Step 2: Whip Up the Garlic Butter
In a bowl, combine the melted butter, minced garlic, salt, black pepper, paprika, and optional red pepper flakes. This flavorful butter mixture is the base of the Garlic Parmesan Shrimp Skewers Recipe and grants each shrimp a burst of rich, savory taste with every brush.
Step 3: Skewer and Season
Thread about 4 to 5 shrimp per skewer, making sure they sit snugly but not overcrowded for even cooking. Then, brush each skewer generously with your garlic butter, coating every crevice. Sprinkle freshly grated Parmesan cheese over both sides to create that irresistible crispy topping when cooked.
Step 4: Cook to Perfection
You’ve got two excellent methods here: grilling or oven broiling. For the grill, preheat to medium-high heat (around 400°F or 200°C), then cook the shrimp skewers for 2 to 3 minutes per side until they turn pink and get a slight char. If you prefer oven broiling, place your skewers on a lined tray and broil on high for about 2 to 3 minutes on each side—be vigilant as shrimp cook fast and you want to avoid overcooking.
Step 5: The Perfect Finish
Once cooked, drizzle the skewers with fresh lemon juice to cut through the richness and sprinkle chopped parsley on top for that fresh, vibrant touch. Serve immediately to enjoy the tender shrimp with the crunchy Parmesan crust at its best.
How to Serve Garlic Parmesan Shrimp Skewers Recipe
Garnishes
To elevate these skewers, sprinkle extra freshly grated Parmesan or a few lemon wedges on the side. A handful of chopped parsley or basil not only adds a lovely color contrast but also enhances the fresh herbal aroma.
Side Dishes
Garlic Parmesan Shrimp Skewers pair wonderfully with a variety of sides. Think classic Caesar salad, fluffy rice pilaf, or grilled seasonal vegetables that match the smoky, garlicky notes. Garlic bread or a light pasta tossed in olive oil and herbs also make fantastic companions for a hearty, satisfying meal.
Creative Ways to Present
For a fun twist, serve the shrimp skewers over a bed of creamy polenta or alongside a tangy mango salsa for a sweet and spicy contrast. You can also use them as protein toppings for flatbreads or serve them as appetizers on a festive platter with dipping sauces such as garlic aioli or a zesty lemon butter dip.
Make Ahead and Storage
Storing Leftovers
If you happen to have any leftovers, store them in an airtight container in the refrigerator for up to 2 days. Make sure to let the shrimp cool down before sealing to maintain the best texture and flavor.
Freezing
While fresh is always best with shrimp, you can freeze cooked skewers by wrapping them tightly in foil and placing them in a freezer bag. They’ll keep for up to 2 months, though parmesan texture might soften slightly after thawing.
Reheating
When you’re ready to enjoy your stored Garlic Parmesan Shrimp Skewers Recipe again, reheat gently either in a preheated oven at 350°F for 5-7 minutes or in a skillet over medium heat to retain tenderness and keep the parmesan crispiness as much as possible. Avoid microwaving if you can, as it tends to dry shrimp out.
FAQs
Can I use frozen shrimp for this recipe?
Absolutely! Just make sure to thaw them completely and pat them dry before marinating and cooking to ensure they cook evenly and get that nice char.
What if I don’t have a grill or broiler?
No worries—you can sauté the shrimp in a hot skillet with garlic butter and Parmesan, but keep an eye on them so they don’t overcook. They won’t have the same crispy crust but will still be delicious.
Can I make this recipe gluten-free?
Yes, the basic Garlic Parmesan Shrimp Skewers Recipe is naturally gluten-free as long as you check your paprika and Parmesan for any added gluten ingredients. Also, avoid adding panko or use gluten-free breadcrumbs if you want that extra crisp.
How spicy is the dish with the red pepper flakes?
The red pepper flakes add just a gentle heat that complements the garlic and Parmesan without overwhelming the shrimp. You can adjust the amount or omit it altogether depending on your heat preference.
Can I prepare these skewers ahead of time for a barbecue?
You can assemble and marinate the shrimp on skewers a few hours ahead and keep them refrigerated. Just pull them out a bit before cooking to take the chill off, then follow the cooking steps for perfect results.
Final Thoughts
If you want a recipe that’s fast, packed with flavor, and perfect for sharing, this Garlic Parmesan Shrimp Skewers Recipe is a total winner. Whether it’s for an easy weeknight dinner or your next backyard gathering, these skewers bring excitement to the table with every bite. Give it a try and watch how they quickly become a beloved favorite in your recipe rotation!
“`
Print
Garlic Parmesan Shrimp Skewers Recipe
- Prep Time: 15 minutes
- Cook Time: 6 minutes
- Total Time: 21 minutes
- Yield: 3–4 servings
- Category: Appetizer
- Method: Grilling
- Cuisine: American
Description
Garlic Parmesan Shrimp Skewers feature juicy, buttery shrimp infused with bold garlic flavor and finished with a crispy Parmesan coating. Ready in about 20 minutes, these skewers are perfect for grilling or quick oven broiling, offering a delicious and easy seafood dish ideal for summer meals or any time you want a flavorful appetizer or main course.
Ingredients
Shrimp and Marinade
- 1 lb large shrimp, peeled & deveined (tails on optional)
- 3 tbsp melted butter
- 3 cloves garlic, minced
- ½ tsp salt
- ½ tsp black pepper
- ½ tsp paprika (smoked if you like heat)
- ¼ tsp red pepper flakes (optional)
- 1 tbsp lemon juice
- 1 tbsp chopped fresh parsley
Coating and Skewering
- ½ cup freshly grated Parmesan cheese
- Wooden or metal skewers (if wooden, soaked in water for 15 minutes)
Instructions
- Prep: If using wooden skewers, soak them in water for 15 minutes to prevent burning during cooking. Pat the shrimp dry thoroughly to ensure they char nicely instead of steaming.
- Make Garlic Butter: In a bowl, mix the melted butter with minced garlic, salt, black pepper, paprika, and red pepper flakes (if using) to create a flavorful garlic butter marinade.
- Skewer: Thread about 4–5 shrimp onto each skewer. Brush the shrimp generously with the garlic butter mixture. Then, sprinkle freshly grated Parmesan cheese evenly over both sides of the shrimp to create a crispy crust.
- Cook (Grill Option – Best Flavor): Preheat the grill to medium-high heat (around 400°F / 200°C). Place skewers on the grill and cook for 2–3 minutes per side, until shrimp turn pink and develop a slight char.
- Cook (Oven Broil Option – Fast & Easy): Place skewers on a broiler pan and broil on high for 2–3 minutes per side, watching closely as shrimp cook quickly to avoid overcooking.
- Finish: Drizzle the cooked shrimp skewers with fresh lemon juice and sprinkle chopped parsley on top. Serve immediately to enjoy the best texture and flavor.
Notes
- Do not overcook shrimp; they are done when opaque and form a C-shape.
- Freshly grated Parmesan cheese provides better melting and browning than pre-shredded varieties.
- For extra crispiness, sprinkle a small amount of panko breadcrumbs on shrimp before broiling.
- If using wooden skewers, soaking is essential to prevent burning on the grill or under the broiler.
- Serve skewers over pasta, on Caesar salad, alongside garlic bread, or with rice and grilled vegetables for a complete meal.


