

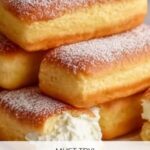
If you’ve ever looked at a tray of classic golden Twinkies and wished you could capture their delightful, fluffy charm right in your own kitchen, then this Homemade Twinkies Recipe is going to be a total game-changer. The magic lies in that perfect combination of tender sponge cake wrapped around a luscious, creamy filling that’s both nostalgic and irresistible. There’s something truly special about making these iconic treats from scratch—fresh flavors, no preservatives, and the pride of knowing you created every pillowy bite yourself.
Ingredients You’ll Need
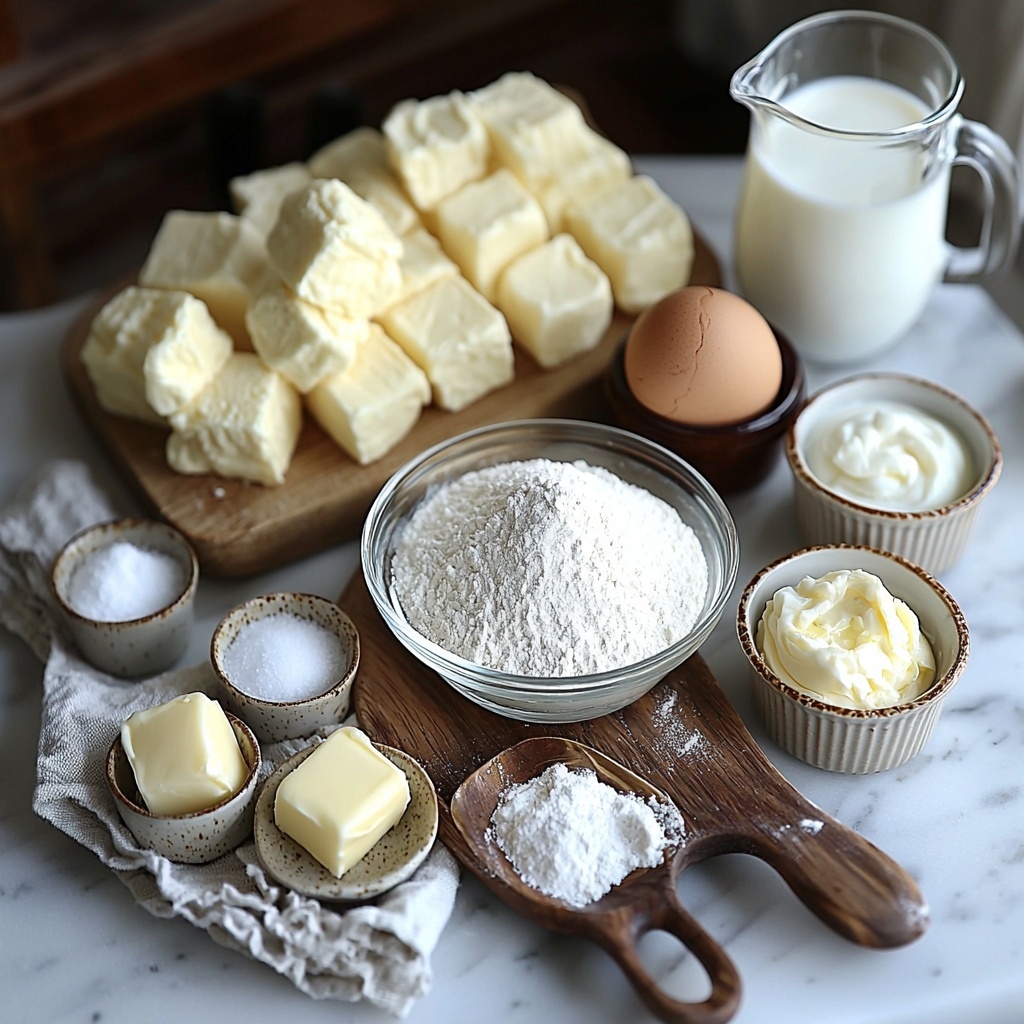
Gathering the right ingredients is your first step to nailing this Homemade Twinkies Recipe. Each one is simple but crucial, contributing to that signature light texture, sweetness, and creamy finish that make Twinkies such an all-time favorite.
- All-purpose flour: The base of your batter providing structure and softness to the sponge.
- Baking powder: Helps your cake rise perfectly for that airy, tender bite.
- Baking soda: Adds a subtle lift and balances the cake’s pH for ideal texture.
- Salt: Enhances all the flavors and balances sweetness.
- Unsalted butter, softened: Brings richness and moisture while keeping the cake tender.
- Granulated sugar: Sweetens the cake and helps create that golden crust.
- Large eggs: Provide structure, richness, and help trap air in the batter.
- Vanilla extract: Adds warmth and depth to the overall flavor.
- Milk: Keeps the batter smooth and adds moisture for a soft crumb.
- Cream filling ingredients (powdered sugar, butter, vanilla, milk): Combine to create the luscious, sweet center that melts in your mouth with every bite.
How to Make Homemade Twinkies Recipe
Step 1: Prepare Your Oven and Dry Ingredients
Begin by preheating your oven to 350°F (175°C). While it heats, whisk together the flour, baking powder, baking soda, and salt in a bowl. This dry mix is the backbone of your sponge, ensuring it rises evenly and gets that beautiful texture.
Step 2: Cream Butter and Sugar
In a separate large bowl, beat the softened butter and granulated sugar until light and fluffy—about three minutes. This step is crucial because it introduces air, making your cakes tender and airy, just like the original Twinkies.
Step 3: Add Eggs and Vanilla
One at a time, add the eggs to the creamed mixture, beating well after each addition. Then stir in the vanilla extract. These ingredients add rich flavor, moisture, and structure to the batter.
Step 4: Combine Dry and Wet Ingredients With Milk
Gradually mix in the dry ingredients, alternating with the milk. Start and end with the dry mix. This technique keeps the batter smooth and ensures the perfect blend of moisture and stability in your sponge.
Step 5: Fill Your Molds and Bake
Spoon the batter into Twinkie molds or, if you don’t have them, well-greased cupcake pans. Fill each cavity about two-thirds full to allow room for rising. Bake for 20 to 25 minutes, or until the cakes turn golden brown and a toothpick inserted comes out clean.
Step 6: Cool and Fill
Allow your homemade Twinkies to cool completely before filling. Once cool, use a piping bag to inject the luscious cream filling made from powdered sugar, butter, vanilla, and milk. This sweet surprise inside is what truly completes these treats.
Step 7: Enjoy Your Creation
Now, it’s time for the best part—bite into your freshly made Homemade Twinkies Recipe and savor that perfect balance of fluffy cake and creamy filling. You just whipped up an iconic dessert that’s sure to impress!
How to Serve Homemade Twinkies Recipe
Garnishes
While these Twinkies are delicious just as they are, a simple dusting of powdered sugar or a drizzle of melted chocolate over the top can add a special touch. Fresh berries on the side provide a bright contrast to the sweet cream filling and add a fresh burst of flavor.
Side Dishes
Homemade Twinkies make a charming dessert paired beautifully with a scoop of vanilla ice cream or a dollop of whipped cream. For a light balance after a heavy meal, a cup of hot coffee or rich milk complements every bite perfectly, enhancing the overall experience.
Creative Ways to Present
Serve these treats on a vintage cake stand or arrange them on a colorful platter for a festive look. You can also twist things up by slicing them in half lengthwise and spreading fruit jam for an extra burst of flavor. The creative possibilities with this Homemade Twinkies Recipe are endless.
Make Ahead and Storage
Storing Leftovers
Store any leftover Homemade Twinkies in an airtight container at room temperature for up to two days. Keep them fresh and soft by avoiding refrigeration unless your kitchen is warm—moisture and temperature can affect the delicate sponge texture.
Freezing
If you want to enjoy your treats later, wrap each Twinkie tightly in plastic wrap and place them in a freezer-safe container or bag. They freeze beautifully for up to two months, making this recipe a perfect option for batch baking ahead of time.
Reheating
To bring your frozen or stored Twinkies back to life, thaw them at room temperature and warm gently in a 300°F oven for about 5 minutes. This gentle reheating revives that freshly baked softness without melting the creamy filling.
FAQs
Can I use cupcake pans instead of Twinkie molds?
Absolutely! Cupcake pans work wonderfully if you don’t have specialized Twinkie molds. Just make sure to grease them well and fill the cavities about two-thirds full for best results.
What makes this Homemade Twinkies Recipe different from store-bought ones?
This recipe uses fresh ingredients without preservatives, resulting in a much lighter texture and richer flavor. Plus, you get the satisfaction of making a nostalgic treat yourself, tailored to your taste.
Can I make the cream filling ahead of time?
Yes, the cream filling can be prepared a day ahead and stored in the refrigerator. Bring it to room temperature and give it a quick whisk before filling your Twinkies for smooth, creamy consistency.
Is there a gluten-free version of this recipe?
You can experiment with gluten-free flour blends in place of all-purpose flour, but keep in mind the texture might vary slightly. It’s best to use a blend designed for cakes for the closest results.
How long do Homemade Twinkies last?
Fresh Homemade Twinkies are best enjoyed within two days when stored at room temperature. If refrigerated or frozen, follow appropriate thawing and reheating to preserve texture and flavor.
Final Thoughts
Making this Homemade Twinkies Recipe is truly a joyful kitchen adventure that brings back sweet memories while giving you a treat that’s fresh, fluffy, and irresistibly creamy. Whether you’re baking for a cozy afternoon snack or a delightful party dessert, these little bundles of happiness are sure to bring smiles all around. Don’t hesitate—grab your ingredients and start creating your very own homemade classic today!
Print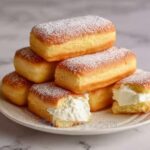
Homemade Twinkies Recipe
- Prep Time: 15 minutes
- Cook Time: 25 minutes
- Total Time: 40 minutes
- Yield: 12 servings
- Category: Dessert
- Method: Baking
- Cuisine: American
Description
This recipe guides you through making classic homemade Twinkies with a light, fluffy sponge cake filled with a creamy vanilla filling. Perfect for a nostalgic treat or special dessert, these Twinkies combine soft cake with a sweet, smooth filling that you create from scratch.
Ingredients
Cake Ingredients
- 1 cup all-purpose flour
- 1 teaspoon baking powder
- 1/2 teaspoon baking soda
- 1/4 teaspoon salt
- 1/2 cup unsalted butter, softened
- 1 cup granulated sugar
- 2 large eggs
- 1 teaspoon vanilla extract
- 1/2 cup milk
Cream Filling
- 1 cup powdered sugar (approximate, adjust for consistency)
- 1/2 cup unsalted butter, softened
- 1 teaspoon vanilla extract
- 2–3 tablespoons milk (to achieve desired filling consistency)
Instructions
- Preheat Oven: Preheat your oven to 350°F (175°C) to prepare for baking the Twinkie batter.
- Mix Dry Ingredients: In a medium bowl, whisk together the all-purpose flour, baking powder, baking soda, and salt to evenly distribute the leavening agents and salt.
- Cream Butter and Sugar: In a separate large bowl, beat the softened unsalted butter and granulated sugar together using a hand mixer or stand mixer until the mixture is light and fluffy, about 3 minutes. This adds air to the batter for a soft texture.
- Add Eggs: Add the eggs one at a time to the butter and sugar mixture, beating well after each addition to fully incorporate and maintain the airy structure.
- Add Vanilla Extract: Stir in the vanilla extract to flavor the batter.
- Combine Wet and Dry Ingredients: Gradually add the dry flour mixture to the wet ingredients, alternating with the milk. Start and end with the dry ingredients, mixing gently just until combined to avoid overmixing which could toughen the cake.
- Fill Molds: Spoon the batter into Twinkie molds or greased cupcake pans, filling each cavity about two-thirds full to allow room for rising.
- Bake: Bake in the preheated oven for 20-25 minutes or until the cakes are golden brown and a toothpick inserted in the center comes out clean, indicating they are fully cooked.
- Cool Before Filling: Remove the cakes from the oven and allow them to cool completely on a wire rack, ensuring they don’t crumble when filled.
- Prepare Cream Filling: In a bowl, beat together the powdered sugar, softened butter, vanilla extract, and milk. Adjust the amount of milk to achieve a smooth, pipeable consistency suitable for filling.
- Fill the Twinkies: Using a piping bag, carefully fill the cooled cakes with the cream filling by inserting the tip into the center or side of the cake and squeezing gently until filled.
- Serve and Enjoy: Your homemade Twinkies are now ready to be enjoyed fresh or stored in an airtight container for later indulgence.
Notes
- Use Twinkie molds for authentic shape, or cupcake pans as a practical alternative.
- Allow cakes to cool completely before filling to prevent cream from melting.
- Adjust powdered sugar and milk in the filling to get the desired sweetness and consistency.
- Store finished Twinkies refrigerated for up to 3 days for freshness.
- You can substitute milk with a non-dairy alternative if desired.
