

“`html
If you’ve ever craved that irresistibly soft, golden, and creamy snack that brings back childhood memories, then this Homemade Twinkies Recipe is your new best friend in the kitchen. These delightful treats combine a light, airy sponge cake with a luscious cream filling that’s perfectly sweet and entirely from scratch. Making Twinkies at home might sound daunting, but with a little love and these simple steps, you will be rewarded with fresh, tender, and unmistakably nostalgic goodies that beat store-bought any day.
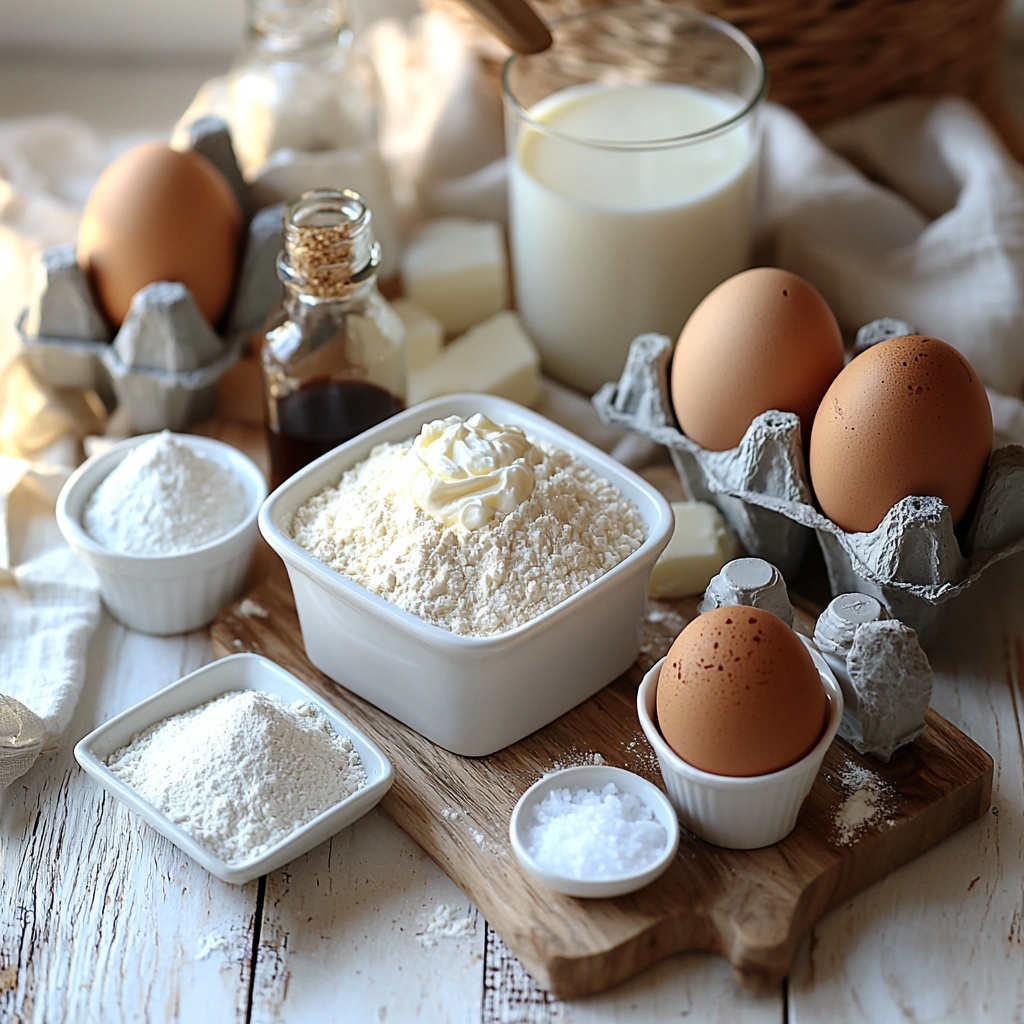
Ingredients You’ll Need
Getting ready to make your own batch of homemade Twinkies is easier than you think because each ingredient plays a starring role in crafting the perfect texture and flavor. From the fluffiness of the cake to the richness of the filling, these simple pantry staples come together for something truly special.
- 1 cup all-purpose flour: The foundation of the cake, providing structure without heaviness.
- 1 teaspoon baking powder: Helps the cake rise and become nice and fluffy.
- 1/2 teaspoon baking soda: Adds a gentle lift and aids in browning.
- 1/4 teaspoon salt: Balances sweetness and enhances flavor complexity.
- 1/2 cup unsalted butter, softened: Gives the cake moistness and rich flavor while letting you control the salt level.
- 1 cup granulated sugar: Sweetens and helps create a tender crumb.
- 2 large eggs: Bind ingredients and contribute to the tender texture.
- 1 teaspoon vanilla extract: Adds warm, aromatic depth to both the cake and filling.
- 1/2 cup milk: Keeps the batter smooth and creates a moist crumb.
- Cream filling: Made from powdered sugar, butter, vanilla extract, and milk for consistency, this luscious filling is the hallmark of the Twinkie experience.
How to Make Homemade Twinkies Recipe
Step 1: Preheat and Prepare
Start by heating your oven to 350°F (175°C). This ensures a perfect baking environment to give your Twinkies that gorgeous golden finish. If you have Twinkie molds, grease them well—if not, greased cupcake pans work beautifully as an alternative.
Step 2: Mix the Dry Ingredients
In a medium bowl, whisk together the flour, baking powder, baking soda, and salt. This mix is what will give structure and lift to your cake layers, so combining them evenly is key.
Step 3: Cream Butter and Sugar
Using a mixer, beat the softened butter and granulated sugar until the mixture is light and fluffy. This usually takes about 3 minutes and is crucial to incorporating air that will keep your cakes tender and airy.
Step 4: Add Eggs and Vanilla
Add the eggs one at a time, making sure each is fully mixed in before adding the next. Then stir in the vanilla extract for that classic sweet aroma that ties the cake together.
Step 5: Combine Wet and Dry Mixtures
Gradually add the dry ingredients to the wet, alternating with the milk. This method helps avoid lumps and keeps the batter smooth and light—exactly what you want for that soft crumb.
Step 6: Fill Molds and Bake
Spoon the batter into your prepared molds or cupcake pans, filling each about two-thirds full to allow room for the cake to rise. Bake for 20 to 25 minutes, or until the cakes are golden brown and a toothpick inserted comes out clean.
Step 7: Cool and Fill
Once baked, let your homemade Twinkies cool completely before gently piping in the cream filling. This cream is the heart of the Homemade Twinkies Recipe—rich, smooth, and just sweet enough to complement the delicate cake.
How to Serve Homemade Twinkies Recipe
Garnishes
While these homemade delights are amazing on their own, a light dusting of powdered sugar adds a touch of elegance and extra sweetness. For a playful twist, try topping with a few fresh berries to brighten the plate and add a fresh contrast.
Side Dishes
Serve your homemade Twinkies with a tall glass of cold milk or a steaming cup of coffee or tea. The creamy beverage pairs perfectly with the light and airy cake, creating a snack or dessert experience that’s simply comforting and satisfying.
Creative Ways to Present
Want to wow your guests? Arrange your Homemade Twinkies Recipe on a decorative platter with a drizzle of chocolate sauce or a side of whipped cream. You could even try cutting them into bite-sized pieces for a charming finger food platter at your next gathering.
Make Ahead and Storage
Storing Leftovers
If you find yourself with leftovers (which is rare!), store your homemade Twinkies in an airtight container in the refrigerator. They will stay fresh and delicious for up to 3 to 4 days, keeping that soft cake texture and creamy filling intact.
Freezing
You can freeze the baked, unfilled cakes wrapped tightly in plastic wrap and placed inside a freezer bag for up to 2 months. When ready to enjoy, thaw them overnight in the fridge and fill with cream before serving to maintain freshness and texture.
Reheating
For a fresh-from-the-oven feel, warm refrigerated Twinkies slightly in the microwave for about 10-15 seconds. Be careful not to melt the cream filling—just enough to soften the cake and bring back that freshly baked warmth.
FAQs
Can I use a different type of flour?
All-purpose flour works best for the texture and rise of homemade Twinkies; using whole wheat or gluten-free flours can change the lightness and density. If you need to substitute, look for a gluten-free all-purpose blend designed for baking.
Do I need special Twinkie molds?
While specialized Twinkie molds make the traditional shape easy to achieve, they are not essential. Greased cupcake tins or mini loaf pans work well for baking these treats right at home.
Can I make the cream filling ahead of time?
Absolutely! The cream filling can be prepared a day ahead and kept covered in the refrigerator. Just give it a quick stir before piping it into the cakes to refresh its smoothness.
How do I know when the Twinkies are done baking?
Look for a golden-brown color on top and test by inserting a toothpick in the center—if it comes out clean, the cakes are perfectly baked and ready to cool before filling.
Can I add flavors to the cream filling?
Yes, feel free to get creative. Adding a bit of cocoa powder for chocolate cream or a drop of almond extract can take your Homemade Twinkies Recipe to a fun new level of flavor.
Final Thoughts
Making a Homemade Twinkies Recipe is a joyful kitchen adventure that brings sweetness and smiles to any day. Whether for a nostalgic treat or a show-stopping dessert, these light, creamy cakes will become a cherished favorite. So don’t wait—grab your ingredients and dive into this delightful baking experience. You won’t believe how much better a fresh, homemade Twinkie tastes!
“`
Print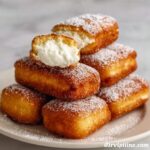
Homemade Twinkies Recipe
- Prep Time: 15 minutes
- Cook Time: 25 minutes
- Total Time: 40 minutes
- Yield: 12 servings
- Category: Dessert
- Method: Baking
- Cuisine: American
Description
Delight in these homemade Twinkies, a classic American snack cake made from a soft vanilla sponge cake filled with a creamy, sweet filling. This recipe guides you through creating fluffy baked cakes with a luscious cream center, perfect for a nostalgic treat or party dessert.
Ingredients
Cake Ingredients
- 1 cup all-purpose flour
- 1 teaspoon baking powder
- 1/2 teaspoon baking soda
- 1/4 teaspoon salt
- 1/2 cup unsalted butter, softened
- 1 cup granulated sugar
- 2 large eggs
- 1 teaspoon vanilla extract
- 1/2 cup milk
Cream Filling
- 1 cup powdered sugar
- 1/4 cup unsalted butter, softened
- 1 teaspoon vanilla extract
- 2–3 tablespoons milk (adjust for consistency)
Instructions
- Preheat the oven: Set your oven to 350°F (175°C) to prepare for baking the cakes evenly.
- Mix dry ingredients: In a bowl, sift together the flour, baking powder, baking soda, and salt to distribute the leavening agents and seasoning uniformly.
- Cream butter and sugar: In a separate bowl, beat the softened butter and granulated sugar for about 3 minutes until the mixture becomes light, fluffy, and pale in color, which helps to aerate your batter.
- Add eggs: Incorporate the eggs one at a time into the butter mixture, mixing thoroughly after each addition to ensure a smooth batter.
- Stir in vanilla: Add the vanilla extract to the wet mixture to infuse flavor.
- Combine wet and dry: Gradually add the dry flour mixture to the wet ingredients, alternating with the milk, beginning and ending with the dry ingredients; mix gently to avoid overmixing and keep the batter light.
- Prepare baking pans: Spoon the batter into Twinkie molds or greased cupcake pans, filling each about two-thirds full to allow room for rising.
- Bake: Place the molds in the oven and bake for 20-25 minutes, or until the cakes turn golden brown and a toothpick inserted in the center comes out clean, indicating they’re cooked through.
- Cool cakes: Remove cakes from the oven and let them cool completely in the pans before removing to avoid breakage and allow the filling process.
- Make cream filling: Beat together powdered sugar and softened butter until smooth. Add vanilla extract and milk slowly, beating until the filling reaches a smooth, pipeable consistency.
- Fill the cakes: Using a piping bag, carefully inject the cream filling into the cooled cakes to create the signature filled center.
- Serve and enjoy: Your homemade Twinkies are now ready to be enjoyed fresh or stored for later indulgence.
Notes
- Ensure butter is softened to room temperature for easy creaming with sugar.
- Carefully alternate adding dry ingredients and milk to avoid overmixing which can toughen the cake.
- If Twinkie molds are unavailable, use cupcake pans as a simple alternative.
- Adjust milk in the cream filling to achieve the desired pipeability and sweetness level.
- Allow cakes to cool fully before filling to prevent melting or collapsing of the cream.
- Store filled Twinkies in an airtight container in the refrigerator for up to 3 days.
- This recipe can be doubled for larger batches or parties.

