

“`html
If you have a sweet tooth and a soft spot for nostalgic Southern comfort desserts, you are going to absolutely adore the Magnolia Bakery Banana Pudding Recipe. This legendary dessert is a luscious harmony of creamy vanilla pudding, fresh bananas, crisp Nilla wafers, and cloud-like whipped cream, layered to create a dreamy treat that melts in your mouth. What makes this recipe so special is its perfect balance of textures and flavors — from the smoothness of the pudding to the slight crunch of the wafers and the freshness of the fruit. Whether you’re making it for a family gathering, a potluck, or just because you deserve a little indulgence, this recipe will make you feel like you’ve stepped right into Magnolia Bakery itself.
Ingredients You’ll Need
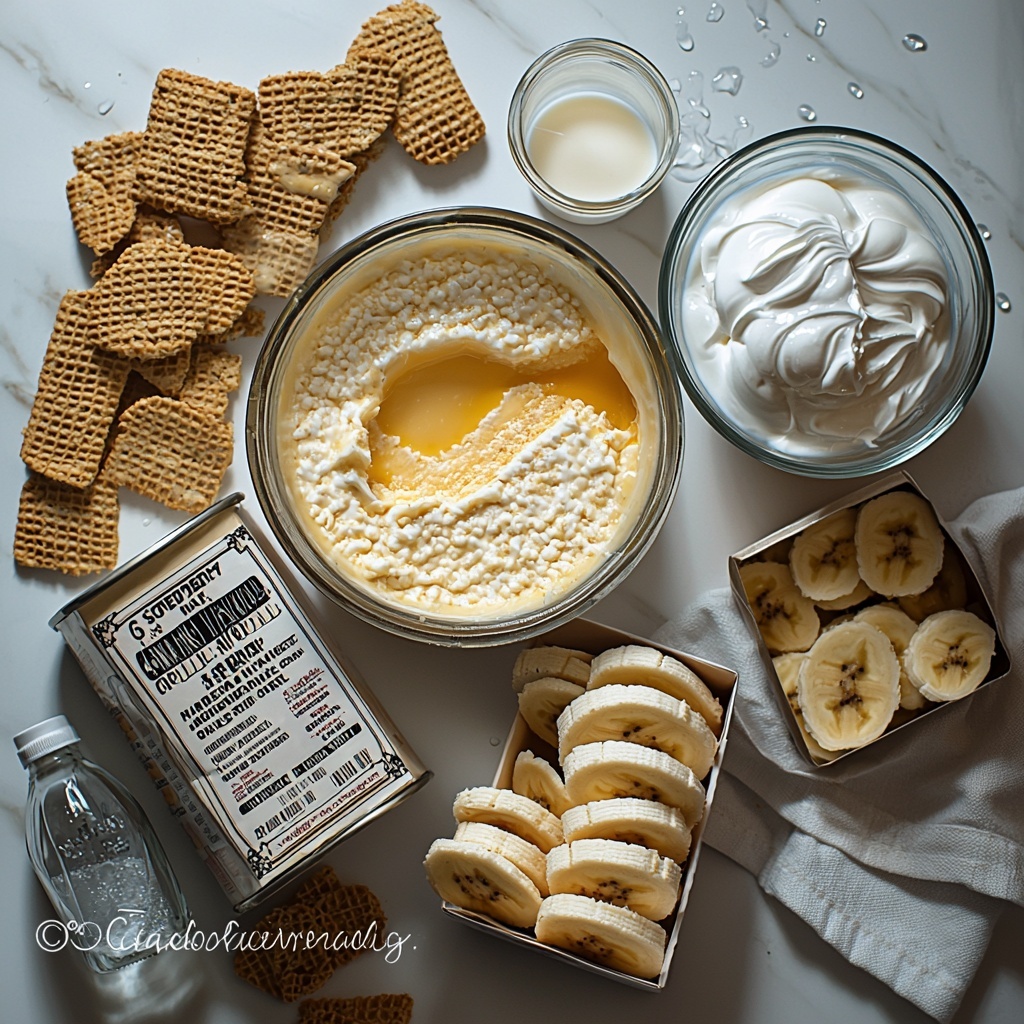
This Magnolia Bakery Banana Pudding Recipe is surprisingly simple but every ingredient plays a vital role in bringing the dessert to life. From the sweetened condensed milk that adds richness, to the fresh bananas that bring natural sweetness and softness, each component is crucial for that iconic taste and texture.
- Sweetened condensed milk: Adds creamy sweetness and richness that makes the pudding decadent.
- Very cold milk: Ensures the pudding sets properly for a silky smooth texture.
- Very cold water: Helps lighten the pudding mixture to keep it from getting too dense.
- Instant vanilla pudding mix: Gives that unmistakable vanilla flavor and creamy base for the dessert.
- Nilla Wafers (11-12 oz): Brings a buttery crunch that contrasts wonderfully with the soft pudding and bananas; save a few for garnish.
- Heavy whipping cream: Whipped to stiff peaks, it adds airy lightness and richness to the pudding mixture.
- Clear vanilla flavoring: Enhances the vanilla notes without altering the color or texture.
- Bananas (just barely ripe, sliced): Fresh and sweet, they add natural fruitiness while balancing the creamy layers.
How to Make Magnolia Bakery Banana Pudding Recipe
Step 1: Combine the Milk and Condensed Milk
Start by mixing the sweetened condensed milk with the cold milk and cold water. Using a handheld or stand mixer on low to medium speed for about 1 to 2 minutes helps blend these together perfectly, creating the base that’s rich and smooth. This step is important because the cold liquids help the pudding set nicely later on.
Step 2: Add Instant Pudding Mix
Next, add your instant vanilla pudding to the mixture and beat on medium speed for 2 minutes. You’ll notice the pudding starting to thicken, signaling that it’s developing the silky texture that’s key to this recipe. This step really builds the body of the pudding.
Step 3: Chill the Pudding
Cover your pudding and refrigerate it for at least 4 hours, or ideally overnight. This time in the fridge lets the pudding fully set and develop that melt-in-your-mouth creaminess everyone loves about the Magnolia Bakery Banana Pudding Recipe. Patience here pays off big time.
Step 4: Whip the Cream
While the pudding chills, whip the heavy cream with the clear vanilla flavoring until stiff peaks form. The whipped cream adds an airy, velvety contrast that transforms the pudding into something truly special, giving it that signature lightness and flavor boost.
Step 5: Fold Whipped Cream into Pudding
Once your pudding is fully set, gently fold the whipped cream into it until evenly combined without streaks. This folding technique keeps the mixture airy and luscious, ensuring every bite is smooth and fluffy rather than heavy.
Step 6: Assemble the Layers
Grab a large serving bowl, trifle dish, or individual mini trifles to assemble your banana pudding. Start with a layer of about one-third of the Nilla Wafers at the bottom—roughly 30 wafers. This crispy base brings that signature texture critical to the experience.
Step 7: Add Banana Slices
Evenly layer about 1 ½ cups of your freshly sliced bananas over the wafers. Using barely ripe bananas ensures they are sweet but still firm so they hold up well in the pudding.
Step 8: Spoon On the Pudding Mixture
Top the bananas with one-third of the pudding mixture. This creamy layer melds wonderfully with the crunch and fruit.
Step 9: Repeat the Layers
Repeat the layers two more times — wafers, bananas, and pudding — for a total of three layers each. This multi-layer structure makes every bite a perfect combination of all the ingredients.
Step 10: Add the Crunchy Topping
Finally, crush your reserved 5-6 wafers and sprinkle them along with any remaining crumbs on top of your pudding. This last crunchy touch is classic Magnolia Bakery Banana Pudding Recipe style and gives a beautiful finish.
Step 11: Chill Until Serving
Cover the assembled pudding and keep it refrigerated until it’s time to serve. Chilling not only keeps it fresh but helps the flavors meld beautifully.
How to Serve Magnolia Bakery Banana Pudding Recipe
Garnishes
For a charming finishing touch, sprinkle crushed Nilla wafer crumbs on top, just like the original Magnolia Bakery Banana Pudding Recipe. If you want to get creative, garnish with a few fresh banana slices or even a sprig of mint for color and freshness.
Side Dishes
This banana pudding shines as a standalone dessert, but it also pairs wonderfully with light, summery dishes such as fresh fruit salads, grilled chicken, or even a scoop of vanilla ice cream to accentuate its creamy qualities without overwhelming your taste buds.
Creative Ways to Present
Instead of one large bowl, try making individual mini trifles in glass cups to showcase the beautiful layers. This presentation style is perfect for parties or gatherings and lets everyone enjoy their own perfectly portioned Magnolia Bakery Banana Pudding Recipe experience.
Make Ahead and Storage
Storing Leftovers
Leftover banana pudding keeps wonderfully in the fridge for up to 3 days if covered tightly. Because the bananas can brown over time, giving the pudding a fresh stir before serving helps refresh the texture and flavor.
Freezing
While you can freeze the pudding, it’s best to do so without the bananas layered inside, as they don’t thaw well. Freeze the pudding mixture and wafers separately, then assemble after thawing for best results.
Reheating
This dessert is meant to be served chilled and should not be reheated. Instead, allow refrigerated leftovers to come to a slightly less cold temperature before serving if you prefer them less chilled.
FAQs
Can I use fresh homemade vanilla pudding instead of instant mix?
While fresh homemade pudding sounds delicious, the instant vanilla pudding mix provides the ideal set and consistency that’s key to this traditional Magnolia Bakery Banana Pudding Recipe. Homemade versions may be too loose or require thickening agents.
What kind of bananas should I use?
Just barely ripe bananas are best. They’re sweet without being mushy, so they hold their shape nicely in the layers and add freshness to the pudding.
Can I substitute the Nilla Wafers?
For the authentic texture and flavor, Nilla Wafers are recommended. However, you can try other buttery, vanilla-flavored cookies, but the signature crunch might be slightly different.
How long does the pudding need to chill?
A minimum of 4 hours is needed for the pudding to set, but overnight chilling is ideal for the creamiest, most flavorful result.
Is this recipe suitable for a crowd?
Absolutely. With 16 servings, the Magnolia Bakery Banana Pudding Recipe is perfect for parties, potlucks, or family gatherings. It’s easy to scale up if needed, too!
Final Thoughts
If you’ve been searching for that perfect banana pudding that’s creamy, crunchy, and simply unforgettable, the Magnolia Bakery Banana Pudding Recipe is your answer. Each bite is a little celebration of sweet vanilla goodness and fresh fruit that feels like a warm hug. Trust me, once you make this luscious dessert, it will quickly become a cherished favorite to bring out for special occasions or whenever you want a slice of happiness. So grab your mixing bowl and let’s get pudding!
“`
Print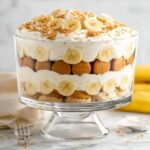
Magnolia Bakery Banana Pudding Recipe
- Prep Time: 20 minutes
- Cook Time: 0 minutes
- Total Time: 4 hours 20 minutes
- Yield: 16 servings
- Category: Dessert
- Method: No-Cook
- Cuisine: American
Description
Magnolia Bakery Banana Pudding is a classic Southern dessert featuring layers of creamy homemade vanilla pudding, freshly sliced ripe bananas, and crunchy Nilla Wafers, all folded together with whipped cream for a light, airy texture. Perfect for gatherings or as a refreshing treat, this pudding is chilled to perfection, allowing the flavors to meld into a deliciously smooth and comforting dessert.
Ingredients
Pudding Mixture
- 1 14-oz can sweetened condensed milk
- 1 cup very cold milk
- ½ cup very cold water
- 1 3.4 oz box instant vanilla pudding mix
Other Ingredients
- 1 11-12 oz box of Nilla Wafers (reserve 5–6 wafers plus crumbs from package)
- 3 cups heavy whipping cream
- ½ teaspoon clear vanilla flavoring
- 5 just barely ripe bananas, sliced
Instructions
- Mix liquids: Using a handheld or stand mixer, combine the sweetened condensed milk, very cold water, and very cold milk. Mix on low to medium speed for 1-2 minutes until well combined.
- Add pudding mix: Add the instant vanilla pudding mix to the liquid mixture and beat on medium speed for 2 minutes. The pudding mixture should begin to thicken.
- Chill pudding: Cover the pudding mixture and refrigerate for 4 hours or overnight to allow it to fully set and thicken.
- Whip cream: Using a mixer, combine the heavy whipping cream and clear vanilla flavoring. Beat until stiff peaks form.
- Fold cream into pudding: Gently fold the whipped cream into the chilled and fully set pudding mixture until completely combined and uniform in color with no streaks.
- Prepare serving dish: Choose a large serving bowl, trifle dish, compote dish, or individual mini trifle dishes for layering. Line the bottom with about one-third of the vanilla wafers (approximately 30 wafers).
- Layer bananas: Evenly distribute half of the sliced bananas (about 1 ½ cups) on top of the wafer layer.
- Add pudding layer: Spread one-third of the pudding and whipped cream mixture evenly over the bananas.
- Repeat layers: Repeat layering wafers, bananas, and pudding mixture twice more to create three full layers.
- Crush reserved wafers: Crush the reserved 5-6 whole wafers to create small crumbs for topping.
- Finish and chill: Sprinkle the crushed wafers and any remaining crumbs evenly over the top layer of pudding. Cover the dish and refrigerate until ready to serve.
Notes
- For best results, chill the pudding mixture for at least 4 hours or overnight to ensure it fully sets.
- Use just barely ripe bananas to maintain texture and avoid mushiness.
- You can prepare this dessert a day in advance; the flavors improve as it sits.
- If you prefer a lighter dessert, reduce the amount of heavy cream slightly or substitute with whipped topping.
- Ensure the cold milk and water are very cold before mixing to help the pudding set properly.
- Optional: garnish with fresh banana slices on top before serving for added visual appeal.

