
“`html
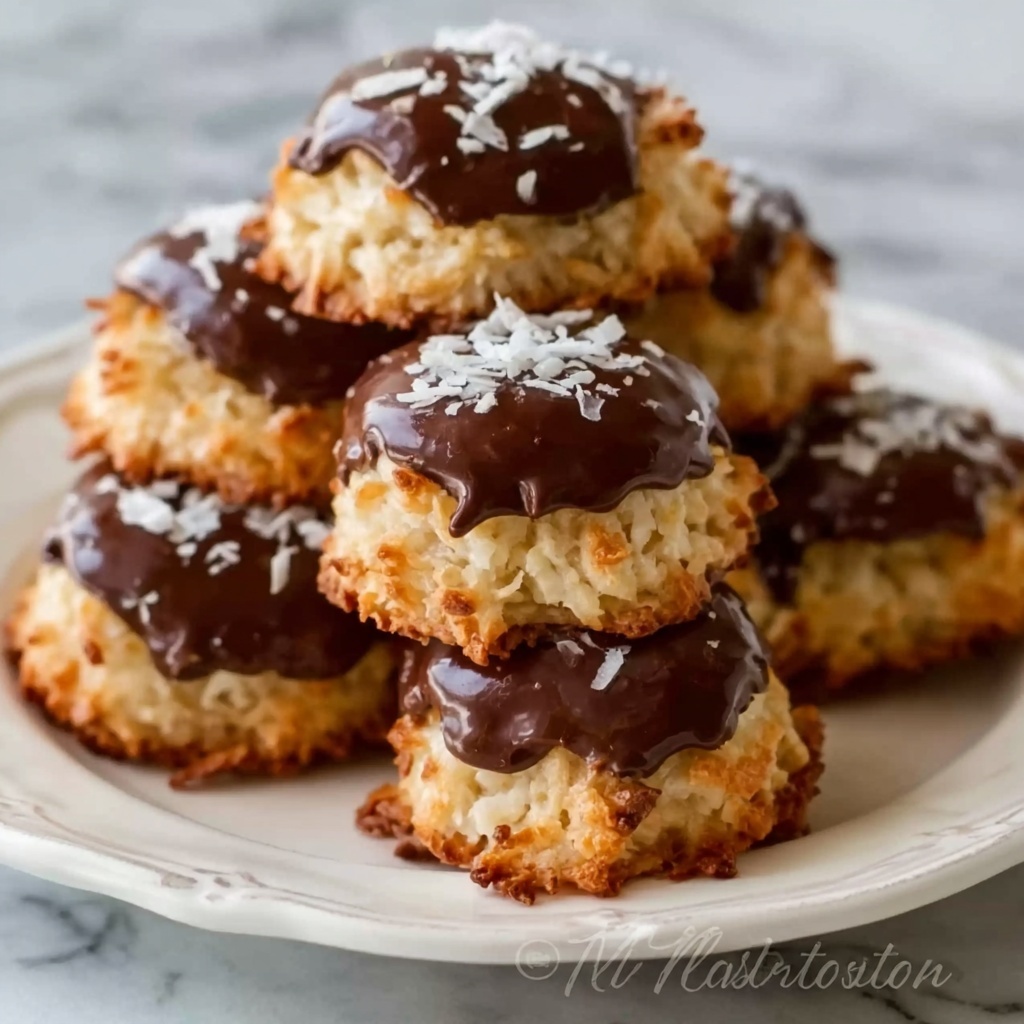
If you have a sweet tooth and love that perfect blend of caramel, coconut, and chocolate, you’re going to fall head over heels for this No-Bake Samoa Cookies Recipe. These little gems capture the essence of the classic Samoa cookie but without turning on your oven. They come together with toasty shredded coconut wrapped in a luscious caramel coating, all dipped in silky chocolate and finished with a sprinkle of coconut. Whether you’re craving something nostalgic or need an impressive treat in under an hour, these no-bake delights will quickly become your go-to favorite.
Ingredients You’ll Need
Getting the ingredients right is key to nailing the texture and flavor of your No-Bake Samoa Cookies Recipe. Each component plays a crucial role, from the toasted coconut’s crunch to the rich caramel’s melt-in-your-mouth magic and the smooth chocolate that ties it all together.
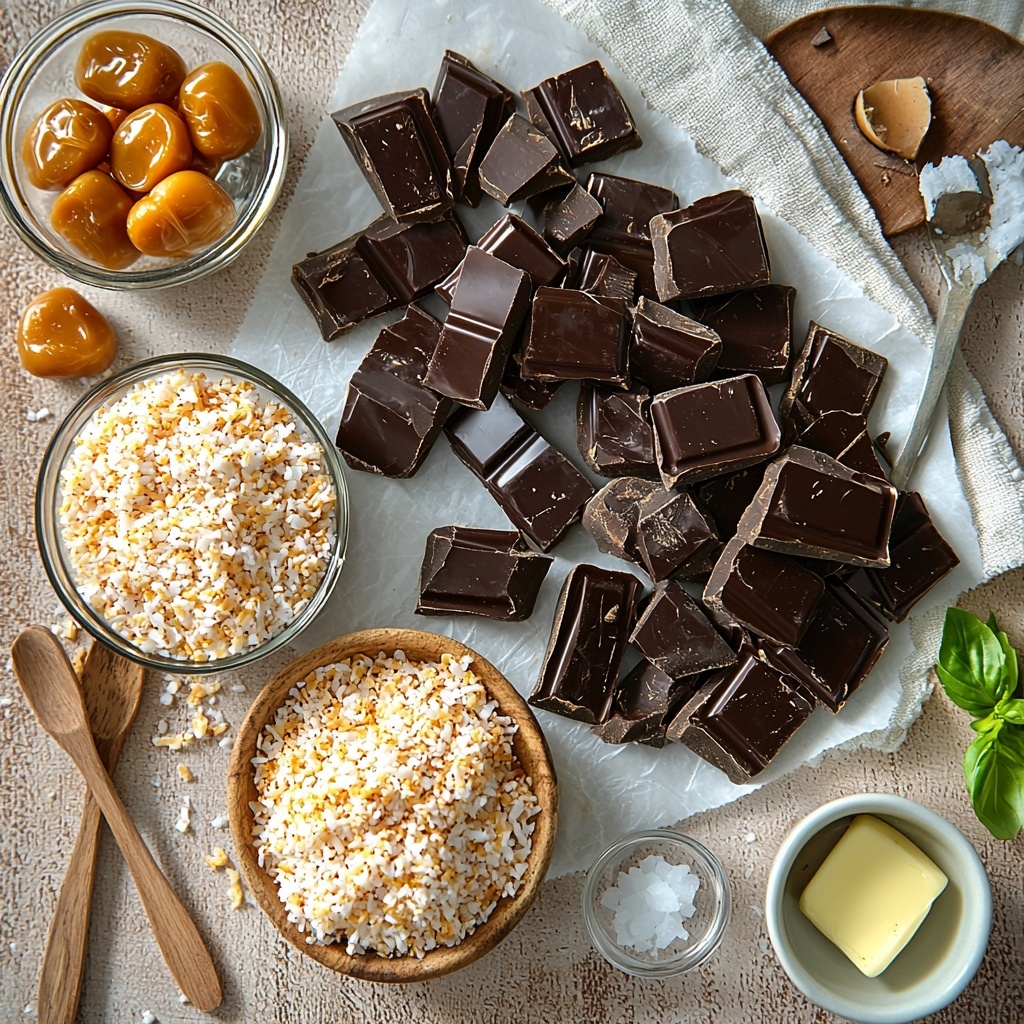
- 3 cups sweetened shredded coconut, divided: Provides the chewy, toasty coconut base essential for authentic flavor and texture.
- 11 ounces soft caramel candies, unwrapped: Melts down into a gooey, luscious coating that binds the coconut beautifully.
- 3 tablespoons heavy cream: Helps create a creamy, smooth caramel sauce with just the right consistency.
- 2 tablespoons unsalted butter: Adds richness and a velvety finish to the caramel layer.
- 1 teaspoon vanilla extract: Lifts the caramel with a warm, aromatic note you won’t want to skip.
- 1/4 teaspoon fine sea salt: Balances the sweetness and enhances all the flavors.
- 8 ounces dark or semisweet chocolate, finely chopped: For dipping and drizzling, creating the perfect bittersweet contrast.
- 2 teaspoons coconut oil or neutral oil: Ensures your melted chocolate is ultra-smooth and shiny when coating the cookies.
How to Make No-Bake Samoa Cookies Recipe
Step 1: Prepare for Toasting and Topping
Start by lining a large baking sheet with parchment paper or a silicone mat to prevent sticking—and trust me, you don’t want to skip this! Then set aside a small bowl with 1/4 cup of the shredded coconut; this is your secret weapon for garnishing the cookies at the end and adding an extra layer of coconut goodness.
Step 2: Toast the Coconut
Place the remaining 2 3/4 cups of coconut into a large dry skillet over medium heat. Toast it while stirring frequently for about 4 to 6 minutes until it turns a lovely golden-brown shade and fills your kitchen with that irresistible nutty aroma. Transfer it immediately to a large mixing bowl to cool slightly—this step unlocks the brightest, crunchiest coconut flavor that’s essential to the vibe of this recipe.
Step 3: Make the Caramel Sauce
In a small saucepan over low heat, combine those unwrapped soft caramel candies with heavy cream and butter. Stir this trio constantly for 3 to 5 minutes until everything melts into a glossy, velvety smooth sauce. Remove from heat and gently stir in the vanilla extract plus the fine sea salt. This luscious caramel is what gives these cookies their signature chewy, sweet-salty perfection.
Step 4: Mix Caramel With Coconut
Pour that warm caramel over the toasted coconut in your mixing bowl. Using a sturdy spatula, fold everything together until every strand is coated in sticky, sweet caramel. Let the mix cool for 3 to 5 minutes until it’s just cool enough to handle but still pliable enough to shape. This resting period is the key to manageable, no-mess cookie shaping.
Step 5: Shape the Cookies
Use a 1 1/2-tablespoon cookie scoop or measuring spoon to form packed mounds of your caramel-coconut mixture onto the lined baking sheet, creating 24 evenly sized cookies. Wet your fingers slightly and press down each mound to compact and secure their shape—this prevents crumbling and keeps your cookies perfectly formed.
Step 6: Chill for Firmness
Pop the tray in the refrigerator for 20 to 30 minutes. This chilling step lets your cookies set up nicely so they don’t fall apart when you dip them in chocolate. Patience here pays off with gorgeous, sturdy cookies that look as amazing as they taste.
Step 7: Melt the Chocolate
Place the chopped chocolate and coconut oil in a microwave-safe bowl. Microwave in short bursts of 20 to 30 seconds, stirring between each, until the chocolate is totally melted and silky smooth. The coconut oil gives the chocolate a beautiful shine and smooth texture, making your cookies look bakery-perfect.
Step 8: Dip and Drizzle
Work with one chilled cookie at a time. Dip the bottom into the melted chocolate, allowing any excess to drip back into the bowl before returning it to the lined tray. Once all cookie bottoms are dipped, drizzle the remaining chocolate over the tops in a decorative pattern and immediately sprinkle them with that reserved coconut. This finishing touch adds texture, visual appeal, and an extra coconut punch.
Step 9: Final Chill and Set
Refrigerate the tray again for 10 to 15 minutes until the chocolate sets completely. Your No-Bake Samoa Cookies are best served slightly chilled or at cool room temperature, so they balance chewy caramel and crisp coconut with that smooth chocolate finish perfectly.
How to Serve No-Bake Samoa Cookies Recipe
Garnishes
Sprinkle extra toasted coconut, a light dusting of sea salt, or even some finely chopped toasted pecans or macadamia nuts on top. These accents elevate the cookies with crunch and subtle flavor boosts.
Side Dishes
Pair these cookies with a hot cup of coffee or a cold glass of milk to balance their sweetness. They also shine alongside fresh berries or a scoop of vanilla ice cream, making for an indulgent dessert spread.
Creative Ways to Present
Serve the cookies on a rustic wooden board or elegant cream-colored platter surrounded by fresh flowers or tropical leaves. Wrapping a few in parchment paper tied with twine makes charming handmade gifts that anyone would be thrilled to receive.
Make Ahead and Storage
Storing Leftovers
Keep your No-Bake Samoa Cookies refrigerated in an airtight container to maintain their texture and flavor for up to 1 week. This way, every bite stays just as delicious as when you first made them.
Freezing
You can freeze these cookies by placing them in a single layer on a parchment-lined tray, freezing until firm, then transferring them to a sealed container or freezer bag. They’ll stay great for up to 3 months. Thaw in the refrigerator before serving to keep that chewy caramel integrity intact.
Reheating
These cookies are perfect enjoyed cold or at room temperature, so reheating isn’t necessary. If you prefer them softer, let them sit at room temp for 20 to 30 minutes before digging in.
FAQs
Can I use unsweetened coconut instead of sweetened shredded coconut?
While you can use unsweetened shredded coconut, it will make the cookies less sweet. You might want to add a little extra caramel or sugar if you prefer a sweeter treat, but the classic version shines brightest with sweetened coconut.
Is there a substitute for the caramel candies?
If caramel candies aren’t handy, you can try making your own caramel sauce from scratch using sugar, butter, and cream. However, using soft caramel candies simplifies the process and ensures consistent texture and flavor.
Can I use milk chocolate instead of dark or semisweet chocolate?
Absolutely! Milk chocolate will add a sweeter, creamier touch to the cookies. Just be mindful that it may make the overall taste sweeter, so adjust other ingredients if needed.
What if I don’t have coconut oil for melting chocolate?
If you don’t have coconut oil, a neutral oil like vegetable or canola oil works just as well to smooth and shine the chocolate coating. Just use it sparingly to avoid thinning the chocolate too much.
Can these cookies be made gluten-free?
Yes! The ingredients in this No-Bake Samoa Cookies Recipe are naturally gluten-free, but always double-check your caramel candies and any other packaged items for hidden gluten to be safe.
Final Thoughts
This No-Bake Samoa Cookies Recipe is truly a crowd-pleaser, offering all the nostalgic joy of your favorite cookie with far less fuss and time. Once you’ve tasted how perfectly chewy, chocolatey, and coconutty these treats are, they’ll become a staple in your dessert rotation. So go ahead—gather your ingredients, whip up a batch, and enjoy every delicious bite!
“`
Print
No-Bake Samoa Cookies Recipe
- Prep Time: 15 minutes
- Cook Time: 10 minutes
- Total Time: 45 minutes
- Yield: 24 cookies
- Category: Dessert
- Method: No-Cook
- Cuisine: American
Description
No-Bake Samoa Cookies are a delightful treat inspired by the classic Girl Scout cookie. These chewy coconut and caramel cookies are coated in rich dark chocolate and finished with toasted coconut for a perfect balance of sweetness and texture. Ready in under an hour without the need for baking, they make a quick and impressive dessert or snack.
Ingredients
Coconut:
- 3 cups sweetened shredded coconut, divided
Caramel Mixture:
- 11 ounces soft caramel candies, unwrapped
- 3 tablespoons heavy cream
- 2 tablespoons unsalted butter
- 1 teaspoon vanilla extract
- 1/4 teaspoon fine sea salt
Chocolate Coating:
- 8 ounces dark or semisweet chocolate, finely chopped
- 2 teaspoons coconut oil or neutral oil
Instructions
- Prepare the baking sheet: Line a large baking sheet with parchment paper or a silicone mat and set aside. Measure 3 cups sweetened shredded coconut and reserve 1/4 cup in a small bowl for topping later.
- Toast the coconut: Place the remaining 2 3/4 cups coconut in a large dry skillet over medium heat. Toast, stirring frequently, for 4–6 minutes until the coconut is lightly golden and fragrant. Transfer to a large mixing bowl and allow to cool slightly.
- Melt the caramel mixture: In a small saucepan over low heat, combine the soft caramel candies, heavy cream, and unsalted butter. Stir constantly for 3–5 minutes until fully melted and smooth. Remove from heat and stir in vanilla extract and sea salt.
- Combine caramel and coconut: Pour the warm caramel mixture over the toasted coconut. Stir and fold with a sturdy spatula until every strand is evenly coated and the mixture is thick and sticky. Let cool for 3–5 minutes until pliable but cool enough to handle.
- Scoop and shape cookies: Using a 1 1/2-tablespoon cookie scoop or measuring spoon, form packed mounds of the mixture onto the prepared baking sheet, creating 24 cookies. Slightly dampen your fingers and press each mound to compact and hold together well.
- Chill the cookies: Refrigerate the baking sheet for 20–30 minutes until the cookies are firm and set, which helps maintain their shape during chocolate dipping.
- Melt the chocolate: In a microwave-safe bowl, combine chopped chocolate and coconut oil. Microwave in 20–30 second increments, stirring between each, until chocolate is completely melted and smooth.
- Dip and decorate: Dip the bottom of each chilled cookie into the melted chocolate, letting excess drip off, then place back on the parchment-lined tray. Drizzle remaining chocolate over the tops and immediately sprinkle with the reserved 1/4 cup coconut.
- Final chilling: Refrigerate the cookies for another 10–15 minutes until the chocolate is fully set. Serve slightly chilled or at cool room temperature. Store any leftovers in an airtight container in the refrigerator for up to one week.
Notes
- Use a cookie scoop for even-sized cookies to ensure uniform chilling and coating.
- Adjust sweetness by choosing dark or semisweet chocolate according to your preference.
- Keep cookies refrigerated as they contain soft caramel and chocolate coatings sensitive to heat.
- For a vegan version, substitute caramel candies with a vegan caramel alternative and use dairy-free butter and cream substitutes.
- Make sure the coconut is toasted lightly without burning for maximum flavor.


