
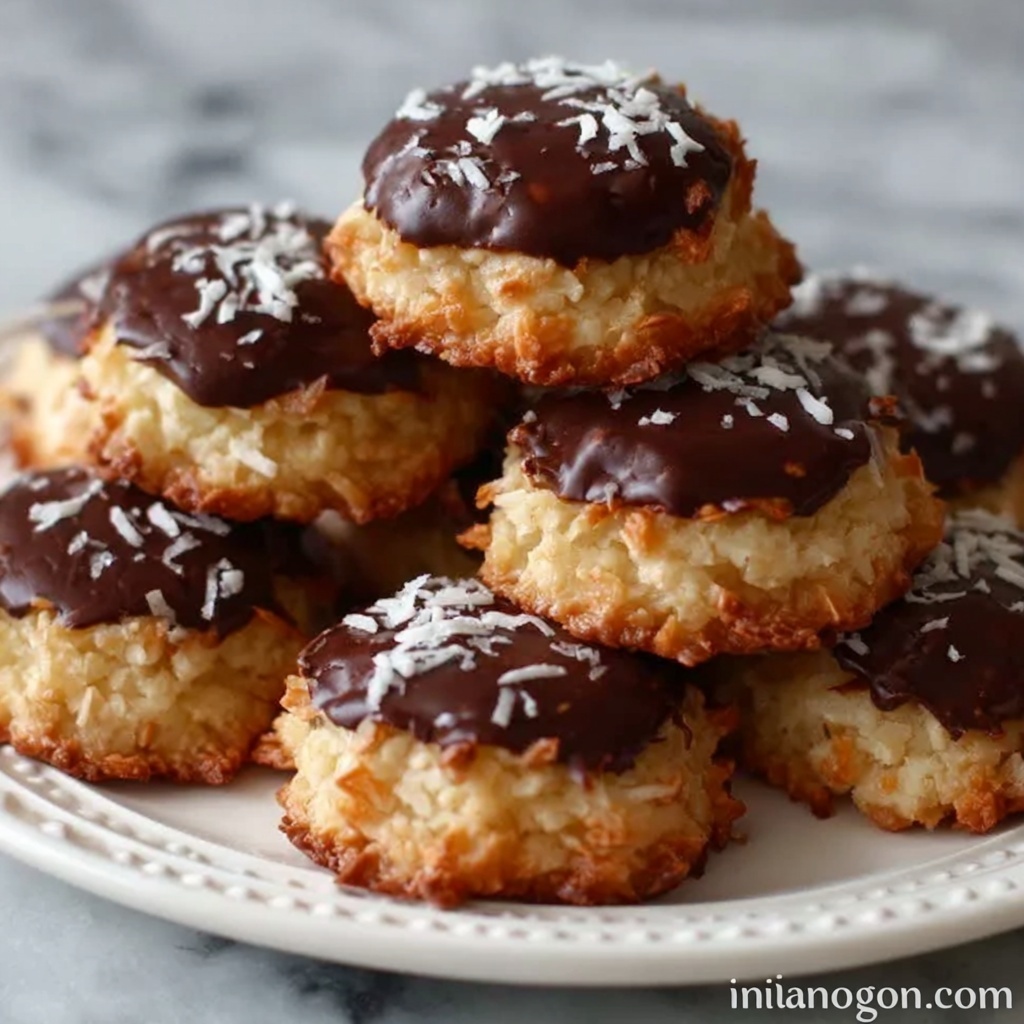
If you’re anything like me, you adore cookies that are both decadent and convenient to make. That’s why I’m beyond excited to share this gem with you—the No-Bake Samoa Cookies Recipe. It perfectly captures all the irresistible flavors of the beloved Samoa cookie—rich caramel, toasty coconut, and luscious chocolate—without ever needing to heat up your oven. Trust me, these chewy, chocolate-dipped treats will become your new go-to for impressing guests or satisfying your sweet cravings with minimal effort and maximum flavor.
Ingredients You’ll Need
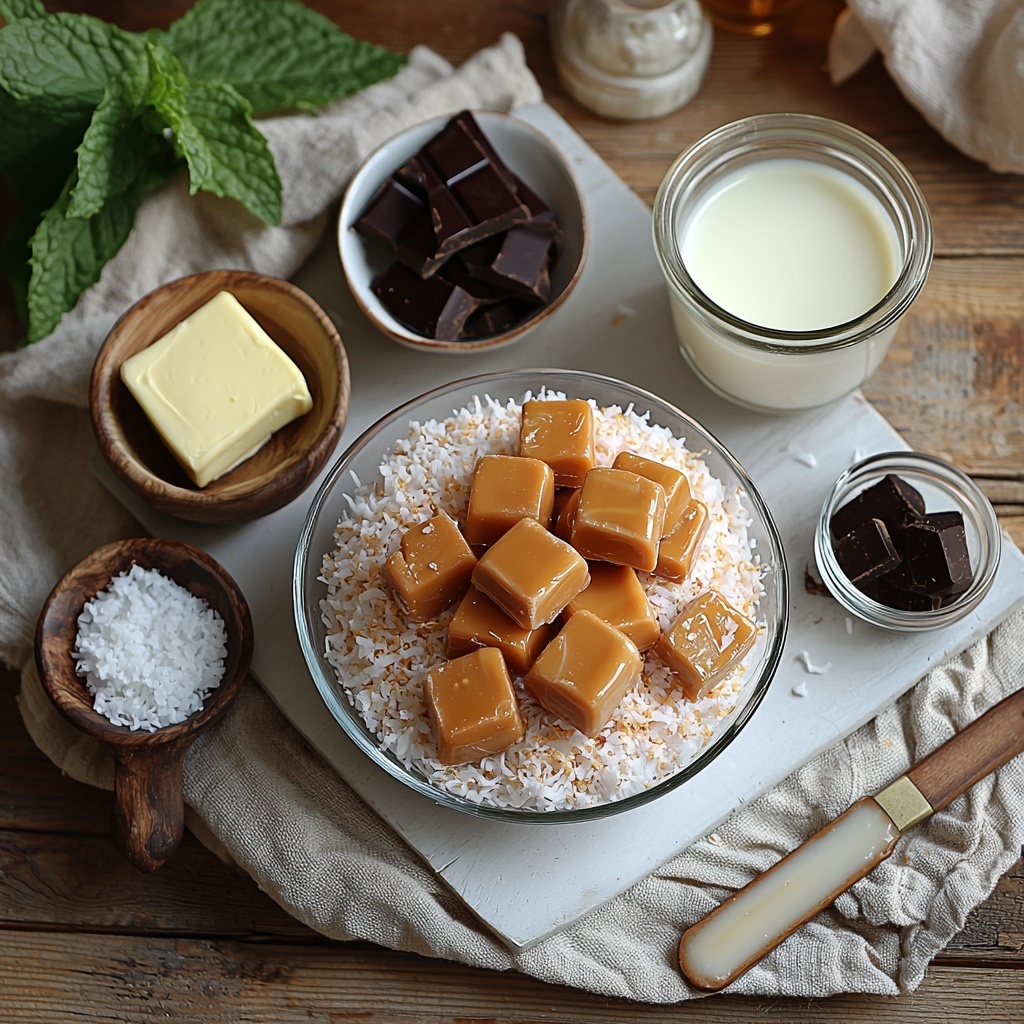
Getting started with the No-Bake Samoa Cookies Recipe is delightfully simple, thanks to straightforward ingredients that each play an essential role. From sweet shredded coconut adding texture and golden color, to silky caramel delivering that melt-in-your-mouth richness, every component works together to build layers of irresistible taste.
- Sweetened shredded coconut (3 cups): Divided for toasting and topping, this brings the signature chewy crunch and tropical aroma.
- Soft caramel candies (11 ounces): The heart of the cookie’s luscious caramel flavor and sticky binding agent.
- Heavy cream (3 tablespoons): Adds creaminess and helps melt the caramel into a smooth sauce.
- Unsalted butter (2 tablespoons): Enriches and softens the caramel mixture for perfect chewiness.
- Vanilla extract (1 teaspoon): Enhances everything with warm, floral notes.
- Fine sea salt (1/4 teaspoon): A pinch balances the sweetness and deepens the flavor complexity.
- Dark or semisweet chocolate (8 ounces), finely chopped: For dipping and drizzling, lending that signature chocolate finish.
- Coconut oil or neutral oil (2 teaspoons): Smooths the melted chocolate to a shiny, irresistible coating.
How to Make No-Bake Samoa Cookies Recipe
Step 1: Prep and Toast the Coconut
Start by lining a large baking sheet with parchment or a silicone mat to keep everything neat. Measure out 3 cups of shredded coconut, reserving a small 1/4 cup to sprinkle on top later—this will give your cookies that final touch of tropical flair. Toast the remaining coconut in a dry skillet over medium heat for 4 to 6 minutes until it’s golden and smelling heavenly. This step brings out that deep, nutty coconut flavor that’s essential for authentic Samoa cookies.
Step 2: Create the Caramel Mixture
Gently melt the caramel candies with heavy cream and butter in a small saucepan over low heat. Stir constantly to promote a smooth, glossy texture without burning. Once fully melted, remove from heat and stir in vanilla and a pinch of sea salt. This caramel sauce is where the magic starts, giving the cookies their signature chewy sweetness with just a hint of saltiness to balance the flavor.
Step 3: Combine Coconut with Caramel
Pour that warm caramel right over your toasted coconut. Using a sturdy spatula, mix everything together until each shredded coconut strand is luxuriously coated and sticky. Let the mixture cool just enough to handle, so it’s pliable for shaping but not too hot—it’s like peanut butter meets caramel in a cozy, chewy dance.
Step 4: Form the Cookies
Grab a 1 1/2-tablespoon scoop or measuring spoon to portion out mounds of the coconut caramel mixture onto your prepared baking sheet. Use slightly damp fingers to gently press each mound, ensuring they’re compact enough to hold their shape without crumbling. This hands-on step is fun, almost like making little edible treasures.
Step 5: Chill Until Firm
Pop the tray into the refrigerator for 20 to 30 minutes to let the cookies firm up. This chilling time is crucial so the cookies don’t fall apart when dipped in chocolate later. It’s the perfect pause to get excited for the next step!
Step 6: Melt the Chocolate
While your cookies chill, melt the chopped chocolate with coconut or neutral oil in short bursts in the microwave, stirring in between. This method keeps the chocolate from seizing and gives you a smooth, shiny coating that will make your cookies look professionally finished.
Step 7: Dip and Decorate
Carefully dip the bottom of each chilled cookie into the melted chocolate and let excess drip off before placing it back on the parchment-lined sheet. Drizzle the remaining chocolate over the tops and immediately sprinkle your reserved coconut for an elegant final touch. This is when your cookies turn into showstoppers.
Step 8: Final Chill and Set
Refrigerate the whole batch for another 10 to 15 minutes until the chocolate is fully set. Serve these gems slightly chilled or at cool room temperature, and watch as everyone falls in love with their chewy, chocolatey, coconutty goodness.
How to Serve No-Bake Samoa Cookies Recipe
Garnishes
Sprinkling toasted coconut on top gives a beautiful texture contrast and that visual hint of sweetness before you even take a bite. You can also add a tiny pinch of flaky sea salt atop the chocolate drizzle to amplify the flavors if you love a salty-sweet combo.
Side Dishes
Pair these cookies with a steaming cup of coffee or chai tea for a comforting afternoon treat. They also make a delightful accompaniment to vanilla bean ice cream, creating an impromptu dessert plate that’s both easy and elegant.
Creative Ways to Present
Arrange your No-Bake Samoa Cookies on a pretty platter lined with banana leaves or a vibrant napkin for a tropical vibe. You can also individually wrap them in clear cellophane tied with a ribbon to give as charming homemade gifts.
Make Ahead and Storage
Storing Leftovers
Keep your cookies fresh by storing them in an airtight container in the refrigerator. They’ll stay chewy and delicious for up to one week, perfect for having on hand for sudden cravings or last-minute guests.
Freezing
If you want to make a big batch ahead, freeze the cookies in a sealed container separated by parchment paper. When you’re ready to enjoy, just thaw them in the fridge overnight to keep their texture pristine.
Reheating
Since these are no-bake cookies, reheating is really about enjoying them at your preferred temperature. Serve slightly chilled or bring them to room temperature for softer caramel goodness—just avoid heat as it may soften the chocolate too much.
FAQs
Can I use unsweetened coconut instead of sweetened?
Yes, but the cookies might end up less sweet, so you might want to add a bit more caramel or a small amount of sugar to balance the flavor.
What if I don’t have coconut oil for melting chocolate?
You can substitute with any neutral cooking oil like vegetable or canola oil to achieve the same smooth, glossy finish.
Can I make these cookies gluten-free?
Absolutely! This No-Bake Samoa Cookies Recipe uses naturally gluten-free ingredients, just ensure your caramel candies are certified gluten-free.
How long do these cookies last at room temperature?
Because of the caramel and chocolate, it’s best to keep them refrigerated. At room temperature, they may become too soft after a day or two.
Can I add nuts or other mix-ins to this recipe?
Sure! Chopped macadamia nuts or almonds would add a lovely crunch, but be mindful to keep the mixture balanced so the cookies hold together well.
Final Thoughts
There’s something so satisfying about biting into a cookie that tastes indulgent yet is simple to make—trust me, this No-Bake Samoa Cookies Recipe hits that sweet spot perfectly. From the toasty coconut to the gooey caramel and rich chocolate, it’s a flavor trifecta that’s sure to brighten any day. So grab your ingredients and get ready to whip up these charming cookies that will have everyone asking for your secret!
Print
No-Bake Samoa Cookies Recipe
- Prep Time: 15 minutes
- Cook Time: 10 minutes
- Total Time: 45 minutes
- Yield: 24 cookies
- Category: Dessert
- Method: No-Cook
- Cuisine: American
- Diet: Vegetarian
Description
These No-Bake Samoa Cookies are a delightful treat combining toasted sweetened shredded coconut, rich caramel, and smooth dark chocolate. With a perfect balance of chewy caramel and crunchy coconut, all coated with luscious chocolate and topped with extra coconut, these cookies offer an irresistible homemade twist on the classic Samoa candy bar without requiring any baking.
Ingredients
For the Coconut Base
- 3 cups sweetened shredded coconut, divided
For the Caramel Mixture
- 11 ounces soft caramel candies, unwrapped
- 3 tablespoons heavy cream
- 2 tablespoons unsalted butter
- 1 teaspoon vanilla extract
- 1/4 teaspoon fine sea salt
For the Chocolate Coating
- 8 ounces dark or semisweet chocolate, finely chopped
- 2 teaspoons coconut oil or neutral oil
Instructions
- Prepare Baking Sheet: Line a large baking sheet with parchment paper or a silicone mat and set aside. Measure 3 cups sweetened shredded coconut, reserving 1/4 cup in a small bowl for topping the cookies later.
- Toast Coconut: Place the remaining 2 3/4 cups shredded coconut in a large dry skillet over medium heat. Toast the coconut while stirring frequently for 4 to 6 minutes until it turns lightly golden and fragrant. Transfer the toasted coconut to a large mixing bowl to cool slightly.
- Melt Caramel Mixture: In a small saucepan over low heat, combine soft caramel candies, heavy cream, and unsalted butter. Stir constantly for 3 to 5 minutes until the caramels fully melt and the mixture becomes smooth and glossy. Remove from heat, then stir in vanilla extract and fine sea salt to enhance flavor.
- Combine Coconut and Caramel: Pour the warm caramel mixture over the toasted coconut in the mixing bowl. Use a sturdy spatula to stir and fold until every strand of coconut is evenly coated and the mixture becomes thick and sticky. Allow the mixture to rest for 3 to 5 minutes until it cools enough to handle but remains pliable.
- Form Cookies: Using a 1 1/2-tablespoon cookie scoop or measuring spoon, scoop packed mounds of the caramel-coconut mixture onto the prepared baking sheet, forming 24 cookie mounds. Slightly dampen your fingers and press each mound to compact it so the cookie holds together well.
- Chill Cookies: Refrigerate the baking sheet for 20 to 30 minutes to let the cookie mounds firm up and set, which helps maintain their shape during chocolate dipping.
- Melt Chocolate: Place chopped chocolate and coconut oil in a microwave-safe bowl. Microwave in 20 to 30 second increments, stirring between each burst, until chocolate is completely melted and smooth.
- Dip and Decorate Cookies: Working one chilled cookie at a time, dip the bottom into the melted chocolate, letting excess drip back into the bowl. Return the cookie to the parchment-lined tray. Once all cookies have chocolate-coated bottoms, drizzle the remaining chocolate over the tops, then immediately sprinkle each with the reserved 1/4 cup shredded coconut.
- Set Chocolate and Serve: Refrigerate the baking sheet for another 10 to 15 minutes until the chocolate fully sets. Serve the cookies slightly chilled or at a cool room temperature. Store leftovers in an airtight container in the refrigerator for up to 1 week.
Notes
- To toast coconut evenly, stir constantly to avoid burning and ensure a fragrant, golden color.
- If you prefer a milder chocolate flavor, semisweet chocolate works best; for richer taste, use dark chocolate.
- You can substitute coconut oil with any neutral-flavored oil like vegetable or canola oil for melting chocolate.
- Pressing the cookie mixture firmly and chilling it before dipping helps maintain cookie shape and prevents crumbling.
- These cookies keep well refrigerated for up to one week, and you can also freeze them for longer storage.
