

If you’re looking to bring a little campfire magic into your kitchen, this delightful S’mores Bar Recipe is about to become your new best friend. It perfectly captures all the gooey, crunchy, chocolaty goodness of classic s’mores but in a convenient, shareable bar form that everyone will adore. Whether it’s a casual gathering or a sweet treat after dinner, these bars hit the nostalgia button with every bite. The crunchy graham cracker crust, melting Hershey’s chocolate, and perfectly toasted marshmallows create that unforgettable combination that makes s’mores truly special.
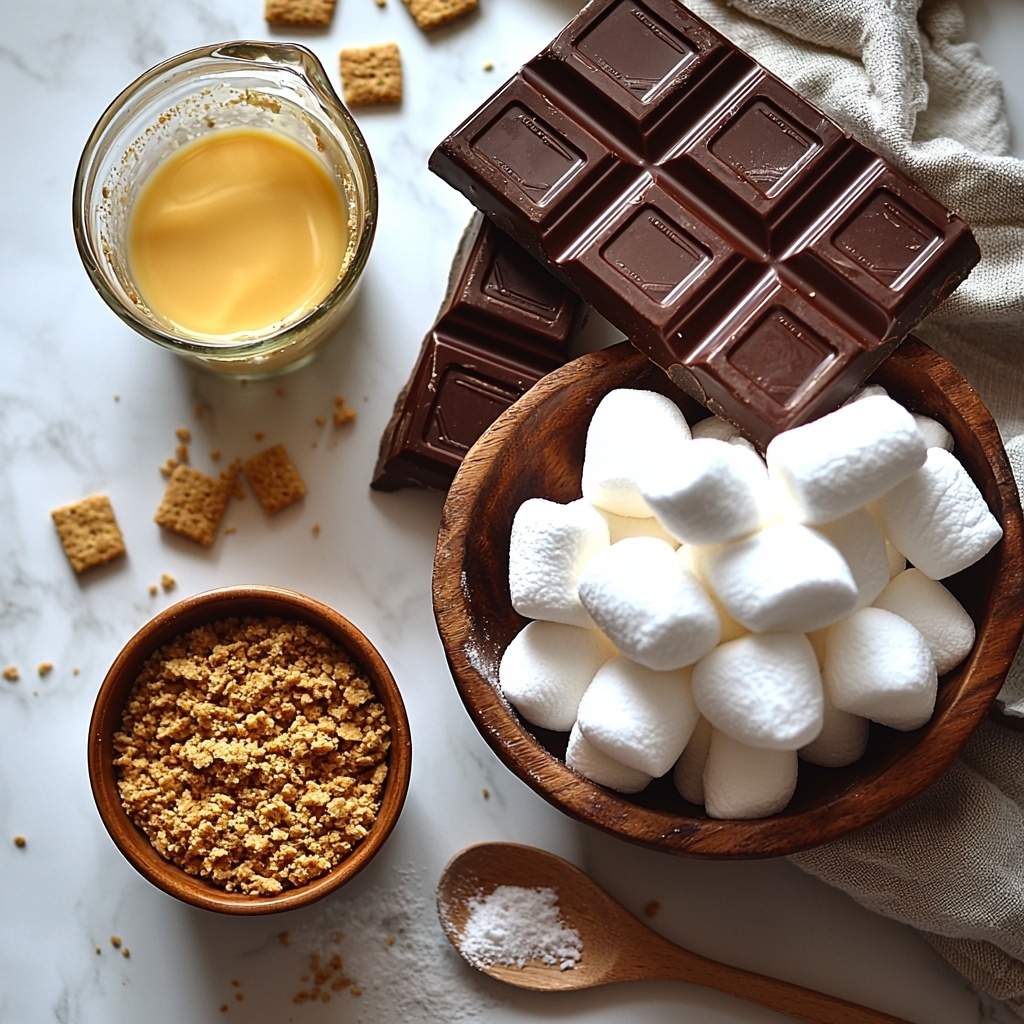
Ingredients You’ll Need
The beauty of this S’mores Bar Recipe lies in its simplicity. Each ingredient plays a vital role—whether it’s the crispy base, the rich chocolate layer, or the fluffy, toasted marshmallows on top that make your taste buds dance.
- 2 Cups graham cracker crumbs: The crunchy foundation for that classic s’mores flavor and texture.
- 8-12 Tablespoons butter (melted): Binds the graham crackers together and adds a buttery richness to the crust.
- 1/2 Cup powdered sugar: Adds just the right touch of sweetness to balance the flavors.
- 4 Hershey Chocolate Bars (4.4 ounces each): The signature chocolate layer that melts into absolute heaven.
- 1 package mini marshmallows: For that gooey, toasty topping that makes s’mores irresistible.
How to Make S’mores Bar Recipe
Step 1: Prep and Preheat
Start by preheating your oven to 350 degrees Fahrenheit. This is the perfect temperature to achieve a beautifully golden crust without overcooking your marshmallows later. Don’t forget to grease a 9×13 inch pan with a non-stick butter spray to prevent sticking—this step saves you a lot of hassle during cleanup.
Step 2: Mix the Crust
In a medium bowl, combine your graham cracker crumbs, powdered sugar, and melted butter. Stir this mixture thoroughly with a spoon to ensure every crumb is coated and ready to stick together firmly once baked. The melted butter really helps the crust pack nicely and gives it that irresistible buttery flavor.
Step 3: Press and Bake the Crust
Transfer your crumb mixture to the prepared pan. Use your fingers or the bottom of a glass to press it evenly across the bottom and slightly up the sides of the pan. You want a solid, packed crust that will hold all those amazing layers above it. Bake it in the oven for about 5 to 8 minutes, just until the edges start to turn a gentle golden brown. Keep in mind the crust will firm up further as it cools.
Step 4: Cool and Add the Chocolate Layer
Once your crust is baked, take it out and let it cool slightly. Then, lay the Hershey’s chocolate bars on top, covering the crust as evenly as possible. Bake again for about 3 minutes until the chocolate just starts to melt and shines. This step creates that smooth, luscious chocolate layer that contrasts perfectly with the crunchy base.
Step 5: Top with Marshmallows and Broil
After the second bake, let your pan cool for a minute or two, then pack the mini marshmallows tightly over the melted chocolate. Turn your oven to the broil setting and place the pan inside. This is the moment where you have to pay close attention because marshmallows toast quickly—and you want them golden, not burnt. Keep a close eye for about 2 minutes until they achieve that perfect toasty brown color. Remove once done and let cool completely. For the best cutting experience, pop the bars in the fridge to set well.
Step 6: Serve with Ease
Use a sharp knife warmed under hot water and dried off before slicing your bars to avoid sticky messes. You might need to rewarm the knife between cuts, but the payoff is worth the effort—a delicious, perfectly portioned S’mores Bar ready to delight everyone at your table.
How to Serve S’mores Bar Recipe
Garnishes
A little extra flair never hurts. Sprinkle some crushed graham crackers or a dusting of cocoa powder on top for added texture and visual appeal. If you really want to impress, serve with a drizzle of caramel or chocolate syrup. These simple touches add a gourmet twist to a beloved classic.
Side Dishes
Pair your s’mores bars with a glass of cold milk or a warm cup of coffee or hot chocolate. Fresh fruit like strawberries or bananas also complements the sweetness nicely and adds a refreshing contrast. This combination makes for a complete dessert experience that satisfies every craving!
Creative Ways to Present
Looking to wow guests? Serve your s’mores bars on a wooden cutting board for that rustic campfire vibe or stack them with parchment paper in between layers in a pretty box for gifting. You can even try individual portions in mini jars topped with a few toasted marshmallows—fun AND practical for parties.
Make Ahead and Storage
Storing Leftovers
These bars keep well in an airtight container at room temperature for up to 2 days. If your kitchen is warm, storing them in the refrigerator will extend their shelf life and keep the marshmallows from getting too sticky.
Freezing
You can freeze leftover s’mores bars wrapped tightly in plastic wrap and placed in a freezer-safe container. When you want to enjoy them, thaw overnight in the fridge and bring to room temperature before serving for the best texture.
Reheating
If you want your bars a bit melty again, pop them in the microwave for 10 to 15 seconds or warm gently in a low oven for a couple of minutes. Just keep an eye so your marshmallows don’t scorch—they reheat quickly and stay delectably soft when done right.
FAQs
Can I use a different type of chocolate for the S’mores Bar Recipe?
Absolutely! While Hershey’s bars provide the classic taste, feel free to experiment with milk chocolate, dark chocolate, or even flavored bars like mint or caramel. Just make sure your chocolate melts smoothly for that perfect gooey layer.
How do I prevent the marshmallows from burning under the broiler?
Broiling requires close attention. Stay by the oven and watch the marshmallows constantly. The moment they start turning golden brown, remove the pan immediately. Oven broilers can vary significantly, so it helps to know how quick yours heats.
Is it possible to make this recipe gluten-free?
Yes! Simply substitute the graham cracker crumbs with gluten-free graham crackers or use crushed gluten-free cookies. The rest of the ingredients are naturally gluten-free, making this an easy swap for dietary needs.
Can I make smaller or individual-sized s’mores bars?
Definitely. Using mini muffin tins or small baking dishes works great for bite-sized portions. Just reduce bake and broil times slightly and watch closely to avoid burning marshmallows.
What’s the best way to cut sticky s’mores bars?
Warm a sharp knife under hot water, dry it well, and then slice. This prevents sticking and tearing. Repeat warming and drying between cuts if needed to keep those edges clean and neat.
Final Thoughts
There’s something truly magical about this S’mores Bar Recipe, and I can’t wait for you to try it. It’s a nostalgic, crowd-pleasing dessert that’s easy to make and shares perfectly. Whether you’re making it for family, friends, or a cozy night in, these bars bring warmth, sweetness, and joy to every bite. So go ahead and whip up a batch—you deserve that scrumptious moment of gooey s’mores happiness!
Print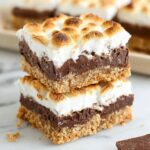
S’mores Bar Recipe
- Prep Time: 10 minutes
- Cook Time: 15 minutes
- Total Time: 25 minutes
- Yield: 16 servings
- Category: Dessert
- Method: Baking
- Cuisine: American
Description
This delicious S’mores Bar recipe combines a buttery graham cracker crust, melted Hershey’s chocolate, and toasted mini marshmallows for an irresistible dessert. Perfect for parties or a sweet treat, these bars are easy to make and capture the classic campfire s’mores flavor in a convenient baked form.
Ingredients
Crust
- 2 Cups graham cracker crumbs
- 8–12 Tablespoons melted butter
- 1/2 Cup powdered sugar
Topping
- 4 Hershey Chocolate Bars (4.4 ounces each)
- 1 package mini marshmallows
Instructions
- Preheat Oven: Preheat your oven to 350 degrees Fahrenheit to prepare for baking the crust.
- Prepare Pan: Grease a 9×13 inch baking pan with non-stick butter spray to prevent sticking.
- Mix Crust Ingredients: In a medium bowl, combine the graham cracker crumbs, powdered sugar, and melted butter. Stir well to create a moist mixture that will form the crust.
- Press Crust: Evenly distribute the crust mixture along the bottom and sides of the prepared pan. Press firmly with your fingers to pack it tightly.
- Bake Crust: Bake the crust in the preheated oven for about 5-8 minutes until the edges turn slightly golden brown. The crust will harden as it cools.
- Cool Crust: Remove the pan from the oven and allow the crust to cool completely.
- Layer Chocolate: Place the Hershey bars evenly over the cooled graham cracker crust, covering the entire surface.
- Melt Chocolate: Return the pan to the oven and bake for approximately 3 minutes, or until the chocolate just starts to melt and appears shiny.
- Cool Briefly: Let the pan cool for 1-2 minutes to slightly set the melted chocolate.
- Add Marshmallows: Arrange the mini marshmallows on top of the melted chocolate, placing them closely together to cover the surface evenly.
- Broil Marshmallows: Switch the oven to the broil setting. Place the pan under the broiler and watch carefully—toast the marshmallows for about 2 minutes until they are golden brown. Be vigilant to prevent burning, as broiling times may vary.
- Cool Completely: Remove from the oven and let the bars cool completely. For easier cutting, refrigerate the bars to set the layers firmly.
- Serve: Use a sharp knife warmed under hot water and dried to cut the bars cleanly, repeating warming as needed to prevent sticking. Serve and enjoy these delicious s’mores bars.
Notes
- Use melted butter within the range of 8 to 12 tablespoons depending on desired crust firmness.
- The crust hardens as it cools, ensuring a firm base for the toppings.
- Watch the marshmallows carefully when broiling to avoid burning or catching fire.
- Refrigerating the bars after they cool makes slicing easier and prevents stickiness.
- Warming the knife under hot water before slicing helps achieve clean cuts through the gooey layers.

