Description
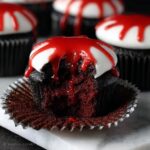
These Vampire Bite Halloween Cupcakes are spooky and delicious treats perfect for Halloween parties. Featuring vibrant red velvet cupcake bases filled with a luscious red velvet and sweetened condensed milk filling, topped with a creamy skin-tone buttercream frosting, and decorated with candy fangs and dripping red syrup for a dramatic vampire bite effect.
Ingredients
Scale
Cupcake Batter
- 1 and 1/2 cups all-purpose flour
- 1 cup granulated sugar
- 1/2 cup unsalted butter, softened
- 2 large eggs
- 1/2 cup buttermilk
- 2 tablespoons cocoa powder
- 1 tablespoon gel-based red food coloring
- 1 teaspoon vanilla extract
- 1/2 teaspoon baking soda
- 1 teaspoon white vinegar
- 1/4 teaspoon salt
Filling
- 1/2 cup red velvet cake crumbs (from cupcake centers)
- 1/3 cup sweetened condensed milk
- 1 tablespoon unsalted butter, melted
- 1 to 2 tablespoons red food coloring
Buttercream Frosting
- 1 cup unsalted butter, softened
- 3 to 4 cups powdered sugar, sifted
- 2 to 3 tablespoons milk or heavy cream
- A few drops ivory or peach food coloring
- 1 teaspoon vanilla extract
Decoration
- Candy fangs or small dots of red gelatin
- Red syrup or edible red gel
- Red straws (for decoration, not edible)
Instructions
- Preheat and prepare muffin tin: Preheat your oven to 350°F (175°C) and line a 12-cup muffin tin with paper liners to ensure easy removal and clean-up.
- Cream butter and sugar: In a large bowl, cream together the softened butter with granulated sugar for 2 to 3 minutes until the mixture is light and fluffy, providing a good base for the cupcakes.
- Add eggs: Incorporate the eggs one at a time into the butter mixture, beating well after each addition to maintain a smooth batter.
- Mix in flavorings and color: Stir in the vanilla extract and gel-based red food coloring until the batter turns a vibrant red, which is characteristic of red velvet cupcakes.
- Combine dry ingredients: In a separate bowl, whisk together the all-purpose flour, cocoa powder, and salt to evenly distribute these ingredients before adding to the batter.
- Add dry and wet ingredients alternately: Gradually add the dry ingredient mixture and buttermilk alternately to the butter mixture, starting and ending with the dry ingredients, and mix until just combined to avoid overmixing.
- Activate leavening: Stir in the baking soda and vinegar. This will cause a chemical reaction that helps the cupcakes rise and become fluffy.
- Fill muffin cups: Divide the batter evenly among the muffin cups, filling each about two-thirds full to allow room for rising.
- Bake cupcakes: Bake for 18 to 20 minutes, or until a toothpick inserted into the center of a cupcake comes out clean, indicating they are fully baked.
- Cool cupcakes: Allow the cupcakes to cool in the pan for 5 minutes, then transfer them to a wire rack to cool completely, which is important before filling or frosting.
- Remove liners: Once cooled, peel off the paper liners carefully to prepare for the filling step.
- Prepare filling: In a small bowl, blend the red velvet cake crumbs (from the cored centers) with sweetened condensed milk and melted butter to create a creamy filling.
- Add color to filling: Mix in red food coloring as needed to achieve an intense, vibrant red hue for a dramatic look.
- Core cupcakes: Using a sharp knife or cupcake corer, carefully remove a small portion from the center of each cooled cupcake to create space for the filling.
- Fill cupcakes: Gently spoon the creamy red velvet filling into each cupcake cavity, filling it to the top for a surprise center.
- Beat buttercream: In a large bowl, beat the softened butter until creamy as the base for the frosting.
- Add powdered sugar: Gradually mix in the sifted powdered sugar, one cup at a time, on low speed to avoid a mess and achieve the right consistency.
- Incorporate flavor and cream: Add vanilla extract and 2 tablespoons of milk or cream, then beat the mixture until smooth and fluffy for a creamy, spreadable frosting.
- Color the frosting: Add a few drops of ivory or peach food coloring and blend until the frosting has a uniform pale, skin-like tone, perfect for vampire-themed cupcakes.
- Frost cupcakes: Spread or pipe the skin-toned buttercream evenly over each filled cupcake for a smooth finish.
- Optional chilling: Chill the frosted cupcakes briefly if a firmer texture is desired before decorating, which helps maintain the shape of decorations.
- Add vampire bite decorations: Press candy fangs or place two small red gelatin dots close together on the surface of each cupcake to mimic vampire bite marks.
- Drip red gel: Drizzle red syrup or edible red gel from each ‘bite’ to simulate dripping blood, enhancing the spooky visual effect.
- Serve: Arrange the decorated cupcakes on a dark serving platter for dramatic contrast and serve immediately to preserve the fresh look.
Notes
- Ensure cupcakes are fully cooled before removing liners and adding filling to prevent breaking.
- Gel-based food coloring provides more intense color without thinning the batter.
- If you prefer, substitute heavy cream for milk in the buttercream for a richer frosting.
- Use a cupcake corer or sharp paring knife to remove centers evenly for filling.
- Red syrup can be substituted with edible red gel available at cake supply stores.
- These cupcakes can be made a day ahead; store unfrosted cupcakes in an airtight container and frost just before serving.