
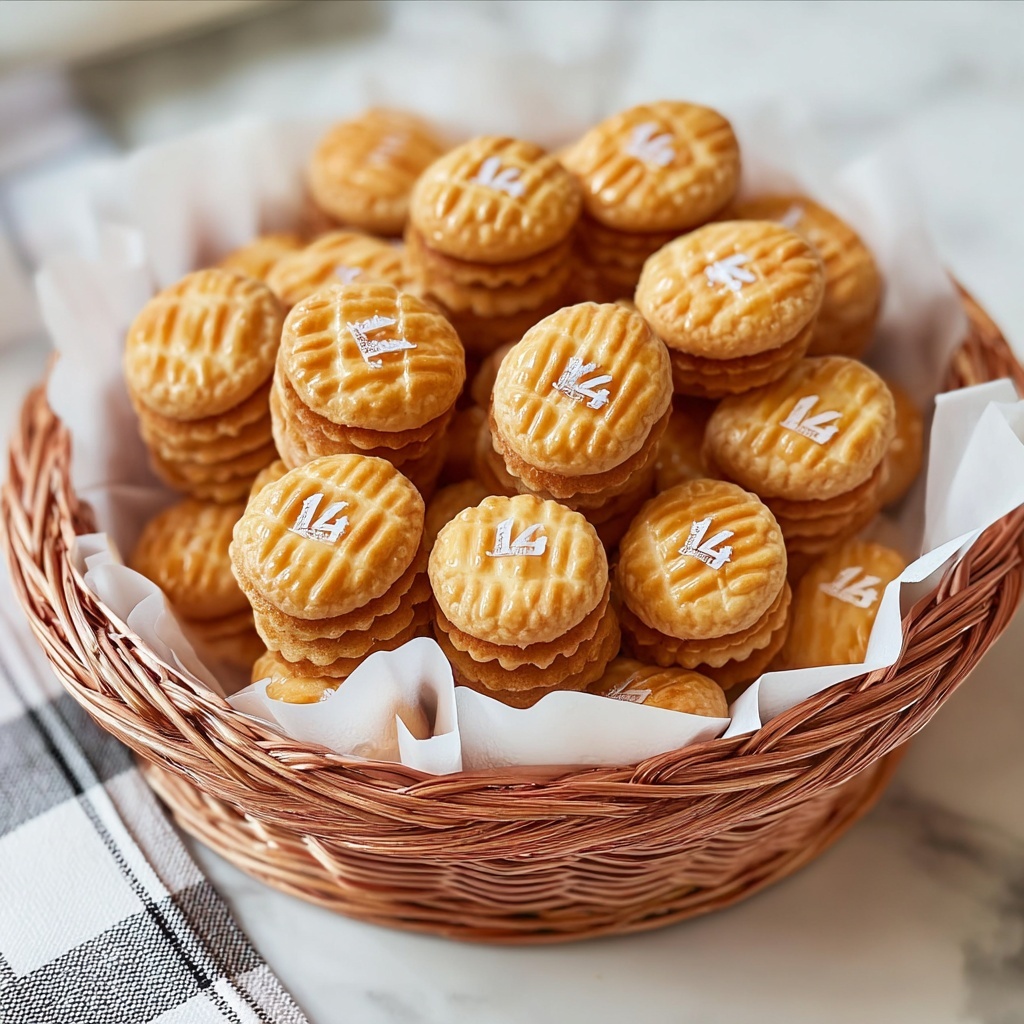
If you have a soft spot for sweet, tangy treats that melt in your mouth, let me introduce you to the truly delightful Irresistible Pineapple Tarts for a Homemade Sweet Escape Recipe. These tarts deliver a perfect balance of buttery, flaky pastry and luscious pineapple jam that will transport your taste buds to a tropical paradise. Every bite bursts with tropical sweetness and just the right hint of spice, making them an ideal snack or dessert to share or savor all by yourself. If you’re ready for a baking adventure that feels like a warm hug from the inside, these pineapple tarts are exactly what you need.
Ingredients You’ll Need
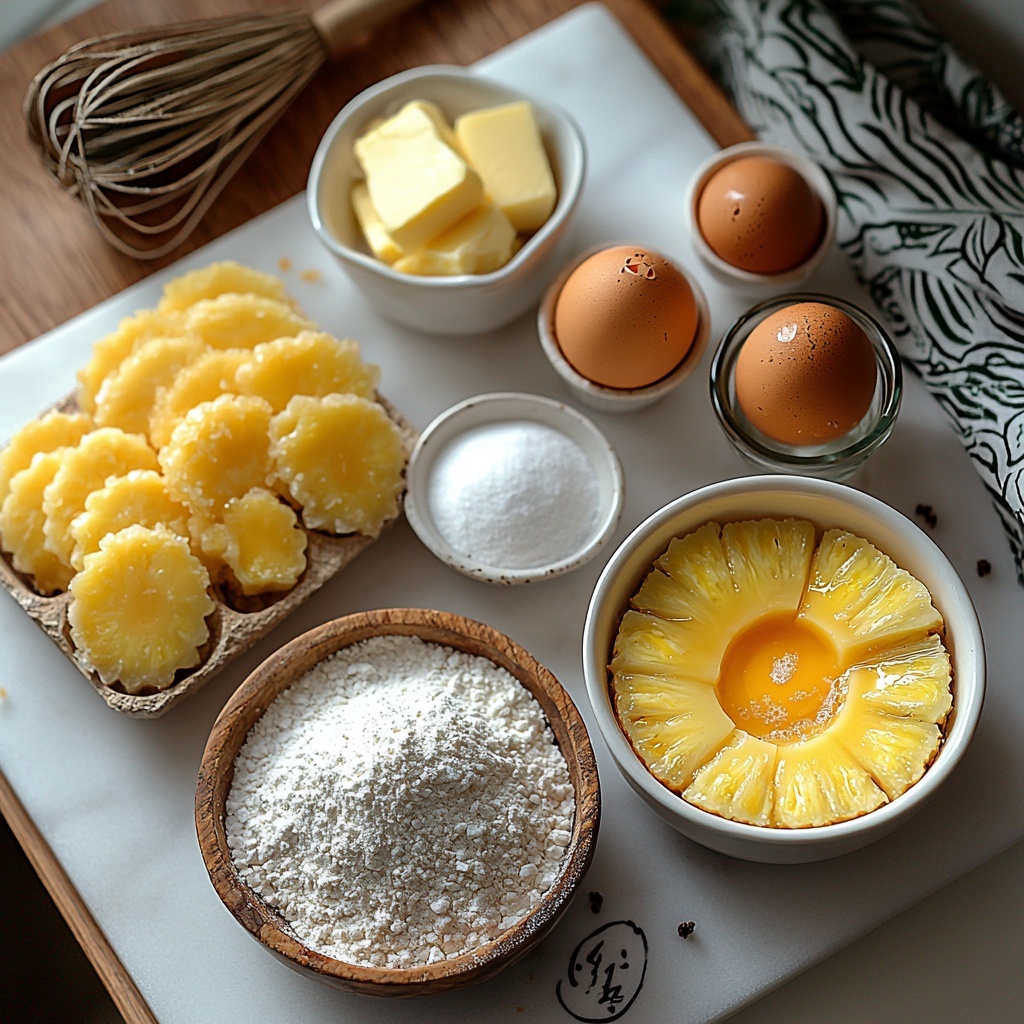
The magic of this recipe lies in its simple yet thoughtfully chosen ingredients. Each one plays a vital role in crafting that exquisite texture and flavor—from the crisp, buttery crust to the rich, fragrant pineapple filling.
- All-purpose flour (2.5 cups): This forms the base of your crispy and flaky pastry, making every bite a delicate crunch.
- Cornstarch (2 tablespoons): Helps to achieve that light and tender texture; don’t skip it!
- Salt (0.25 teaspoon): Enhances the flavors and balances the sweetness, bringing all elements together.
- Confectioners’ sugar (4 tablespoons): Adds a touch of sweetness to the dough that complements the pineapple jam perfectly.
- Unsalted butter (2 sticks): Make sure it’s cold for the best results; it’s the secret to that melt-in-your-mouth pastry.
- Egg yolks (2 yolks): Adds richness to the pastry, contributing to its tender crumb.
- Egg yolk (1 yolk, lightly beaten): Used with condensed milk for a gorgeous golden glaze that makes your tarts look irresistible.
- Condensed milk (0.5 tablespoon): Mixed with the egg yolk to give your glaze a sweet, shiny finish.
- Sliced pineapples (30 oz): The star of the show; use ripe pineapple for the best flavor in your homemade jam filling.
- Sugar (10 tablespoons): Adjust this based on the sweetness of your pineapples to get the filling just right.
- Cloves (1 teaspoon, optional): Adds a warm spice note that elevates the pineapple jam to something truly special.
How to Make Irresistible Pineapple Tarts for a Homemade Sweet Escape Recipe
Step 1: Prepare the Pineapple Jam
Start by making your pineapple jam, this will be the heart of your tarts. Cook the sliced pineapples with sugar and cloves in a saucepan over medium heat, stirring occasionally until the mixture thickens to a jam-like consistency. This step is where your kitchen fills with heavenly tropical aromas—a sure sign of the deliciousness ahead.
Step 2: Make the Tart Dough
In a large mixing bowl, whisk together the all-purpose flour, cornstarch, salt, and confectioners’ sugar until well combined. This dry mix sets the stage for your tender and crisp pastry.
Step 3: Cut in the Butter
Using a pastry cutter or your fingers, work the cold unsalted butter into the flour mixture until it resembles coarse crumbs. This technique ensures the dough will be flaky and buttery—exactly what you want for those perfect tarts.
Step 4: Incorporate the Egg Yolks
Add the two egg yolks to the dry ingredients and gently bring the dough together. Be careful not to overmix! The dough should come together smoothly but still feel soft.
Step 5: Chill the Dough
Wrap the dough in plastic wrap and refrigerate for 30 minutes. Chilling firm ups the dough, making it easier to roll out and maintain its flaky texture during baking.
Step 6: Roll Out and Assemble
Roll out the chilled dough on a lightly floured surface to your desired thickness, typically about 1/4 inch. Cut into small circles or squares depending on your preferred shape. Spoon a generous amount of the pineapple jam onto each piece.
Step 7: Seal and Glaze
Brush the edges of each pastry with the egg yolk and condensed milk mixture to seal the tarts and give them a golden, shiny finish once baked. This step adds that irresistible visual appeal that invites tasting.
Step 8: Bake to Perfection
Place the assembled tarts on a baking sheet lined with parchment paper and bake in a preheated oven until golden brown, usually about 20-25 minutes depending on your oven. The perfect golden hue is your sign that the tarts are ready to dazzle.
How to Serve Irresistible Pineapple Tarts for a Homemade Sweet Escape Recipe
Garnishes
For an extra touch of elegance, sprinkle your tarts with a light dusting of powdered sugar right before serving or add a tiny piece of candied ginger on top to introduce a zingy contrast that awakens the palate.
Side Dishes
Pair these tarts with a cup of fragrant tea like jasmine or black tea, which beautifully balances the sweet and tangy flavors. A scoop of vanilla ice cream can also turn this into an indulgent dessert perfect for warm days.
Creative Ways to Present
Consider serving your pineapple tarts on a vintage cake stand adorned with tropical leaves for a charming presentation. You can even create mini tart towers by stacking them with layers of fresh mint leaves or edible flowers to impress your guests.
Make Ahead and Storage
Storing Leftovers
If you have any leftovers, store them in an airtight container at room temperature for up to three days to keep the pastry crisp and the pineapple filling fresh.
Freezing
To freeze, place the tarts on a baking sheet, freeze until solid, then transfer to a zippered freezer bag. They can be frozen for up to 1 month. Thaw at room temperature before reheating.
Reheating
Warm the tarts in a preheated oven at 350°F (175°C) for about 5-8 minutes to revive the crispy pastry and warm the luscious pineapple filling, making them taste freshly baked all over again.
FAQs
Can I use canned pineapple for the jam?
Absolutely! Just make sure to drain any excess syrup and adjust the amount of sugar you add accordingly, since canned pineapple can be sweeter than fresh.
Is it necessary to use cornstarch in the dough?
Cornstarch helps keep the pastry tender and less gluten-heavy, so it’s highly recommended to get that perfect light texture, but you can try without if you prefer a sturdier dough.
Can I prepare the pineapple jam in advance?
Yes, preparing the pineapple jam a day ahead lets the flavors develop even more, and it saves you time on baking day.
What type of butter is best for this recipe?
Unsalted butter is best so you can control the salt level precisely. Make sure to use cold butter for a flakier crust.
How do I know when the tarts are perfectly baked?
Look for a golden-brown color on the pastry edges and the bottom. The glistening egg wash will also darken slightly, signaling a beautifully baked tart.
Final Thoughts
Honestly, these Irresistible Pineapple Tarts for a Homemade Sweet Escape Recipe are like a little tropical vacation baked right in your kitchen. Whether you’re making them for a special occasion or just to brighten an ordinary day, they are bound to bring smiles and happy cravings. So, roll up your sleeves, gather your ingredients, and enjoy this wonderful baking journey—your sweet escape awaits in every bite!
Print
Irresistible Pineapple Tarts for a Homemade Sweet Escape Recipe
- Prep Time: 35 minutes
- Cook Time: 50 minutes
- Total Time: 1 hour 25 minutes
- Yield: 24 servings
- Category: Baked Goods
- Method: Baking
- Cuisine: Chinese Southeast Asian
Description
This homemade Pineapple Tarts recipe offers a delightful sweet escape with crispy, flaky pastry and a rich, fragrant pineapple jam filling. Perfect for festive occasions or a special treat, these tarts balance the buttery crust with the natural sweetness and spice of clove-infused pineapple jam.
Ingredients
Pastry Dough
- 2.5 cups all-purpose flour
- 2 tablespoons cornstarch
- 0.25 teaspoon salt
- 4 tablespoons confectioners’ sugar
- 2 sticks unsalted butter (cold)
- 2 egg yolks
- 1 egg yolk (for egg wash)
- 0.5 tablespoon condensed milk
Pineapple Jam Filling
- 30 oz sliced pineapples
- 10 tablespoons sugar
- 1 teaspoon cloves (optional)
Instructions
- Mix Dry Ingredients: In a large mixing bowl, whisk together the all-purpose flour, cornstarch, salt, and confectioners’ sugar until combined thoroughly.
- Incorporate Butter: Cut the cold unsalted butter into the dry ingredients using a pastry cutter or your fingers until the mixture resembles coarse crumbs with pea-sized pieces.
- Add Egg Yolks: Gently mix the 2 egg yolks into the crumbly mixture and form a smooth dough without overworking it.
- Chill Dough: Wrap the dough tightly in plastic wrap and refrigerate for 30 minutes to firm up and make it easier to handle.
- Cook Pineapple Jam: In a medium saucepan over medium heat, combine sliced pineapples, sugar, and cloves. Cook, stirring occasionally, until the mixture thickens into a jam-like consistency, approximately 20-30 minutes. Remove cloves before using.
- Prepare Egg Wash: Mix the beaten egg yolk with 0.5 tablespoon condensed milk for a sweet, golden glaze.
- Roll Out Dough: On a floured surface, roll out the chilled dough to your preferred thickness, typically about 1/4 inch.
- Assemble Tarts: Cut dough into desired shapes, place a generous spoonful of pineapple jam in the center of each, and fold or cover according to your tart style.
- Apply Egg Wash: Brush edges and tops of the pastries with the egg yolk-condensed milk mixture to encourage browning and shine.
- Bake Tarts: Preheat the oven to 350°F (175°C). Place tarts on a baking sheet lined with parchment paper, bake for 20-25 minutes or until golden brown and crisp. Cool before serving.
Notes
- Use ripe pineapples for the best flavor and natural sweetness.
- Adjust the sugar in the jam based on the sweetness of your pineapples.
- Chilling the dough is important to prevent tough pastry and make rolling easier.
- If you prefer a spicier filling, increase the cloves slightly but remove them before filling to avoid overpowering the taste.
- Store baked tarts in an airtight container to maintain crispness.


