
“`html
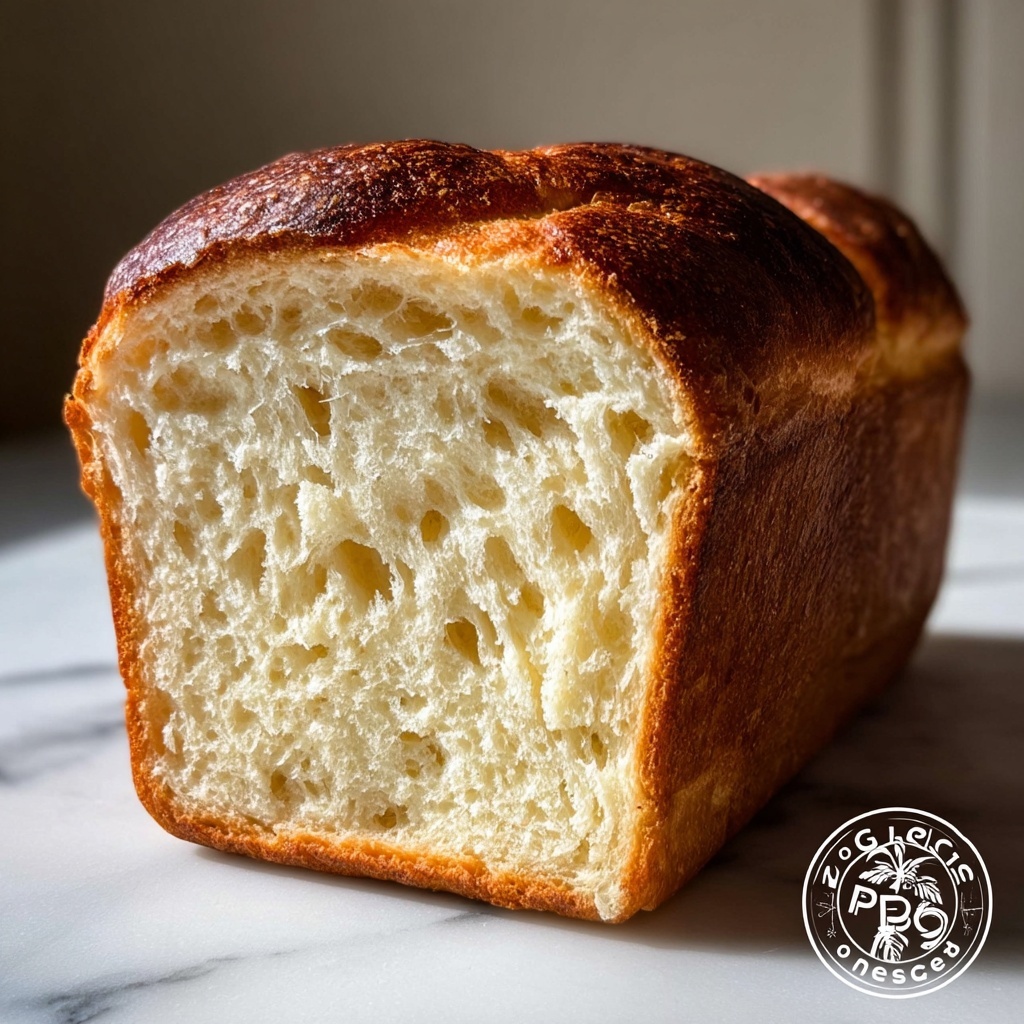
Nothing quite compares to the comforting aroma and soft, tender crumb of freshly baked bread, especially when it’s crafted to be gluten-free without compromising on taste or texture. This Classic White Gluten-Free Sandwich Bread Recipe is a game changer for anyone craving the simple pleasure of homemade bread that’s perfect for sandwiches, toast, or just nibbling straight from the loaf. With its golden crust and pillowy inside, this bread will quickly become your go-to staple in the kitchen.

Ingredients You’ll Need
The beauty of this recipe lies in its simplicity, featuring essential ingredients that work harmoniously to create a loaf that’s fluffy, flavorful, and perfectly textured. Every component has a role—flour for structure, yeast for rise, and eggs for richness—ensuring your gluten-free bread feels anything but ordinary.
- 2 cups gluten-free all-purpose flour: The foundation of your bread, this blend provides structure and a tender crumb.
- 1 tablespoon sugar: Feeds the yeast and adds a subtle sweetness to balance the flavors.
- 1 teaspoon salt: Enhances flavor and controls yeast activity for perfect rise.
- 1 tablespoon active dry yeast: The magical ingredient that makes your dough rise and become airy.
- 1 cup warm water: Activates the yeast and hydrates the flour for proper dough consistency.
- 2 tablespoons olive oil: Adds moisture and lends a mild, fruity richness to the bread.
- 2 eggs: Contribute to the bread’s structure, color, and tender crumb.
How to Make Classic White Gluten-Free Sandwich Bread Recipe
Step 1: Prepare Your Oven and Pan
Start by preheating your oven to 375°F (190°C) to ensure it’s at the perfect temperature when your dough is ready. Grease a loaf pan thoroughly so the bread doesn’t stick, making it easier to remove once baked and keeping the crust intact.
Step 2: Mix Dry Ingredients
In a large mixing bowl, combine the gluten-free flour, sugar, salt, and active dry yeast. Mixing these first helps distribute the yeast evenly, which is vital for an even rise.
Step 3: Incorporate Wet Ingredients
Pour in the warm water, olive oil, and eggs to the dry mixture. Stir everything together until a smooth, cohesive dough forms. The dough might be slightly different from traditional bread dough, but this is normal for gluten-free recipes.
Step 4: Transfer to the Loaf Pan
Gently transfer your dough into the prepared loaf pan. Use a spatula to smooth out the surface, creating an even top that will help your bread bake uniformly and look beautifully polished.
Step 5: Bake to Perfection
Bake your bread for 40 minutes, keeping an eye out for that lovely golden-brown crust. A simple tap on the loaf should produce a hollow sound, signaling it’s perfectly baked and ready to enjoy.
Step 6: Cool Before Slicing
Let your bread cool in the pan for about 10 minutes to set its shape, then transfer it to a wire rack to cool fully. This step prevents the bread from becoming gummy and helps maintain its light texture.
How to Serve Classic White Gluten-Free Sandwich Bread Recipe
Garnishes
This bread shines on its own but can be elevated with a simple slathering of butter, a drizzle of honey, or a sprinkle of your favorite herbs. Toasting it lightly can also bring out a delightful crunch and aroma.
Side Dishes
Pair this bread with comforting soups, fresh salads, or hearty breakfasts. Its mild flavor and fluffy texture complement savory dishes like grilled cheese sandwiches or creamy avocado spreads perfectly.
Creative Ways to Present
Try making mini sandwiches for parties or slicing it thick for decadent French toast. You can also use it as a base for open-faced sandwiches topped with colorful veggies and spreads—turning everyday meals into something special.
Make Ahead and Storage
Storing Leftovers
Store any leftover Classic White Gluten-Free Sandwich Bread Recipe in an airtight container or tightly wrapped in plastic wrap at room temperature. It stays fresh and delicious for 3-4 days, making it ideal for quick snacks or lunches.
Freezing
If you want to keep the bread longer, freezing is your best friend. Slice before freezing so you can pull out individual pieces as needed. Wrapped well, it can last up to a month without losing its soft texture.
Reheating
For an easy refresh, warm slices briefly in a toaster or oven. This revives the bread’s fluffy interior and crisp edge, making it taste just like freshly baked each time.
FAQs
Can I use a different gluten-free flour blend?
Yes, but it’s best to use a gluten-free all-purpose blend designed for baking to ensure the texture and rise stay just right in this Classic White Gluten-Free Sandwich Bread Recipe.
Do I need to knead the dough?
No kneading is required here. Just mix until smooth and transfer to the pan, which simplifies the process and works well with gluten-free doughs.
Can I substitute olive oil with another fat?
Absolutely! Vegetable oil or melted butter can be used as alternatives, bringing subtle changes to the flavor and richness.
How do I know when the bread is done?
The bread should be golden brown on top and sound hollow when tapped. This indicates it’s fully baked and ready to cool.
Is this bread suitable for sandwiches?
Definitely! It’s called a sandwich bread for a reason—its sturdy yet soft texture makes it perfect for holding everything from cold cuts to hearty spreads.
Final Thoughts
Baking your own Classic White Gluten-Free Sandwich Bread Recipe is an incredibly rewarding experience that fills your home with warmth and mouthwatering aromas. It’s simple, straightforward, and yields a deliciously soft bread perfect for countless meals. I can’t wait for you to try it and discover how easy and satisfying gluten-free baking can be!
“`
Print
Classic White Gluten-Free Sandwich Bread Recipe
- Prep Time: 10 minutes
- Cook Time: 40 minutes
- Total Time: 55 minutes
- Yield: 1 loaf (approximately 8 slices)
- Category: Bread
- Method: Baking
- Cuisine: American
- Diet: Gluten Free
Description
This Classic White Sandwich Bread recipe offers a soft, fluffy, and gluten-free alternative perfect for sandwiches or toast. Made with simple ingredients and baked to golden perfection, it delivers a delicious homemade bread experience that is both easy to prepare and satisfying.
Ingredients
Dry Ingredients
- 2 cups gluten-free all-purpose flour
- 1 tablespoon sugar
- 1 teaspoon salt
- 1 tablespoon active dry yeast
Wet Ingredients
- 1 cup warm water
- 2 tablespoons olive oil
- 2 eggs
Instructions
- Preheat Oven and Prepare Pan: Preheat your oven to 375°F (190°C). Grease a loaf pan thoroughly to ensure the bread does not stick during baking.
- Mix Dry Ingredients: In a large mixing bowl, combine the gluten-free all-purpose flour, sugar, salt, and active dry yeast. Stir to evenly distribute all components.
- Add Wet Ingredients: Pour in the warm water, olive oil, and add the eggs to the dry mixture. Mix thoroughly until a smooth dough forms with no lumps.
- Transfer Dough to Pan: Pour or scoop the dough into the prepared loaf pan, smoothing the top with a spatula for an even surface.
- Bake the Bread: Place the loaf pan in the preheated oven and bake for 40 minutes, or until the bread is golden brown on top and sounds hollow when tapped, indicating it is fully baked.
- Cool the Bread: Remove the bread from the oven and let it cool in the pan for 10 minutes. Then, transfer it to a wire rack to cool completely before slicing.
Notes
- Warm water should be around 110°F (43°C) to activate the yeast properly without killing it.
- Make sure to grease the loaf pan well to prevent sticking.
- For a richer flavor, you can substitute olive oil with melted butter if not avoiding dairy.
- Letting the bread cool completely before slicing ensures better texture and easier slicing.
- This bread is gluten-free, suitable for those with gluten sensitivity or celiac disease.


