

If you’ve ever dreamed of making a decadent treat that melts in your mouth without any fuss, then this Rich Chocolate Fudge (So Easy!) Recipe is going to become your absolute new favorite. With only a few simple yet decadent ingredients, this fudge manages to strike the perfect balance between creamy, smooth, and satisfyingly chocolaty. Whether you’re whipping this up for a holiday gathering, a special gift, or just an indulgent moment at home, you’ll love how effortlessly it comes together and how quickly it disappears from the plate.
Ingredients You’ll Need
Gathering the right ingredients is half the joy in making this Rich Chocolate Fudge (So Easy!) Recipe. Each one is simple, but when combined, they deliver that flawless texture and deep chocolate flavor that you crave.
- Sweetened condensed milk: This adds the perfect creamy sweetness and keeps the fudge luxuriously smooth.
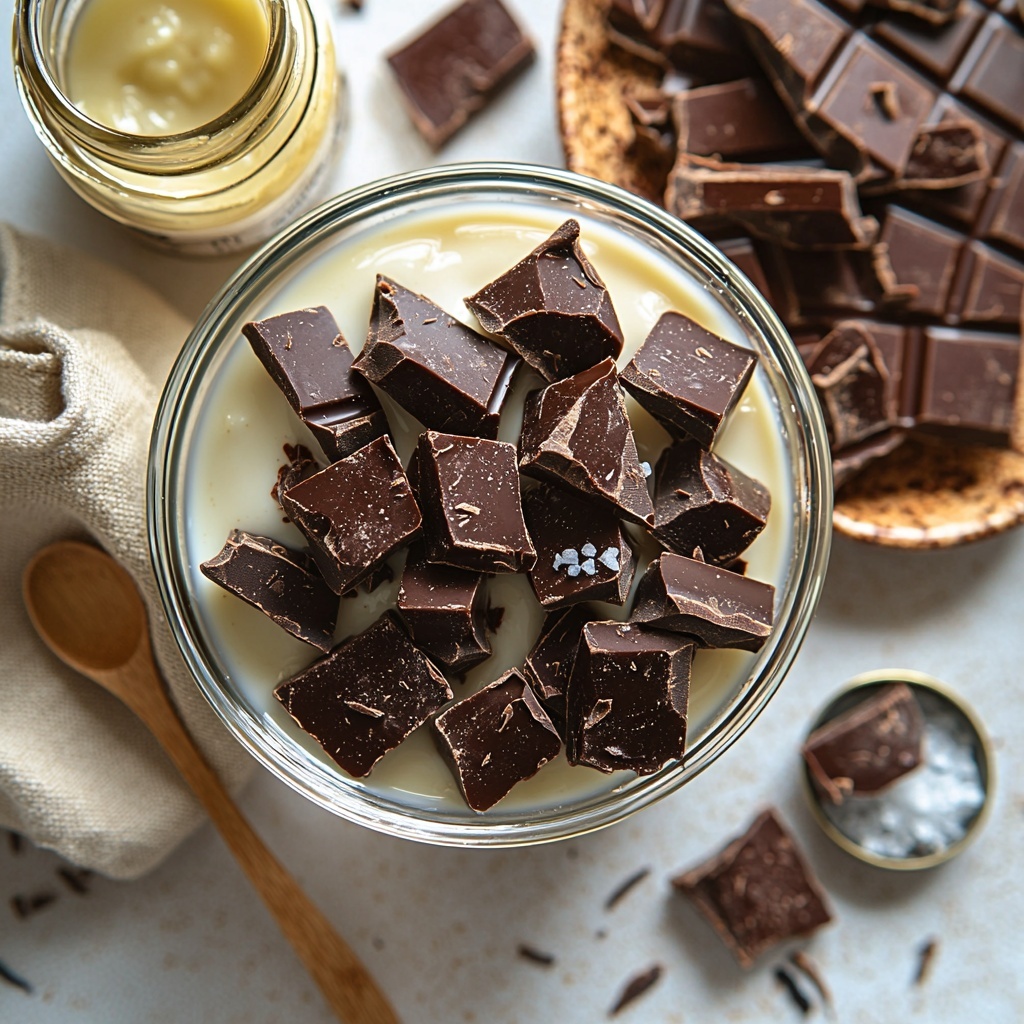
- Semi-sweet chocolate (50% dark, chopped): Offers a rich depth and slightly bittersweet contrast that keeps the fudge from being overly sweet.
- Vanilla extract: Enhances the chocolate flavor with a warm, aromatic touch.
- Pinch of salt: Just a tiny bit to balance the sweetness and highlight the chocolate notes.
How to Make Rich Chocolate Fudge (So Easy!) Recipe
Step 1: Prepare Your Pan
Start by lining an 8×8-inch square pan with parchment paper, making sure the bottom and all sides are covered. I recommend using two sheets placed in opposite directions for extra coverage and leaving some parchment overhang to easily lift the fudge out once it’s set. This small setup step makes cleanup a breeze and ensures your fudge comes out perfectly shaped.
Step 2: Melt the Ingredients
Place a saucepan on low heat and add the sweetened condensed milk, chopped chocolate, vanilla extract, and a pinch of salt. Stir gently and continuously to melt everything evenly without letting the mixture burn or simmer. As the chocolate melts into the creamy milk, you’ll see the mixture turn smooth and glossy—a true sign you’re on the right track. Once combined, immediately remove the pan from heat to avoid overheating.
Step 3: Pour and Smooth the Fudge
Pour your melted chocolate mixture into the prepared pan. Use a spatula to smooth the top evenly, then give the pan a few strong taps on the countertop to release any trapped air bubbles and help the surface settle flat. This step sets you up for uniformly sized and beautifully clean fudge squares.
Step 4: Let the Fudge Set
Allow your fudge to set uncovered at room temperature for about two hours. This initial setting lets the fudge begin to thicken naturally before you cover it loosely with cling wrap and pop it in the fridge for an additional two hours. The fridge firms up the fudge fully, making it easy to cut without crumbling or sticking.
Step 5: Slice and Store
Once the fudge has chilled and is completely firm, use the parchment paper overhang to lift it from the pan. Transfer it onto a cutting board and slice into small, bite-sized squares while still cold. Store your fudge in an airtight container either at room temperature for a softer texture or in the fridge if you prefer it firmer and cooler.
How to Serve Rich Chocolate Fudge (So Easy!) Recipe
Garnishes
Give your Rich Chocolate Fudge (So Easy!) Recipe a little extra flair with simple garnishes. A light sprinkle of flaky sea salt on top right before it sets creates a beautiful salty-sweet contrast. Crushed nuts like pistachios or toasted almonds add crunch and a nutty aroma, while a dusting of cocoa powder or a drizzle of caramel sauce takes presentation to the next level.
Side Dishes
This fudge is a fantastic companion to a warm cup of coffee, chai tea, or even a rich red wine for a grown-up treat. You might also pair it with fresh berries or whipped cream to add a refreshing brightness that cuts through the richness without overpowering it.
Creative Ways to Present
If you’re gifting this fudge or serving it at a party, try stacking the squares on a pretty platter lined with parchment and tied with a festive ribbon. You can also cut the fudge into small shapes with cookie cutters for seasonal themes or layer pieces in mason jars with other sweets and treats for an adorable edible gift.
Make Ahead and Storage
Storing Leftovers
Your leftover Rich Chocolate Fudge (So Easy!) Recipe keeps wonderfully at room temperature in an airtight container for up to two weeks. The flavor actually deepens a bit over time, making every bite even more delicious. Just keep it away from direct sunlight and humidity to maintain that perfect chew.
Freezing
Want to make this fudge well in advance? Wrap individual pieces tightly in plastic wrap and place them in a freezer-safe container or ziplock bag. Frozen fudge can last for up to three months and thaws quickly—just remove from the freezer and let sit at room temperature for 15–20 minutes before enjoying.
Reheating
Because this fudge is best enjoyed cold or at room temperature, reheating isn’t generally needed, but if you want to soften it slightly, warm it gently in short bursts in the microwave (about 5 seconds at a time) or leave it on the counter for a while. Avoid overheating as it can change the texture.
FAQs
Can I use milk chocolate instead of semi-sweet chocolate?
Absolutely! Using milk chocolate will make your Rich Chocolate Fudge (So Easy!) Recipe sweeter and creamier, but keep in mind it may be less rich and slightly softer. Adjust sweetness if needed.
Is it necessary to use parchment paper?
Using parchment paper is highly recommended because it prevents the fudge from sticking and makes removal much easier, helping you keep your squares neat and intact.
Can I add nuts or other mix-ins?
Yes! Mixing in chopped nuts, dried fruit, or even a handful of mini marshmallows before pouring the fudge into the pan adds delightful texture and flavor variations.
What if my fudge turns out grainy? How can I fix it?
Grainy fudge usually means the mixture overheated or wasn’t stirred enough. Make sure to melt on low heat and stir constantly for a smooth, glossy finish. Unfortunately, grainy texture can be hard to fix retroactively.
Can I make this recipe vegan or dairy-free?
This recipe relies on sweetened condensed milk and chocolate, which typically contain dairy. However, you can experiment with condensed coconut milk and dairy-free dark chocolate to create a vegan-friendly version, though the texture may differ slightly.
Final Thoughts
I hope you’re as excited as I am to try this incredible Rich Chocolate Fudge (So Easy!) Recipe at home. It’s one of those timeless treats that looks fancy but takes just minutes and a few simple ingredients to prepare. Perfect for sharing or sneaking a few squares of pure chocolate heaven all for yourself. Trust me, once you make it, this fudge will be a sweet staple in your kitchen for years to come!
Print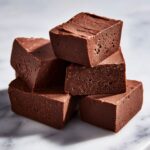
Rich Chocolate Fudge (So Easy!) Recipe
- Prep Time: 20 minutes
- Cook Time: 0 minutes
- Total Time: 4 hours 20 minutes
- Yield: 40 small squares
- Category: Dessert
- Method: Stovetop
- Cuisine: American
Description
This Rich Chocolate Fudge recipe is incredibly easy to make and results in smooth, glossy, and decadent fudge squares. Utilizing sweetened condensed milk and semi-sweet chocolate, this no-bake treat sets perfectly at room temperature before chilling, offering a luscious and satisfying dessert ideal for sharing or gifting.
Ingredients
Ingredients
- 2 cups sweetened condensed milk
- 3½ cups semi-sweet chocolate (50% dark chocolate), roughly chopped
- 1 teaspoon vanilla extract (or essence)
- 1 pinch salt
Instructions
- Prepare the Pan: Line an 8×8-inch square pan with parchment paper covering the bottom and all sides. Use two overlapping sheets placed in opposite directions, leaving a slight overhang on the sides to facilitate lifting the fudge out later.
- Melt the Ingredients: Place a saucepan over low heat and add the sweetened condensed milk, chopped chocolate, vanilla extract, and a pinch of salt. Stir gently and frequently to ensure even melting without burning. Remove immediately once the mixture is smooth and glossy without letting it simmer or overheat.
- Pour Mixture into Pan: Transfer the melted chocolate mixture into the prepared pan. Smooth the top evenly and tap the pan firmly on the counter a few times to remove air bubbles and level the surface.
- Set the Fudge: Let the fudge set uncovered at room temperature for about 2 hours to begin firming up. Then loosely cover it with cling wrap and refrigerate for an additional 2 hours until completely firm.
- Slice and Store: Use the parchment overhang to lift the fudge from the pan. Cut it into small squares while cold. Store in an airtight container either at room temperature for a softer texture or in the fridge for a firmer consistency.
Notes
- Use good quality semi-sweet or dark chocolate for best flavor and texture.
- Do not overheat the chocolate mixture to avoid grainy fudge.
- Ensure the fudge is completely firm before slicing for clean cuts.
- Store fudge in an airtight container to maintain freshness and prevent drying out.
- Optional: Add nuts or flavorings like espresso powder for variation.


