
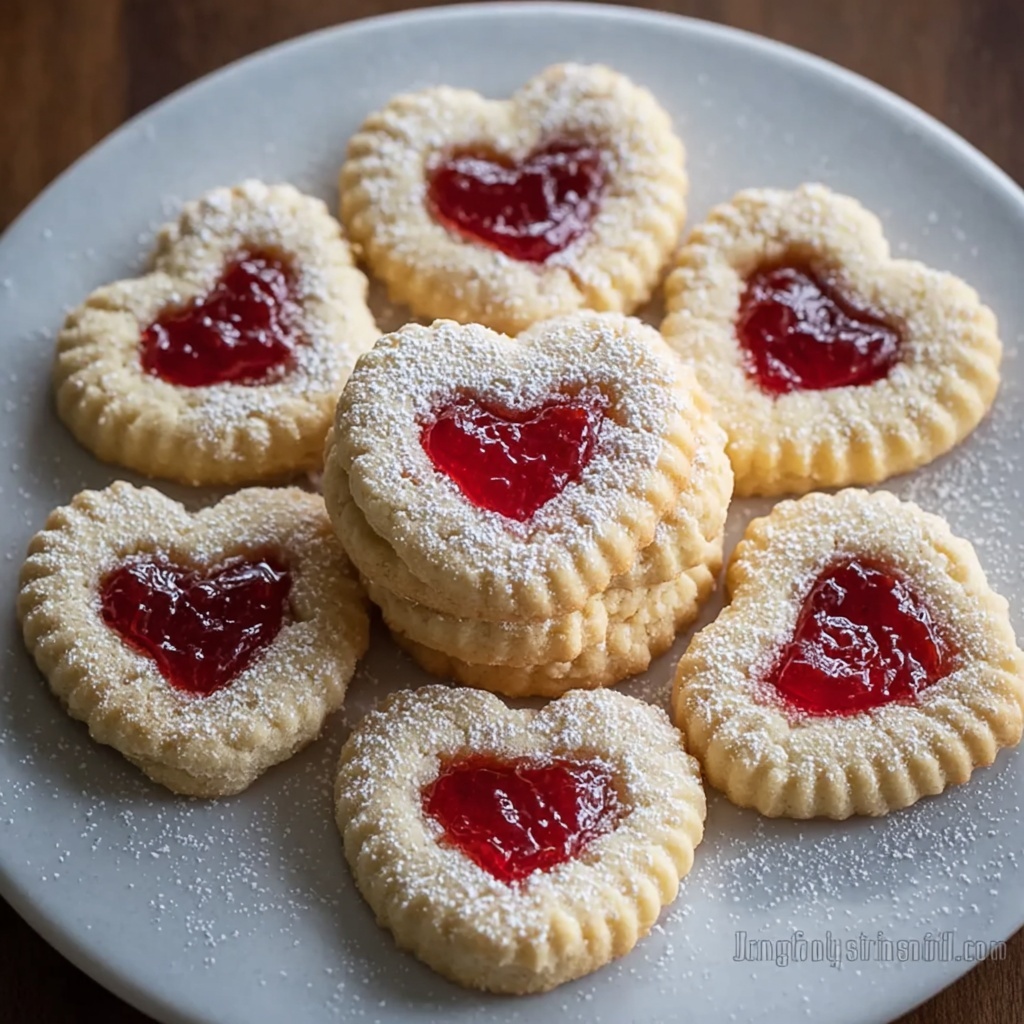
If you’re looking for a charming, delicious treat that not only tastes wonderful but also brightens up any occasion, this Thumbprint Heart Cookies Recipe is exactly what you need. These buttery, tender cookies feature a delightful raspberry jam center nestled in a cute heart-shaped well, creating both a beautiful presentation and a burst of fruity sweetness in every bite. Perfect for sharing, gifting, or simply indulging in your own cozy moments, these cookies effortlessly combine simple ingredients with a touch of love, making baking feel like pure joy from start to finish.
Ingredients You’ll Need
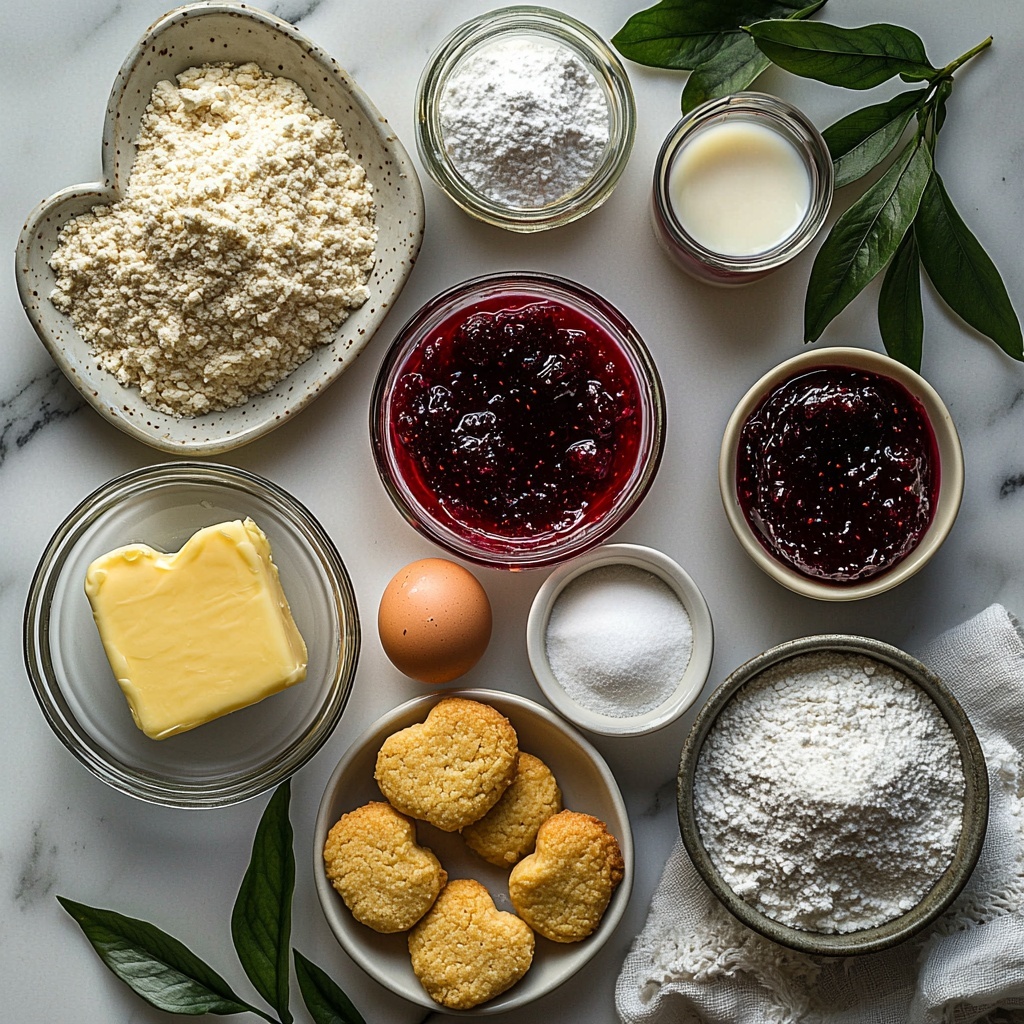
Every ingredient in this Thumbprint Heart Cookies Recipe is simple yet essential, coming together to create a harmoniously balanced cookie. From the creamy butter that gives richness and softness, to the raspberry jam that adds vibrant color and flavor, each component plays a special role in the final texture and taste.
- 113 grams unsalted butter, softened: Provides a rich, tender crumb and melts beautifully in the oven.
- 50 grams granulated sugar: Adds just the right amount of sweetness and helps create a light texture when creamed with butter.
- 1 large egg yolk: Binds the dough while contributing to its moistness and slight richness.
- 1 teaspoon vanilla extract: Enhances the cookie’s flavor with warm, aromatic notes.
- 1/4 teaspoon salt: Balances the sweetness and intensifies the flavors.
- 160 grams all-purpose flour: The main structure builder, creating a soft yet sturdy cookie base.
- 100 grams raspberry jam: Bursts with bright tartness and adds a gorgeous jewel-like heart center.
- 100 grams powdered sugar: For that delicate, sweet glaze that finishes off the cookie beautifully.
- 2 tablespoons milk: Helps transform the powdered sugar into a smooth, drizzle-ready icing.
How to Make Thumbprint Heart Cookies Recipe
Step 1: Preheat and Prepare
Start by heating your oven to 350°F (175°C) and lining a baking sheet with parchment paper. This preheating ensures your oven is at the perfect temperature for even baking, and the parchment paper prevents sticking, making cleanup a breeze.
Step 2: Cream Butter and Sugar
In a mixing bowl, cream together the softened butter and granulated sugar until the mixture looks light and fluffy. This step is crucial because creaming introduces air, which gives the cookies a delicate, melt-in-your-mouth texture.
Step 3: Add Egg Yolk and Vanilla
Mix in the large egg yolk and vanilla extract until fully incorporated. The yolk enriches the dough and helps with binding, while the vanilla infuses the cookie with that classic comforting flavor we all love.
Step 4: Combine Salt and Flour
Stir in the salt, then gradually add the all-purpose flour, mixing until a soft dough forms. Adding the flour slowly prevents overmixing, which keeps the cookies tender and prevents toughness.
Step 5: Shape the Dough
Roll the dough into 1-inch balls and place them on the prepared baking sheet about 2 inches apart. Spacing them out ensures they bake evenly without touching, keeping their perfect shape.
Step 6: Make the Heart Indentations
Use your thumb to press a heart-shaped indentation into the center of each dough ball. This step adds that signature touch of charm and creates the perfect pocket to hold the raspberry jam.
Step 7: Bake Until Golden
Bake the cookies for 12 to 14 minutes, or until the edges develop a light golden hue. You want the cookies firm yet tender, with just a touch of color to signal they are done perfectly.
Step 8: Cool Before Filling
Allow the cookies to cool on the baking sheet for 5 minutes to set, then transfer them to a wire rack to cool completely. Cooling ensures the jam won’t melt when added.
Step 9: Fill with Raspberry Jam
Spoon raspberry jam into each heart-shaped indentation, giving each cookie a jewel-like burst of color and fruity sweetness that makes them so delightful.
Step 10: Drizzle Icing
Whisk the powdered sugar and milk together until smooth, then drizzle this over the cookies for an elegant, glossy finish that complements the raspberry center beautifully.
How to Serve Thumbprint Heart Cookies Recipe
Garnishes
To make your Thumbprint Heart Cookies Recipe extra special, consider a light dusting of extra powdered sugar or a sprinkle of finely chopped pistachios for a pop of green and crunch. Fresh raspberry halves or edible flowers also enhance their visual appeal and freshen the taste.
Side Dishes
These cookies pair wonderfully with a cup of hot tea, coffee, or a glass of cold milk for a comforting snack. For a festive touch, serve alongside a bowl of fresh berries or a dish of whipped cream, turning a simple cookie plate into a charming dessert spread.
Creative Ways to Present
Arrange the Thumbprint Heart Cookies Recipe on a decorative platter lined with doilies or parchment. For gifts, stack them in a mason jar or gift box tied with a ribbon. You can also plate them with small bowls of extra jam and icing for a DIY cookie decorating party—it’s a fun twist that’s sure to impress guests of all ages.
Make Ahead and Storage
Storing Leftovers
Keep any leftover cookies stored in an airtight container at room temperature for up to 4 days. This preserves their texture and flavor without the jam drying out.
Freezing
If you want to make these cookies ahead of time, freeze the baked and cooled cookies without jam for up to 3 months. Once defrosted, add the jam and icing fresh for the best taste and texture.
Reheating
To enjoy your Thumbprint Heart Cookies Recipe warm, simply leave them at room temperature or microwave them for 10 to 15 seconds. Avoid reheating for too long to keep the cookies tender and prevent the jam from melting too much.
FAQs
Can I use different jams in this Thumbprint Heart Cookies Recipe?
Absolutely! While raspberry jam is classic and complements the cookie beautifully, you can experiment with strawberry, apricot, or even marmalade for different flavor profiles. Just choose a jam with a thick consistency that won’t run too much during baking or after filling.
What can I do if I don’t have a thumb to make the heart indentation?
If pressing with your thumb is tricky, you can use the back of a small spoon or a mini heart-shaped cookie cutter gently pressed into the dough. It’s a fun way to achieve the perfect heart shape while keeping things simple.
Is this Thumbprint Heart Cookies Recipe suitable for beginners?
Definitely yes! The steps are straightforward, and the dough is easy to handle, making this recipe a great choice for bakers of all skill levels. Plus, the results look impressive even without advanced techniques.
Can I make these cookies gluten-free?
You can swap the all-purpose flour for a gluten-free baking blend, but be aware that texture might slightly vary. Be sure to select a blend designed for cookies or pastries to maintain the tender crumb of these sweet treats.
How long do you recommend letting the dough chill before baking?
This particular Thumbprint Heart Cookies Recipe doesn’t require chilling, which saves you time. However, if your dough feels too soft to handle, a quick chill in the fridge for 20 minutes can help firm it up and make shaping easier.
Final Thoughts
There’s something truly heartwarming about baking and sharing these Thumbprint Heart Cookies Recipe—you get a perfect blend of buttery softness, fruity brightness, and sweet glaze that never fails to bring smiles. Whether it’s a special occasion or a quiet afternoon treat, these cookies have a way of making moments sweeter. Give them a try and watch your kitchen fill with delicious aromas and your loved ones’ happiness glow. Happy baking!
Print
Thumbprint Heart Cookies Recipe
- Prep Time: 15 minutes
- Cook Time: 14 minutes
- Total Time: 39 minutes
- Yield: 20 cookies
- Category: Dessert
- Method: Baking
- Cuisine: American
- Diet: Vegetarian
Description
Delightfully charming Thumbprint Heart Cookies featuring a buttery, soft base with a sweet raspberry jam center and a light powdered sugar glaze. Perfect for gifting or special occasions, these cookies combine classic flavors and a playful presentation.
Ingredients
Cookie Dough
- 113 grams unsalted butter, softened
- 50 grams granulated sugar
- 1 large egg yolk
- 1 teaspoon vanilla extract
- 1/4 teaspoon salt
- 160 grams all purpose flour
Filling and Glaze
- 100 grams raspberry jam
- 100 grams powdered sugar
- 2 tablespoons milk
Instructions
- Preheat Oven: Preheat the oven to 350°F (175°C) and line a baking sheet with parchment paper to prepare for baking.
- Cream Butter and Sugar: In a mixing bowl, cream the softened butter and granulated sugar together until the mixture is light and fluffy, which will create a tender texture in the cookies.
- Add Egg Yolk and Vanilla: Incorporate the large egg yolk and vanilla extract into the butter-sugar mixture until thoroughly combined, adding richness and flavor.
- Add Dry Ingredients: Stir in the salt, then gradually add the all purpose flour, mixing until a soft dough forms that’s easy to roll.
- Shape Dough Balls: Roll the dough into 1 inch balls and space them about 2 inches apart on the prepared baking sheet to allow for baking expansion.
- Create Heart Indentations: Use your thumb to gently press a heart-shaped indentation into the center of each dough ball, which will hold the jam filling.
- Bake Cookies: Bake the arranged dough balls for 12 to 14 minutes or until the edges are lightly golden, indicating they are crisp yet tender.
- Cool Cookies: Let the cookies cool on the baking sheet for 5 minutes to set, then transfer them to a wire rack to cool completely ensuring they don’t break when adding jam.
- Fill with Jam: Spoon raspberry jam into each heart indentation, adding a bright, sweet center to the cookies.
- Prepare and Drizzle Glaze: Whisk powdered sugar and milk together until smooth, then drizzle the glaze over the cookies for a beautiful, sweet finishing touch.
Notes
- Use room temperature butter for easier creaming and better dough texture.
- Chill the dough before rolling if it feels too sticky to handle.
- For a firmer cookie, bake closer to 14 minutes; for softer, bake towards 12 minutes.
- Raspberry jam can be substituted with any other favorite jam or preserves.
- Cookies keep well stored in an airtight container at room temperature for up to 5 days.
- Glaze can be adjusted in thickness by adding more milk or powdered sugar accordingly.

